Week 10: More scripting
In this lab, we shall be working the original lab2 .dd file and the final version of this file with the deleted and hidden files including the custom file signature jpg. The original lab .dd file is renamed lab4o.dd (o for original) and the final version created at the end of lab 2, lab4f.dd (f for final). The purpose is to compare the original lab4o.dd file with the final lab4f.dd file. We can manually compare every line of hashes to identify where in the file any changes may have taken place. The bash script we shall write will need to record the location of the changes and we will also create a separate file to save the changes to. In this way, the changes in the second file will be obvious because our new file will contain only the changes. This opens up a number of possibilities for this sort of forensic script to be used in forensics but also it is very useful for some security tasks as well.
We shall begin by hashing the 2 files to ensure we are all working with the same file.
┌──(root㉿kali)-[~/Desktop]
└─# md5sum lab4o.dd
a2be5eb52cda823f6afb41f4e8c53f4d  lab4o.dd

┌──(root㉿kali)-[~/Desktop]
└─# md5sum lab4f.dd
12d91c8ccb7c64c497b6833b2d8fb9d6  lab4f.dd
Next, we create a hash of every line of the lab4o.dd and lab4f.dd files.
┌──(root㉿kali)-[~/Desktop]
└─# dcfldd if=lab4o.dd hash=md5 hashwindow=9000 hashlog=lab4o_bytehashes.txt

┌──(root㉿kali)-[~/Desktop]
└─# dcfldd if=lab4f.dd hash=md5 hashwindow=9000 hashlog=lab4f_bytehashes.txt
And then hash the text files we have just created. By comparing the 2 hashes we confirm that the 2 files are not the same.
┌──(root㉿kali)-[~/Desktop]
└─# md5sum lab4o_bytehashes.txt
7820bbdf52259b6431e5d894245feaae  lab4o_bytehashes.txt

┌──(root㉿kali)-[~/Desktop]
└─# md5sum lab4f_bytehashes.txt
b174dcc8e1f69d008af0d52f0f3b38e0  lab4f_bytehashes.txt
By looking at each line, we can see if any lines of bytes are different and identify where the 2 files differ. There are 1051 lines in each file. If we were to compare the 2 files manually and each line took 1 second to compare, it will take us 17.5 minutes to work through the file. This is a 9MiB file – imagine a 1TiB disk images to compare manually (111,111 times as long or 3.7 years!) Recall that a hash only tells us if a file (or whatever data has been hashed which may be part of a file) is the same or not but not where the difference is or how different the file is. By making a log of hashes of each line, we can identify the line where the changes are and how many lines have changed. We won’t know whether it is a single bit that is changed or whether the entire line of data is different, but it will tell us which line to look at for the change. However, this is a slow, methodical, manual task and on a big file is not practical. Therefore, we shall look at how we may be able to automate this process using a bash script. Note that bash is a scripting language and not a programming language. Bash allows us to execute several commands by running the script. It is no different than typing a command, hitting the enter key, typing another command and so on, but as a script we can execute a series of commands, one after the other by typing one command – to run the script.
Recall that there are exactly 1051 lines of hashes in each file. We can check the files by utilizing the wc (word count) command. The format is lines, words, in this case 4 words for almost all lines including the dash character, and then characters.
┌──(root㉿kali)-[~/Desktop]
└─# wc lab4o_bytehashes.txt
 1051  4199 54343 lab4o_bytehashes.txt

┌──(root㉿kali)-[~/Desktop]
└─# wc lab4f_bytehashes.txt
 1051  4199 54343 lab4f_bytehashes.txt
If we look at the properties of the files, we confirm that they are an identical size of 54,343 bytes and the same number of lines – 1051. Therefore, as the hashes for the files do not match, they must have at least 1 line that is different.
However, to find the lines that are different from each other would require a manual search of each line. It is simply not practical to manually search for different lines and then copy those lines out of the file into other files and so on. An automated bash script is required, so we shall write one to do this for us. This is a process that we shall ‘walk’ through and look at different approaches as we go. Some approaches may prove to be not suitable, so there will be some ‘trial and error’ as we build up our scripts.
We shall begin by examining a couple of different general approaches to this, so we begin with hashes and examining hashes. We shall not use this approach in the end, but it is useful to look at this for 2 reasons. Firstly, this will demonstrate that there are multiple approaches to achieving the same goal and secondly, your tasks will require some different approaches and so looking at the first approach may be useful when completing your practical task.
When writing a script, as when writing a programme, the first task is to write out the list of steps to get the desired results. This can be written as discrete steps that will then become the commands and can be similar to pseudo code or simply a list. Assume we shall work with the hash files first.
- Ensure that line numbers are skipped.
- Use the xxd command to examine the first file’s hash.
- Use the xxd command to examine the second file’s hash.
- If they are the same – move on to the next line.
- If they are different
- record the line of hex or the line number in a separate file.
- Save the hex from the .dd file corresponding to the line that is different.
- Loop until the line’s hash is the same again, leave a blank line in the new file.
In this way, we shall construct a third file of hex that is only the hex in the second file that does not match the hex in the first file. Once the hex matches again (the hash for that line matches) then leave a blank line and continue. That way, the groups of hex in the third file should be the files that are different.
It all seems quite straight forward. We just need to understand the commands to do this. Our 2 files are lists of MD5 hashes, so examining each line of hashes will only tell us which lines are the same or not. Our first approach is to use these 2 hash files, when a line (MD5) differs, go to that line in the .dd file (3rd file) and copy it into the 4th file and move on in the hash files. However, this means working with 4 files rather than 2, although the comparisons of the hashes would be very quick.
Instead, we shall use a second approach and work on the 2 original .dd files (lab4o.dd and lab4f.dd) directly. This will require hashing each line and comparing the hash, so it will be a little slow but that is acceptable to keep the script fairly simple. Recall that the hexedit tool will open the file in hex in the terminal window. Rather than work through a terminal with hexedit I shall create a text file of the hex and work on the 2 text files. To do this, the xxd tool is used as this can convert between hex and binary and the output can be directed to a text file.
xxd Command
The xxd command is a file conversion tool that allows the creation of files of hex and binary in customisable formats. We can then use other tools on the hex or binary file, such as Grep and SED to search for information in the file or change formatting of the text.
xxd 是一个命令行工具,用于将文件或标准输入中的数据转换为十六进制格式(也称为十六进制转储)。它不仅可以查看文件的十六进制内容,还可以将十六进制格式转换回原始的二进制格式。下面是对 xxd 的详细介绍及常见用法:
xxd filename输出格式:
偏移量:文件中每行的第一个字段是偏移量,以字节为单位,从 0 开始。它表明了数据在文件中的位置。
十六进制内容:偏移量后面显示的是每一行的十六进制数据,通常以两个字符为一组,每组表示一个字节的数据。默认情况下,每行显示 16 字节(8 组十六进制字符)。
ASCII 内容:在十六进制数据的右侧显示的是其对应的 ASCII 字符(如果字符不可见,则会显示为 .)。
00000000: 4865 6c6c 6f2c 2077 6f72 6c64 210a Hello, world!.将十六进制转换回原始格式
xxd 也可以将十六进制数据转换回原始格式,使用 -r 选项:
xxd -r hexfile.txt > originalfile┌──(root㉿kali)-[~/Desktop]
└─# xxd lab4o.dd > lab4o.txt
┌──(root㉿kali)-[~/Desktop]
└─# xxd lab4f.dd > lab4f.txt┌──(root㉿kali)-[~/Desktop]
└─# wc lab4o.txt
589824 5917670 40108032 lab4o.txt
┌──(root㉿kali)-[~/Desktop]
└─# wc lab4f.txt
589824 5917771 40108032 lab4f.txtWe now have 2 new text files that contain all the hex from the files.
4o.txt
00000000: eb52 904e 5446 5320 2020 2000 0201 0000  .R.NTFS    .....

00000010: 0000 0000 00f8 0000 3f00 ff00 8000 0000  ........?.......

00000020: 0000 0000 8000 0000 ff47 0000 0000 0000  .........G......
4f.txt
00000000: eb52 904e 5446 5320 2020 2000 0201 0000  .R.NTFS    .....

00000010: 0000 0000 00f8 0000 3f00 ff00 8000 0000  ........?.......

00000020: 0000 0000 8000 0000 ff47 0000 0000 0000  .........G......
One issue with these files is that they contain information that we wish to ignore in our search – the line numbers at the beginning and the ASCII conversion at the end. Additionally, the files are 8 columns of hex as this is the default (32 characters). We can change this to any column numbers up to 256 by using the -c command. We shall create a new lab4oa.txt file and lab4fa.txt file with more columns.
┌──(root㉿kali)-[~/Desktop]
└─# xxd -c 256 lab4o.dd > lab4oa.txt

┌──(root㉿kali)-[~/Desktop]
└─# xxd -c 256 lab4f.dd > lab4fa.txt
00000000: eb52 904e 5446 5320 2020 2000 0201 0000 0000 0000 00f8 0000 3f00 ff00 8000 0000 0000 0000 8000 0000 ff47 0000 0000 0000 0018 0000 0000 0000 1000 0000 0000 0000 0200 0000 0800 0000 809b 138e da13 8e2c 0000 0000 fa33 c08e d0bc 007c fb68 c007 1f1e 6866 00cb 8816 0e00 6681 3e03 004e 5446 5375 15b4 41bb aa55 cd13 720c 81fb 55aa 7506 f7c1 0100 7503 e9dd 001e 83ec 1868 1a00 b448 8a16 0e00 8bf4 161f cd13 9f83 c418 9e58 1f72 e13b 060b 0075 dba3 0f00 c12e 0f00 041e 5a33 dbb9 0020 2bc8 66ff 0611 0003 160f 008e c2ff 0616 00e8 4b00 2bc8 77ef b800 bbcd 1a66 23c0 752d 6681 fb54 4350 4175 2481 f902 0172 1e16 6807 bb16 6852 1116 6809 0066 5366 5366 .R.NTFS .............?................G.....................................,.....3.....|.h....hf......f.>..NTFSu..A..U..r...U.u.....u........h...H...............X.r.;...u..........Z3... +.f...............K.+.w......f#.u-f..TCPAu$....r..h...hR..h..fSfSfLet’s check how many lines we need to search now. Begin by counting the lines in lab4o.txt and lab4f.txt and then count the lines in lab4oa.txt and lab4fa.txt. There should be 256/8 times fewer lines (32 times fewer lines – or should there?). Use the wc (word count) tool to count the lines.
┌──(root㉿kali)-[~/Desktop]
└─# wc lab4oa.txt
   36864  4814905 33472512 lab4oa.txt

┌──(root㉿kali)-[~/Desktop]
└─# wc lab4fa.txt
   36864  4815036 33472512 lab4fa.txt
There are 36,864 lines in each file with 256 columns and 589824 lines in the original files with 8 columns.
If we divide 589,824 by 36,864 we find that there are 16 times fewer lines, not 32. The reason is because hexadecimal is written as pairs of hex which is a byte (similar to a byte being written as 8 binary digits). Therefore, each column of 4 hex characters is actually 2 columns of hex even though it is displayed as 1 column. Therefore, the default of 8 columns is actually 16 columns of hex pairs. Let’s check this by using xxd with 8 columns.
I create a lab4o8.txt file with 8 columns (of hex pairs).
┌──(root㉿kali)-[~/Desktop]
└─# xxd -c 8 lab4o.dd > lab4o8.txt

┌──(root㉿kali)-[~/Desktop]
└─# wc lab4o8.txt
 1179648  7094091 47185920 lab4o8.txt
And then open the new file to find….
00000000: eb52 904e 5446 5320  .R.NTFS
00000008: 2020 2000 0201 0000     .....
00000010: 0000 0000 00f8 0000  ........
00000018: 3f00 ff00 8000 0000  ?.......
00000020: 0000 0000 8000 0000  ........
00000028: ff47 0000 0000 0000  .G......
… that there are 4 columns as expected – each column is actually 2 columns of hex pairs.
diff
There are a number of tools that are available to compare 2 files or 2 lines of text. A hash of a file compared to the hash of another file will tell us if the files are the same or not, so the first operation should be to compare the hashes of the files. If they match, we do not need to go any further with comparisons. If they do not match, then we move on to comparing the contents of the 2 files. The ‘diff’ command will search through each line of text and compare each line. When it finds a difference, it displays the difference by showing the 2 complete lines. In 2 test files I have created by copying the lab4o.dd to lab4otest1.dd and lab4test2.dd. I hash the files to check they are identical.
┌──(root㉿kali)-[~/Desktop]
└─# cp lab4o.dd lab4otest1.dd

┌──(root㉿kali)-[~/Desktop]
└─# cp lab4o.dd lab4otest2.dd

┌──(root㉿kali)-[~/Desktop]
└─# md5sum lab4otest1.dd
a2be5eb52cda823f6afb41f4e8c53f4d  lab4otest1.dd

┌──(root㉿kali)-[~/Desktop]
└─# md5sum lab4otest2.dd
a2be5eb52cda823f6afb41f4e8c53f4d  lab4otest2.dd
I then create 2 text files of these files using the xxd command. I now have lab4otest1.txt and lab4otest2.txt.
┌──(root㉿kali)-[~/Desktop]
└─# xxd lab4otest1.dd > lab4otest1.txt

┌──(root㉿kali)-[~/Desktop]
└─# xxd lab4otest2.dd > lab4otest2.txt
I then change one hex character part way into the lab4otest2.txt file at line 90 in hex. The lines begin at zero, not 1, so line 00000090 is the 10th line. This is the 144th byte on line 10 in decimal. There are 16 bytes of hex per line (16 x 9 = 144)
00000090: 1868 1a00 b448 8a16 0e00 8bf4 161f cd13  .h...H..........

Change to

00000090: 1068 1a00 b448 8a16 0e00 8bf4 161f cd13  .h...H..........
And run the diff command.
diff 是一个用于比较文件差异的命令行工具,它可以对比两个文件(或目录)的内容,并输出它们之间的不同之处。这个工具特别适用于代码审查、配置文件比较,以及版本控制。下面是 diff 的详细介绍和常见用法:
diff file1.txt file2.txtdiff 的输出会显示文件中的不同之处,具体标记为:
a/b:a 表示在第一个文件中发生了操作,b 表示在第二个文件中发生了操作。
c:表示更改(change),即两个文件中对应的行发生了变化。
d:表示删除(delete),即第一文件中的行在第二文件中没有。
a:表示添加(add),即第二文件中的行在第一文件中没有。
2c2
< This is a line in file 1.
---
> This is a line in file 2.
解释:
2c2:表示两个文件的第 2 行发生了更改。
<:显示第一个文件中的内容。
>:显示第二个文件中的内容。
---:用于分隔两个文件的内容。
diff 提供了多种选项来格式化输出,以满足不同的比较需求:
-u(Unified 格式)
Unified 格式会显示更多上下文信息,常用于代码审查
-c(上下文格式)
-c 会显示更详细的上下文信息,以便更全面地查看差异
-i(忽略大小写)
在比较时忽略字母的大小写差异
-w(忽略空格)
忽略所有空格的差异
diff 也可以用来比较两个目录中的所有文件:
diff -r dir1 dir2┌──(root㉿kali)-[~/Desktop]
└─# diff lab4otest1.txt lab4otest2.txt
10c10
< 00000090: 1868 1a00 b448 8a16 0e00 8bf4 161f cd13 .h...H..........
---
> 00000090: 1068 1a00 b448 8a16 0e00 8bf4 161f cd13 .h...H..........The diff command finds the difference when line 10 is compared with line 10 (10c10) which is line 00000090.
The difference is displayed in the terminal but this could easily be directed to a new file. Whilst this is useful, it is not really the format that we want the differences in, so we need to find a way to check every byte instead of every line. (If you try the ‘diff’ command on binary files (.dd) the output will either be nothing if they are identical or ‘lab4otest1.dd and lab4otest2.dd differ’, similar to hashing the 2 files but with no further information.)
cmp
To check every byte, we could search through the text files and hash each hex value (a pair of hex values is a byte – eg: 2D). We would need to ‘skip over’ the line number on the left and then read the hex values. Whilst it would be very efficient to hash each line of 256 columns, if the hash does not match, we could then copy the entire line and the difference will be somewhat buried in a long line of hex. Therefore, we are better to hash each hex pair so that immediately a difference is found we know exactly where that difference begins. Conveniently, the line numbers are a fixed width of 8 line numbers followed by a colon and a space, (eg: 00000020: eb52) so I can simply skip 10 characters (including the space) at the start of each line and then read each pair of characters for a total of 256 pairs and then stop before the ASCII and move onto the next line. Any hex values that do not match can be added to a new file. We already have a text file with every byte hashed, but the problem with this file is that the line numbers and hash values have been written as text (it is a text file) so we can’t simply compare numbers or use line numbers for starting and end points. In many programming languages, a string can be converted to an integer by ‘casting’. However, Bash does not have this function – it is not a ‘typed’ language. Rather, the use of different types of brackets and symbols can assist in performing these types of conversion tasks. Perhaps there is a better tool for comparing text files line by line so we shall try the ‘cmp’ tool.
The cmp tool compares 2 files and lists the first difference found at a byte level. This is exactly what we want but the problem with this tool is that it stops once it finds the first byte that differs. We want a tool that will continue through the entire file – or at least if the 2 files are different sizes and continue until it reaches the end of the shortest file. To test this tool, we create a small bash script that takes the 2 files and compares them. I had previously copied the 2 lab files (lab4o.txt and lab4f.txt) and then renamed them with ‘test’ in the names. My practice is to use the word ‘test’ in practice files so I always know that these are practice files that can then be deleted so as not to confuse them with similar files that I wish to keep. Whatever your practice is, is fine, but be careful not to create too many files with similar names that will then become confusing. My bash script will take lab4otest1.txt and lab4otest2.txt and compare them. I have opened lab4otest2.txt in Leafpad and changed 5 bytes on 5 different lines.
Here is the very basic test bash script I have created called cmp.sh (a bash script by convention has an ‘sh’ extension – shell):
cmp 命令用于逐字节比较两个文件,主要用于查找文件之间的差异。与 diff 不同,cmp 更关注文件的二进制内容,通常用于比较二进制文件或文本文件。
-l:以列出所有不同的字节和它们的偏移量,格式为:
-s:静默模式,只返回退出状态而不输出差异信息:
#!/bin/bash

cmp lab4otest1.txt lab4otest2.txt
And then run the script:
┌──(root㉿kali)-[~/Desktop]
└─# ./cmp.sh
lab4otest1.txt lab4otest2.txt differ: byte 624, line 10
The script completes very quickly because it finds a difference near the start of the files. Note that whilst the diff command found the difference on a line, the cmp command checks every byte and reports the difference at the byte level. Also, the bytes checked include the line numbers, spaces and ASCII.
However, there are several differences that it does not find because it stops at the first difference. The script needs to be modified to continue through the files and find all the differences and record them in a new file. To begin, we shall simply have the bash script run the same command 5 times. We use a ‘for’ loop and tell the loop to ‘loop’ 5 times.
#!/bin/bash

for i in {1..5}
do
    cmp lab4otest1.txt lab4otest2.txt
done
This does what we asked but simply tells us the same information 5 times because it starts from the beginning of the file each time the command is executed.
┌──(root㉿kali)-[~/Desktop]
└─# ./cmp.sh
lab4otest1.txt lab4otest2.txt differ: byte 624, line 10
lab4otest1.txt lab4otest2.txt differ: byte 624, line 10
lab4otest1.txt lab4otest2.txt differ: byte 624, line 10
lab4otest1.txt lab4otest2.txt differ: byte 624, line 10
lab4otest1.txt lab4otest2.txt differ: byte 624, line 10
We therefore need to loop 5 times but begin after the first difference is found each time. We should therefore find 5 differences if there are at least 5 differences. Fortunately, the cmp tool permits the use of ‘skip’ to skip a number of bytes and then compare although the skip must be written as ‘-i’ and then the number of bytes to skip for each file. We need to skip the same number of bytes in each file, so we shall require 2 ‘-i’ switches. In this way, we run the command, find a difference (in this case at byte 624) and then run the command again from byte 624
#!/bin/bash

for i in {1..5}
do
    cmp lab4otest1.txt lab4otest2.txt -i 624 -i 624
done
And the output is:
┌──(root㉿kali)-[~/Desktop]
└─# ./cmp.sh
lab4otest1.txt lab4otest2.txt differ: byte 963, line 15
lab4otest1.txt lab4otest2.txt differ: byte 963, line 15
lab4otest1.txt lab4otest2.txt differ: byte 963, line 15
lab4otest1.txt lab4otest2.txt differ: byte 963, line 15
lab4otest1.txt lab4otest2.txt differ: byte 963, line 15
Note that the byte and line numbers are calculated from where the search began, not from the start of the file. Therefore, the byte difference is at 624+339 so it is located at byte 963, the number we shall need for the next skip in the loop. We shall therefore require 2 variables for ‘skipping’ that can be added to at each loop. We shall call these variables skip1 and skip2. In the command, we must remember to put a dollar sign before the variable so that the command reads it as a variable and not as a literal string, so in the command the variables will be $skip1 and $skip2.
#!/bin/bash

skip1=0
skip2=0

for i in {1..5}
do
    cmp lab4otest1.txt lab4otest2.txt -i $skip1 -i $skip2
done
And the output is the same as previously:
┌──(root㉿kali)-[~/Desktop]
└─# ./cmp.sh
lab4otest1.txt lab4otest2.txt differ: byte 624, line 10
lab4otest1.txt lab4otest2.txt differ: byte 624, line 10
lab4otest1.txt lab4otest2.txt differ: byte 624, line 10
lab4otest1.txt lab4otest2.txt differ: byte 624, line 10
lab4otest1.txt lab4otest2.txt differ: byte 624, line 10
We are getting there. The skip switch is working but it adds zero to 624 each loop. Now we need to build up the ‘skip value’ each time a difference is found so that we find the next difference in the files. To do this, we shall require the byte value of the ‘found’ difference. However, the difference is reported as a line of text. We are only interested in the byte value so we would need to extract the byte value each time and add it to the skip value. This will work but is becoming quite complicated. Perhaps there is a simpler method to retrieve the byte values. Fortunately, the cmp command has a switch to just extract the byte values and more fortunately, it continues until the end of the file. The switch is -l (minus ell).
#!/bin/bash

# Find the byte differences between 2 files

cmp -l lab4otest1.text lab4otest2.text
And the output is:
┌──(root㉿kali)-[~/Desktop]
└─# ./cmpl.sh
     624  70  60
    1587  60  61
    3030  67 146
    3967  60 145
    4457  61  64
This command seems to be much more suitable. It lists the byte difference at the start of the line and it continues until the end of the file. One switch has effectively solved a lot of issues for us: no loop required and no extraction of the byte required and no adding byte values to find the next difference.
We can redirect this output to a file:
#!/bin/bash

# Find the byte differences between 2 files

cmp -l lab4otest1.txt lab4otest2.txt > cmpfiles.txt
The resulting file created is:
624 70 60
1587 60 61
3030 67 146
3967 60 145
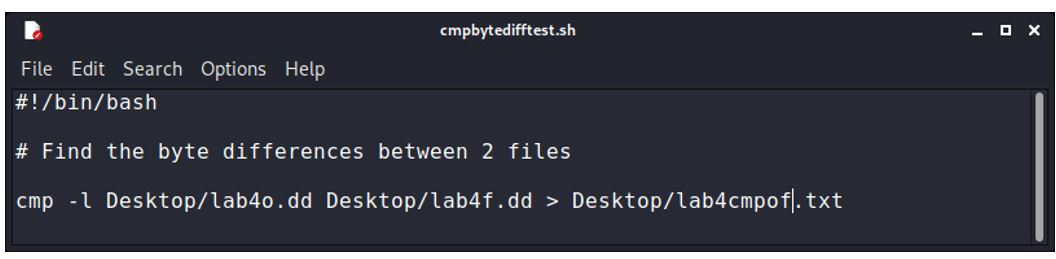
4457 61 64We should now be able to go through this file finding the byte address (in decimal) of every byte that differs from the first file and record those bytes from the second file into a new text file. I shall use lab4o.dd and lab4f.dd. I then modify the cmpbytedifftest.sh bash script to compare these 2 files. They are 9MiB and contain quite different data, so I expect to have a large number of differences. Note that I am working with the raw .dd files this time, not a text file created from the .dd files. I call the result file ‘lab4cmpof.txt’ to make it obvious I am now working with lab4 ‘o’ and ‘f’ files (original and final).
#!/bin/bash

# Find the byte differences between 2 files

cmp -l lab4o.dd lab4f.dd > lab4cmpof.txt
The resulting text file is 249KiB. By using the wc command we can see that the file is 15,968 lines.
5364036   0 377
5364037   0 330
5364038   0 377
5364039   0 340
5364041   0  20
5364042   0 112
5364043   0 106
5364044   0 111
┌──(root㉿kali)-[~/Desktop]
└─# wc lab4cmpof.txt
15968 47904 255488 lab4cmpof.txtawk
This is part way to what we want but the file contains information that we don’t need
We have a choice here: we can write a single command in the bash script to perform a number of operations, one after the other, or we can write separate commands that will be executed one after the other. While it is more efficient to nest commands so that we can create fewer bash script files with multiple commands to get the desired output – the bytes that are different – this is more complex and does not produce files that can show how we got the result. If the forensic recovery of data may be used in evidence, we may be better to follow more structured, smaller, steps. We can then demonstrate more easily how we got the final resulting file output. The approach will depend on what you need – an efficient script or a trail of evidence.
I have created a new bash script called readcmp.sh to read the byte number that is different in the second file and save this to this new text file called lab4cmpofbytesonly.txt.
I have created a new bash script called readcmp.sh to read the byte number that is different in the second file and save this to this new text file called lab4cmpofbytesonly.txt.
read 是一个单独的 Bash 内置命令,它用于从标准输入读取一行数据并将其存储在变量中。
-r:
禁止反斜杠(\)的转义。默认情况下,read 将反斜杠视为转义字符,这个选项可以确保读取的内容保持原样
read -r line-p:
在读取输入之前打印提示字符串。你可以在提示符后输入内容。
read -p "Enter your name: " name-n N:
读取 N 个字符后停止,而不是等到用户按下回车键。
read -n 3 input以及很多参数可以使用
awk 是一种强大的文本处理工具,广泛用于数据提取和报告生成。它可以在命令行中使用,也可以编写脚本进行复杂的数据处理。awk 的名称来自其创建者的姓氏(Alfred Aho、Peter Weinberger 和 Brian Kernighan 的首字母组合)。
awk 'pattern { action }' input_filepattern:一个条件,用于选择输入数据中的行。
action:在选择的行上执行的操作。
input_file:要处理的输入文件。如果没有指定文件,awk 将从标准输入读取数据。
字段和记录:
awk 将每一行视为一条记录(record),并将行中的每个字段(默认使用空格或制表符分隔)视为一个字段(field)。
你可以使用 $1、$2、...、$n 来引用各个字段,$0 代表整行。
内置变量:
NR:当前记录的行号。
NF:当前记录中的字段数量。
FS:字段分隔符,默认是空格或制表符,可以使用 -F 选项自定义。
OFS:输出字段分隔符,默认是空格。
RS:记录分隔符,默认是换行符。
ORS:输出记录分隔符,默认是换行符。
打印特定字段:这条命令将打印 input.txt 文件中每行的第一个字段。
awk '{print $1}' input.txt使用条件过滤:这条命令会检查每行的第三个字段是否大于 50,如果是,则打印前两个字段。
awk '$3 > 50 {print $1, $2}' input.txt自定义字段分隔符:使用 -F 选项将字段分隔符设置为逗号,打印 CSV 文件中的前两个字段。
awk -F "," '{print $1, $2}' input.csv#!/bin/bash
# Read a file of differences and write only the byte difference
# to a new file called writecmp.txt
input="lab4cmpof.txt"
while read line
do
printf "$line" | awk '{print $1}' >> lab4cmpofbytesonly.txt
done < "$input"这段 Bash 脚本的作用是从一个包含差异的文件中读取每一行,并提取每行的第一个字段(通常是字节差异),然后将这些字段写入一个新的文件 lab4cmpofbytesonly.txt。
Input is the location and name of the file to read from. This file contains the byte where the file differs at the first characters in this file, so the first byte to differ is 5364036, the second is 5364037 and so on. The other information on the line is not required. I take this text file called lab4cmpof.txt as the input to the bash script called readcmp.sh. Once I have worked through all the steps to get the results, the multiple bash scripts could be merged into a single script so that I only need to run one script to do everything.
While read line – keep reading lines until the end of the file
Printf – this will print to the screen or a file. Printf works similarly to echo but printf allows for more formatting customization.
$line – this will take the line read and put it into the variable called line.
| the pipe command is used so that it takes the first command(s) and then ‘pipes’ the result to another command.
Awk ‘{print $1;}’ – the awk command will allow for trimming of, or selecting of the desired input in a line, so I can select only part of the line to read. In this case, $1 tells the command to only read the 1st string before the first blank space. In our file with ‘5364036 0 377’ it will read 5364036 only.
the double arrow will ensure what is written to a file is appended to an existing file rather than continually creating a new file and writing over a single line that a single arrow would do.
The output is directed to a new file that is created called lab4cmpofbytesonly.txt and each byte difference address is appended to the file so that each line contains a single number, the byte difference address.
The result is:
5364036
5364037
5364038
5364039
5364041
5364042
5364043
5364044
5364045
5364047
5364048
5364049
5364051
5364053
5364056
...
┌──(root㉿kali)-[~/Desktop]
└─# wc lab4cmpofbytesonly.txt
15968 15968 127744 lab4cmpofbytesonly.txtThere is now a list of byte differences only – much simpler to work with. It is similar to the file it reads from but with the first column only. This is not very efficient, creating 2 files with similar information, so we could look at doing it as a single file later on.
I now create a new bash script called ‘lab4cmpwritehex.sh’. This will read the byte differences listed from readcmp.sh and saved in lab4cmpofbytesonly.txt and then look up that offset address in the second file (lab4f.dd) and read the hex there. It will then write that hex value to a new file called hexdiff.txt.
The command is:
xxd -l1 -p -s $line Desktop/lab4cmp.dd | tr -d '\n' >> Desktop/lab4hexdiff.txt xxd to read hex and write it as ASCII
-l1 (minus ell one) to read just the first characters until a blank space
-p output is written as plain hex dump
-s is the offset. This reads from lab4cmpofbytesonly.txt and uses this as the offset – 5364036, then 5364037 etc.
xxd:调用 xxd 工具。
-l1:
这个选项指定要输出的字节数。在这里,1 表示只提取一个字节。
-p:
该选项表示以“纯十六进制”格式输出,不包括行号或 ASCII 码部分。输出将只包含十六进制值,每个字节用两个十六进制字符表示,没有空格或换行。
-s $line:
该选项用于指定从哪个字节(偏移量)开始读取数据。$line 是一个变量,通常包含一个整数值,表示从 Desktop/lab4cmp.dd 文件的哪个字节位置开始提取。在执行命令时,这个变量应该被具体的字节偏移值替换。
Desktop/lab4cmp.dd:
这是要处理的输入文件,包含要读取的二进制数据。
This is all then piped to another command:
tr -d will put the output on a single line by not writing the newline character of \n
tr -d '\n' 是一个用于删除文本中的换行符的命令,下面是对它的详细解释:
命令分解
tr:是一个用于转换或删除字符的命令行工具。tr 代表 "translate" 或 "transliterate"。
-d:这个选项表示“删除”字符。它后面需要跟要删除的字符集。
'\n':这里的 '\n' 代表换行符。换行符是用于表示文本行结束的字符。在 UNIX 和 Linux 系统中,换行符通常是一个单独的字符。
#!/bin/bash

# Read in byte differences and then read those
# Bytes from a file and put them in a new file
# as one long line of hex

input="lab4cmpofbytesonly.txt"

while read line
do
   xxd -l1 -p -s $line lab4f.dd | tr -d '\n' >> lab4fhexdiff.txt
done < "$input"
┌──(root㉿kali)-[~/Desktop]
└─# ./lab4cmpwritehex.shThe output will be a long line of hex that is in the second file and is different from the first file. The output is appended on each loop to the output file called ‘lab4hexdiff.txt’.
d8ffe0004a464946000201000000e105164578696600492a00000...The output will be a long line of hex that is in the second file and is different from the first file. The output is appended on each loop to the output file called ‘lab4hexdiff.txt’.
┌──(root㉿kali)-[~/Desktop]
└─# wc lab4fhexdiff.txt
    0     1 31936 lab4fhexdiff.txt
The WC command shows that there are zero lines, 1 word and 31,936 characters (bytes)
We know that there is 1 line of text, not zero. The rest of the information is accurate – there is one, very long word with 31,936 characters – all hex values. The reason that there are no lines indicated is because the first line is numbered zero, the second line is one and so on. So, whenever the WC command is run, we should add 1 to the number of lines. But this indicates another issue. Recall from a previous lab that the number of bytes in a .dd file viewed in Hexedit is also numbered from zero. Therefore, the first byte will be zero, the second byte one etc. We had to minus 1 from the byte number to get the accurate location if we wish to start from 1.
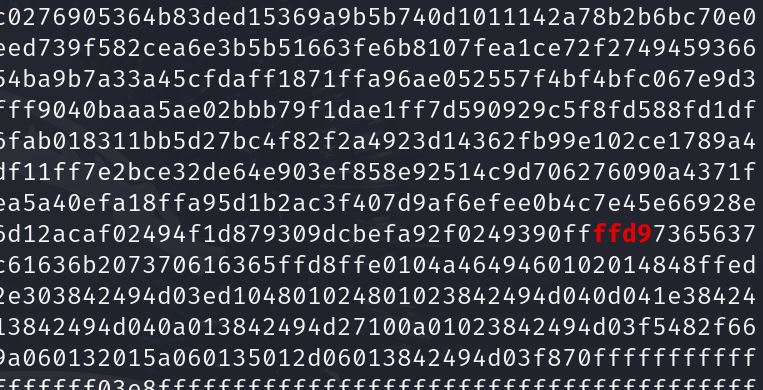
However, the cmp command numbers from 1. Therefore, a similar issue has occurred with our readcmp.sh script. The byte offsets where the differences are, begin at 1, not 0, but the script that reads the hex expects to begin at zero. Therefore, we need to look at the previous byte to find the difference each time. Notice that the differences found in this file begin with ‘d8ffe0’. This should be familiar – ‘ff d8 ff e0’ – is a jpg file signature, but the first byte ‘ff’ is missing. This is because the byte offset read is 1 number larger than where the first difference is, so we need to find the reported offset and minus 1 to get the correct offset.
There are many different ways in Linux to achieve this, but one of the simplest is the ‘awk’ command. We write a new script with one line only that reads in the offset values, minuses 1 from that value and then writes the correct value to a new file. I have called the script ‘lab4minus1.sh’.
#!/bin/bash
# Read anumber from a file and minus 1
# Then write the new number to a new file

awk '$0--' lab4cmpofbytesonly.txt >> lab4cmpofbytesonlyminus1.txt
awk:是一个强大的文本处理工具,用于扫描和处理文本文件。
'$0--':
$0 代表当前行的整个内容。在这里,它指的是从输入文件 lab4cmpofbytesonly.txt 中读取的每一行。
-- 是自减运算符。它将当前行中的数字减去 1。换句话说,如果当前行是数字 5,执行后将变为 4。如果当前行不是有效数字,awk 会忽略该行。
lab4cmpofbytesonly.txt:这是输入文件,包含要处理的数字。
>> lab4cmpofbytesonlyminus1.txt:
>> 是输出重定向符,用于将结果追加到 lab4cmpofbytesonlyminus1.txt 文件。如果文件不存在,将会创建它;如果文件已经存在,新的内容将会附加到文件末尾。
整体功能
这行命令将会:
从 lab4cmpofbytesonly.txt 中读取每一行。
对每一行中的数字进行自减操作(即减去 1)。
将结果追加到 lab4cmpofbytesonlyminus1.txt 文件中。
Note that awk is a formatting command. The name comes from the initials of the developers.
$0- - takes the number at position 0, the first number in a file, and minuses one from it. ++ would add one - - minuses one.
And the resulting file is the original on the left and the new file on the right:
5364035
5364036
5364037
5364038
5364040
5364041
5364042
...
We modify the lab4cmpwritehex.sh script to read from the new text file called lab4cmpofbytesonlyminus1.txt with the offsets decremented by 1 (minus 1). Note that using these rather long names makes it clear what the file contains and avoids confusion. Once everything is working correctly, I can rename the scripts and text output to something shorter.
#!/bin/bash

# Read in byte differences and then read those
# Bytes from a file and put them in a new file
# as one long line of hex

input="lab4cmpofbytesonlyminus1.txt"

while read line
do
   xxd -l1 -p -s $line lab4f.dd | tr -d '\n' >> lab4fhexdiff1.txt
done < "$input"
Now we try reading the lab4f.dd file again with the new script and the result is:
ffd8ffe0104a4649460102014848ffe...grep
Notice that the file signature looks more familiar. The first difference in the file is a jpg file that has been added to the usb stick after the original lab4o.dd image was taken. We now look for the end signature – ‘ff d9’ and then carve out the hex values and put them into a new file.
We shall use the ‘grep’ command to find ‘ffd9’ in the text file.
grep:这是一个用于搜索文本的命令行工具。它从输入文件中查找符合给定模式的行,并输出这些行。
-n:这是一个选项,用于显示匹配行的行号。输出格式为 行号:内容,这样你可以知道匹配行在文件中的确切位置。
"ffd9":这是要搜索的模式。在这里,ffd9 是一个十六进制值的字符串,可能表示某种数据特征或图像文件的结尾(如 JPEG 图像)。此模式将被用于查找包含该字符串的所有行。
lab4fhexdiff1.txt:这是要搜索的输入文件。
┌──(root㉿kali)-[~/Desktop]
└─# grep -n "ffd9" lab4fhexdiff1.txt
And the result is:
This is not ideal. Grep returns the line with the ‘searched for’ text. However, the text file is one long line, so all the text is returned. Fortunately, the text searched for is highlighted in red, and as the file is not too large, we can scroll through the file until the text is spotted.
┌──(root㉿kali)-[~/Desktop]
└─# grep -n "ffd9" lab4fhexdiff1.txt >> pic.txt
I direct the output to a file and as I know it is a jpg, I call it pic1.txt. It won’t open at present because it is text and I need to truncate it after the end signature. The file is opened in Leafpad. This text viewer has a search function, so I can search for ‘ffd9’.
I delete everything after fd9 and the 1: at the beginning, and then put one space after d9 so it gets read correctly. I save the file as pic1.jpg. Now I have a jpg file with all the bytes but in ASCII and not in binary.
It looks the same as if it was opened in Hexedit but it is not – it is text and so not interpreted as binary. I now use the xxd command to convert the text file to a binary text file.
┌──(root㉿kali)-[~/Desktop]
└─# xxd -r -p pic.txt pic.jpg
This is a binary file now but I use xxd command again to convert the hex to a text file. I now have a binary file (pic1.jpg)
┌──(root㉿kali)-[~/Desktop]
└─# xxd pic.jpg >pic2.txt
I now have a pic2 binary file (pic2.jpg) and a pic2 text file (pic2.txt). The file opens as a text file.
00000000: ffd8 ffe0 104a 4649 4601 0201 4848 ffe1  .....JFIF...HH..
00000010: 0516 4578 6966 4949 2a08 0a0e 0102 519e  ..ExifII*.....Q.
00000020: 0f01 0213 d201 1001 020a e601 1201 0301  ................
00000030: 011a 0105 01f0 011b 0105 01f8 0128 0103  .............(..
00000040: 0102 3101 0220 0298 8202 818c 0469 8704  ..1.. .......i..
00000050: 0156 020d 4802 6987 0401 5602 4120 6772  .V..H.i...V.A gr
00000060: 6561 7465 7220 5377 6973 7320 6d6f 756e  eater Swiss moun
00000070: 7461 696e 2064 6f67 2070 7570 7079 2066  tain dog puppy f
It is in the correct format looking at the hex read as ASCII text. This is fine if it is a text file with no file signature, so in theory our method should find a plain text file, something that some commercial software will not do. However, there is a problem that prevents the file from being opened as a jpg file. Every byte in file two that is the same as the byte in file one is not highlighted as a difference and therefore is not saved into the third file. Most files will have dots, ff and 00 in multiple places. If these and other hex that just happens to be the same in both files correspond to the same location in both files, they are ignored and this means that our jpg file is not complete, there are many bytes missing throughout the file. It won’t open, but we can see, looking at the file signature and contents, what the file type is and there is sufficient information to match it to a known file if we have one. Therefore, this is useful to highlight files that are added to a usb stick or similar and is another tool in the digital forensics investigator’s arsenal.
Even though we have managed to create a file of hex differences, it has taken several commands and we have written several bash scripts. One issue we have is that there are multiple bash scripts to work through the steps and currently the file names are all fixed – hard coded. It would be better to combine scripts where we can and ask the user for the file names.
I have a number of bash scripts to perform different functions and create these new files which are then used as input for the next script. I shall keep most files separate as this gives me an ‘evidential’ trail of what I have done. That is, if a lawyer in court wishes to know how I retrieved the differences, I can explain each step quite simply if I have multiple scripts with multiple outputs, much like breadcrumbs leading to the result.
We shall now modify the files and change names to something more meaningful and generic. To begin with, I shall ask for the 2 file names to compare and the name of the resulting file.
I begin by modifying the first script to ask for the file names. Recall that we initially looked at using a file of hashes to find differences in each line but eventually decided to look at hashes of bytes only, so we shall begin with this.
This is the original script:
We now need to replace the filenames with questions to the user of what the 2 files to compare are called. We can combine 2 scripts so that the script asks for the file names which can be .dd files, and saves the byte address of differences in the second file (minus 1) to a new file. The 2 .dd files and the script should be run from a folder on their own so as not to overwrite any previous files created with the scripts. This is a hazard of using absolute names for files rather than asking for unique names. You could modify your script to ask for all file names but this would involve waiting for the request for the filenames several times, so entering names in the script is more efficient but with some risk of overwriting files. For example, if the first file used to compare is called ‘firstfile’, then if it already exists, it will be overwritten. Be careful here and consider using unique names or creating unique folders.
The final command is the ‘cat’ command which is piped to ‘sed’ which puts a space after every 4 characters (2 bytes) and is then piped to ‘fold’ which adds a newline character after the default 80 characters. This produces a nicely readable final file. The completed script is then:
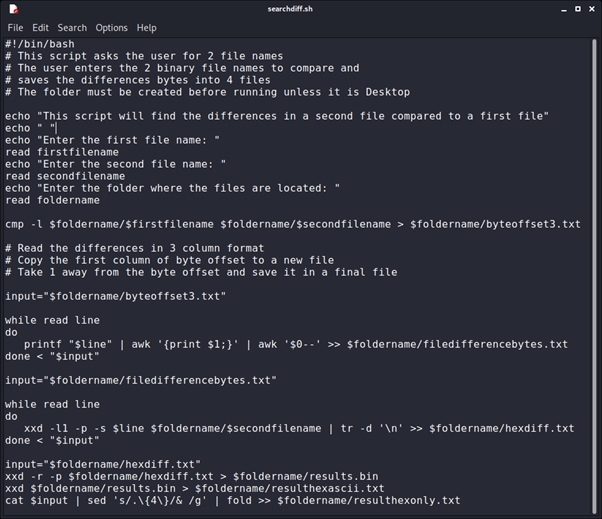
The script takes 2 .dd files as input and produces 5 text files and a binary file.
Note: a folder on the Desktop has been created before the script is run and is called ‘cmpfiles’.
1: byteoffset3.txt: The list of byte differences with 3 columns and 1 offset number too large.
2: filedifferencebytes.txt: The list of byte differences only with the corrected difference (-1).
3: hexdiff.txt: the hex differences in a single line
4: resultsascii.txt: the hex and ascii displayed as a binary file is displayed in Hexedit
5: resulthexonly.txt: The hex only in 2-byte columns to a width of 80 characters. (16 columns)
6: results.bin: The results in a binary file
We can now manually work through this final file and identify the differences to see what they are: hidden text, evidence of steganography, additional files such as pictures or any other file type.